Developer Guide
{ start of table_of_contents written by: Masagca Eris Jacey }
- 1. Introduction
- 2. Setting up
- 3. Design
-
4. Implementation
- 4.1. Switching between different tabs
- 4.2. User confirmation
- 4.3. Adding a session
- 4.4. Entering a session
- 4.5. Presence and participation
- 4.6. Generating the name of a randomly-selected student
- 4.7. Undo/redo feature
- 4.8. Adding a note
- 4.9. [Proposed] Exporting data to csv
- 4.10 [Proposed] Data encryption
- 5. Documentation
- 6. Logging
- 7. Testing
- 8. Configuration
- 9. DevOps
- 10. Appendix: requirements
-
11. Appendix: instructions for manual testing
- 11.1. Launch and shutdown
- 11.2. Switching between tabs
- 11.3. Random name generator
- 11.4. Undo
- 11.5. Redo
- 11.6. Adding a student
- 11.7. Deleting a student
- 11.8. Adding a session
- 11.9. Deleting a session
- 11.10. Entering a session
- 11.11. Participate
- 11.12. Presence
- 11.13. Adding a note
- 11.14. Saving the memo
- 12. Appendix: effort
{ end of table_of_contents written by: Masagca Eris Jacey }
{ start of introduction written by: Masagca Eris Jacey }
1. Introduction
This developer guide provides an overview and details of the system architecture and implementation of ATAS. Its purpose is to provide a useful reference for other developers who wish to contribute to the ongoing project of ATAS, or to simply gain a deeper insight into the team’s development process and considerations.
{ end of introduction written by: Masagca Eris Jacey }
{ start of setting_up written by: Zhang Sheng Yang }
2. Setting up
Refer to the guide Setting up and getting started.
{ end of setting_up written by: Zhang Sheng Yang }
3. Design
{ start of design#architecture written by: Marcus Tan Wei }
3.1 Architecture
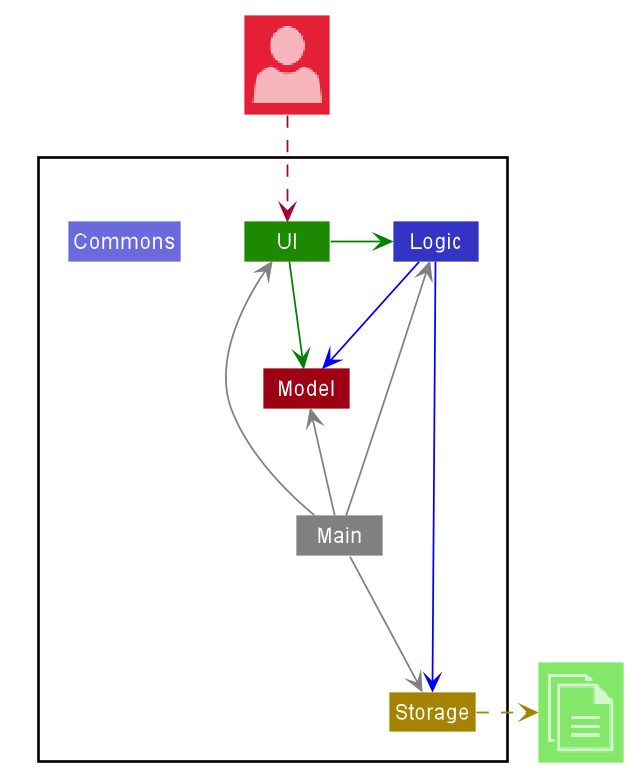
Figure 3.1.1: Architecture Diagram
The Architecture Diagram given above explains the high-level design of the App. Given below is a quick overview of each component.
Main has two classes called Main and MainApp. It is responsible for,
- At app launch: Initializes the components in the correct sequence, and connects them up with each other.
- At shut down: Shuts down the components and invokes cleanup methods where necessary.
Commons represents a collection of classes used by multiple other components.
The rest of the App consists of four components.
-
UI: The UI of the App. -
Logic: The command executor. -
Model: Holds the data of the App in memory. -
Storage: Reads data from, and writes data to, the hard disk.
Each of the four components,
- defines its API in an
interfacewith the same name as the Component. - exposes its functionality using a concrete
{Component Name}Managerclass (which implements the corresponding APIinterfacementioned in the previous point.
For example, the Logic component (see the class diagram given below) defines its API in the Logic.java interface and exposes its functionality using the LogicManager.java class which implements the Logic interface.
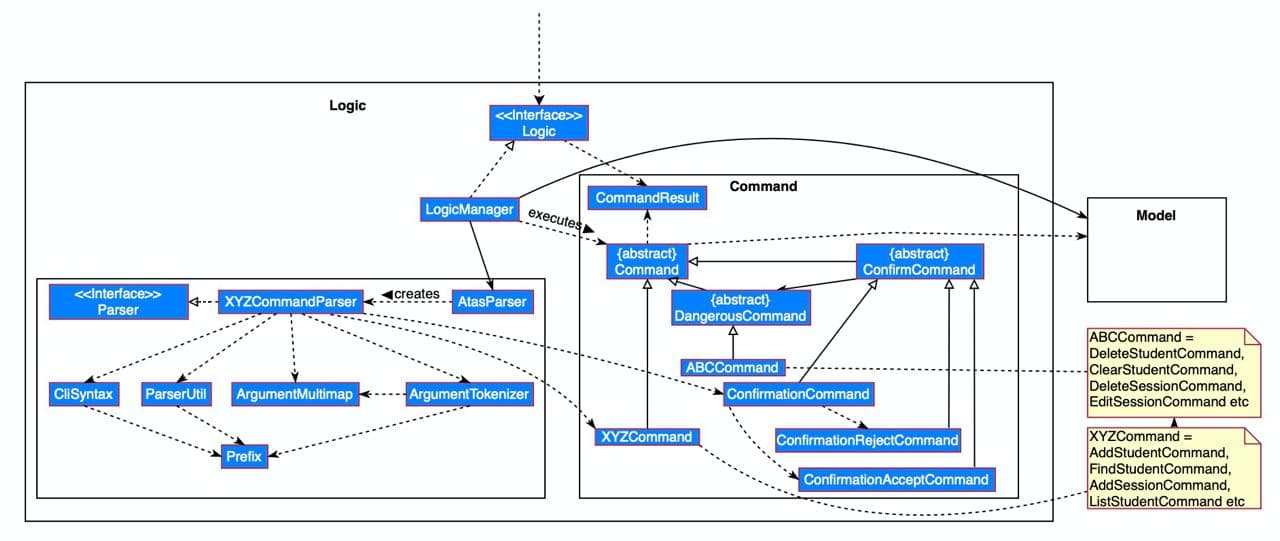
Figure 3.1.2: Example of class diagram for Logic component
How the architecture components interact with each other
The Sequence Diagram below shows how the components interact with each other for the scenario where the user issues the command addses s/Tutorial 1 d/10/10/2020.
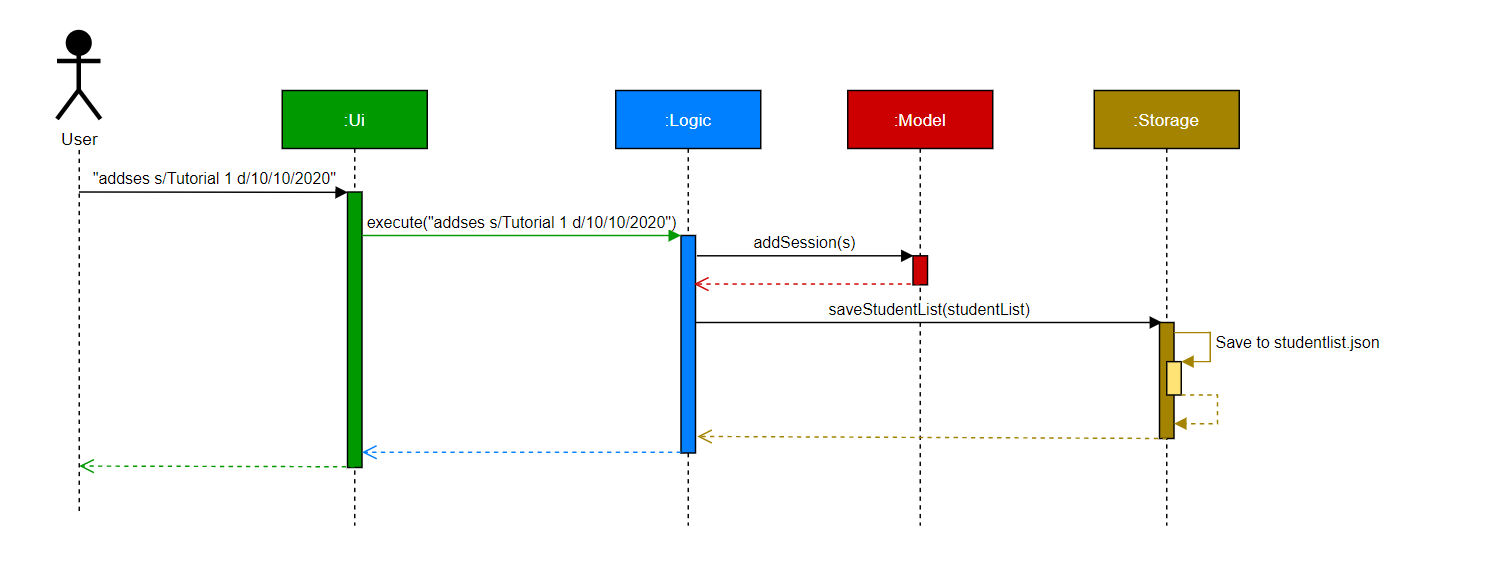
Figure 3.1.3: Architecture sequence diagram
The sections below give more details of each component.
{ end of design#architecture written by: Marcus Tan Wei }
{ start of design#ui_component written by: Ngoh Wei Yue }
3.2. UI component
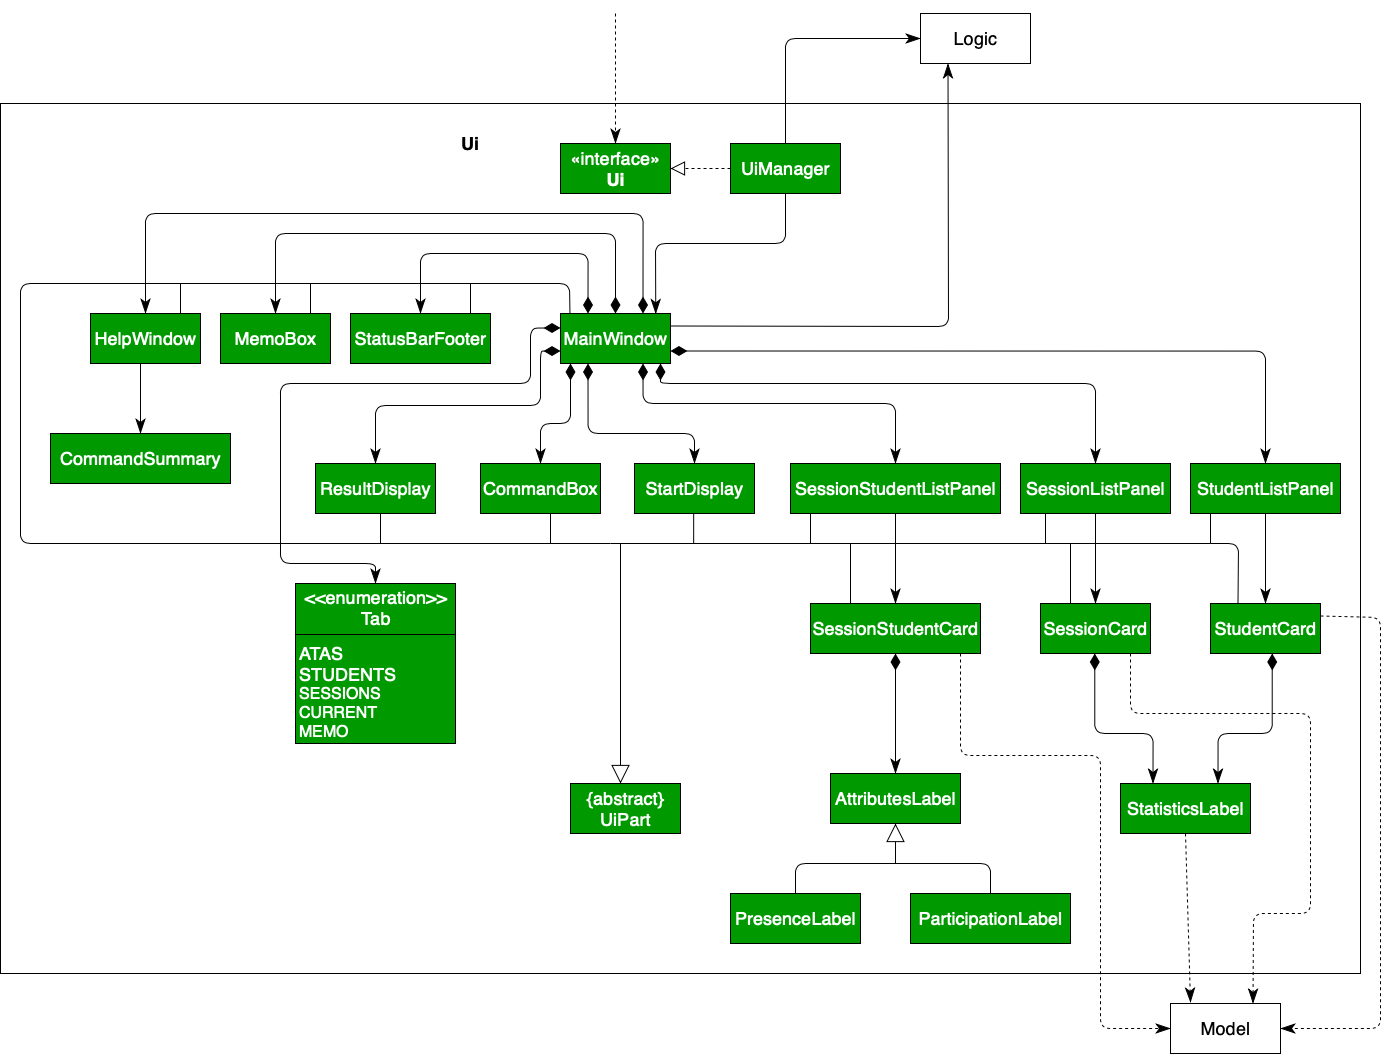
Figure 3.2.1: Class diagram of the Ui component
API :
Ui.java
The UI consists of a MainWindow that is made up of parts e.g.CommandBox, ResultDisplay, StudentListPanel, StatusBarFooterLeft etc. All these, including the MainWindow, inherit from the abstract UiPart class except Tab, which is an enum class.
The Help Window contains the CommandSummary for each command, so as to display the commands in tables.
Specialised labels like AttributesLabel are contained in the SessionStudentCard while StatisticsLabel are contained in Studentcard and SessionCard.
The UI component uses JavaFx UI framework. The layout of these UI parts are defined in matching .fxml files that are in the src/main/resources/view folder. For example, the layout of the MainWindow is specified in MainWindow.fxml.
The UI component,
- executes user commands using the
Logiccomponent. - listens for changes to
Modeldata so that the UI can be updated with the modified data. - displays results to user if any.
{ end of design#ui_component written by: Ngoh Wei Yue }
{ start of design#logic_component written by: Alvin Chee Teck Weng }
3.3. Logic component

Figure 3.3.1: Class diagram of the Logic component
API :
Logic.java
-
Logicuses theAtasParserclass to parse the user command. - This results in a
Commandobject which is executed by theLogicManager. - The command execution can affect the
Model(e.g. adding a student). - The result of the command execution is encapsulated as a
CommandResultobject which is passed back to theUi. - In addition, the
CommandResultobject can also instruct theUito perform certain actions, such as displaying help to the user.
Given below is the Sequence Diagram for interactions within the Logic component for the execute("enterses 1") API call.
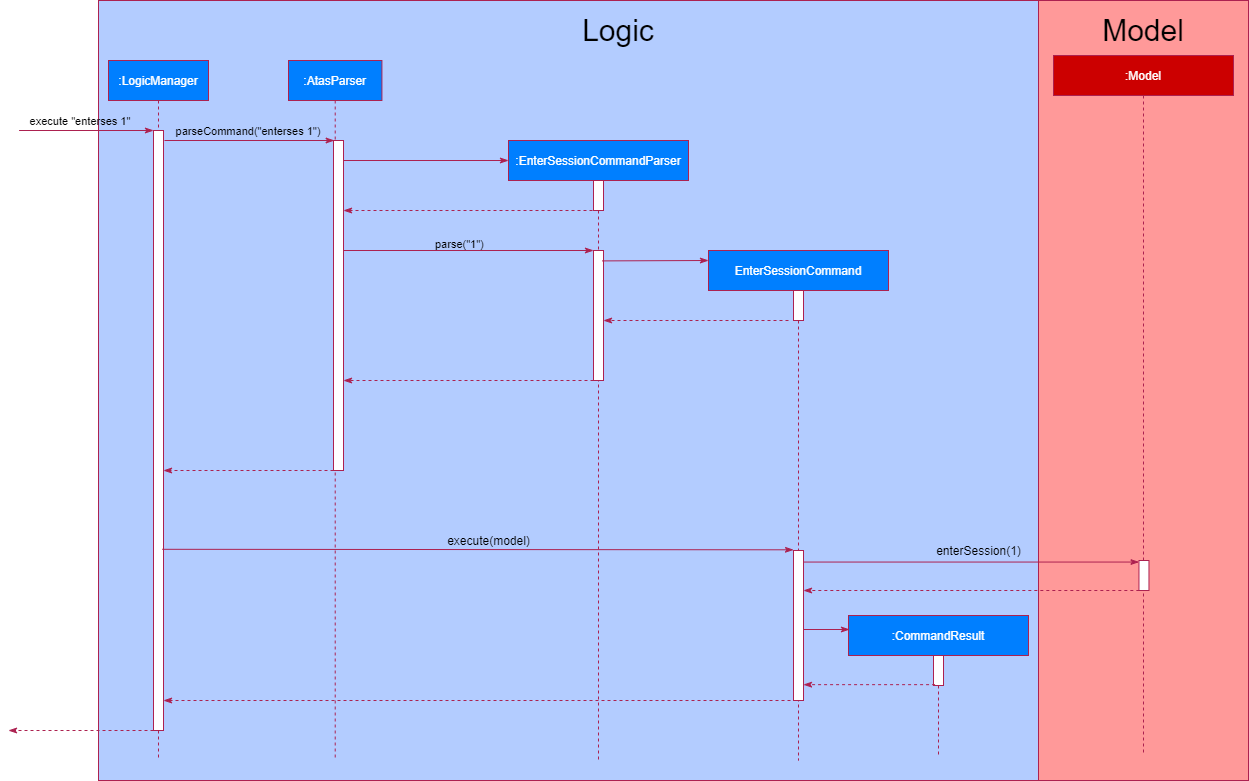
Figure 3.3.2: Enter Session Sequence Diagram
{ end of design#logic_component written by: Alvin Chee Teck Weng }
{ start of design#model_component written by: Masagca Eris Jacey }
3.4. Model component
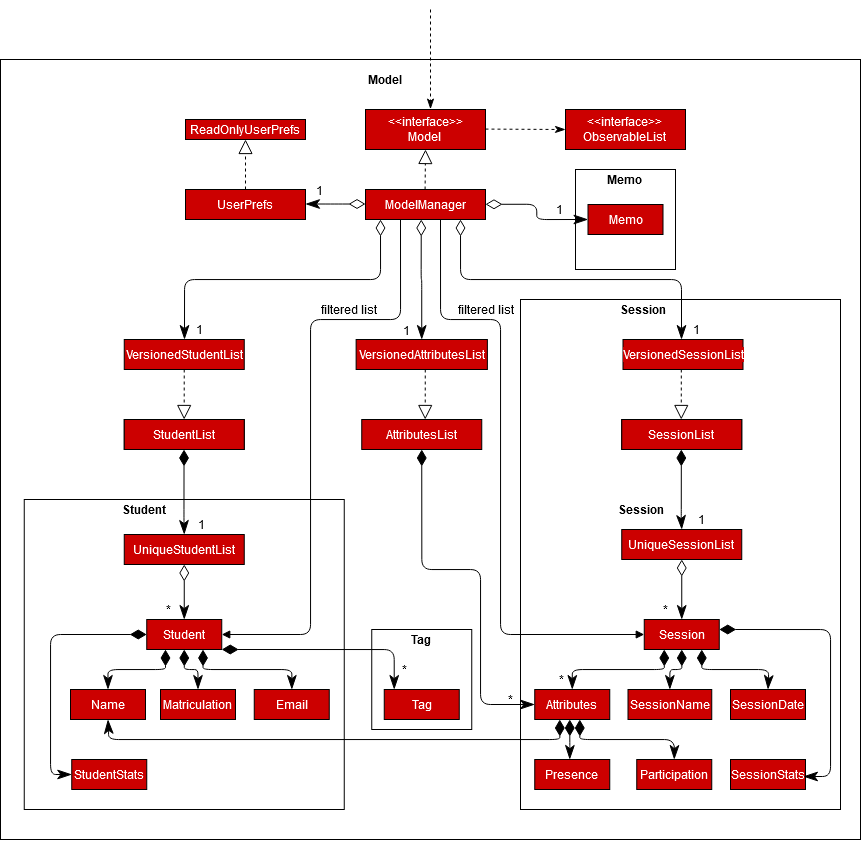
Figure 3.4.1: Class diagram of the Model component
API : Model.java
The Model,
- stores a
UserPrefobject that represents the user’s preferences. - stores the data of the following:
- student list in a
StudentListobject - session list in a
SessionListobject - memo in a
Memoobject.
- student list in a
- exposes an unmodifiable
ObservableList<Student>andObservableList<Session>that can be ‘observed’. e.g. For each list, the UI can be bound to the list so that the UI automatically updates when the data in the list change. - does not depend on any of the other three components.
{ end of design#model_component written by: Masagca Eris Jacey }
{ start of design#storage_component written by: Zhang Sheng Yang }
3.5. Storage component
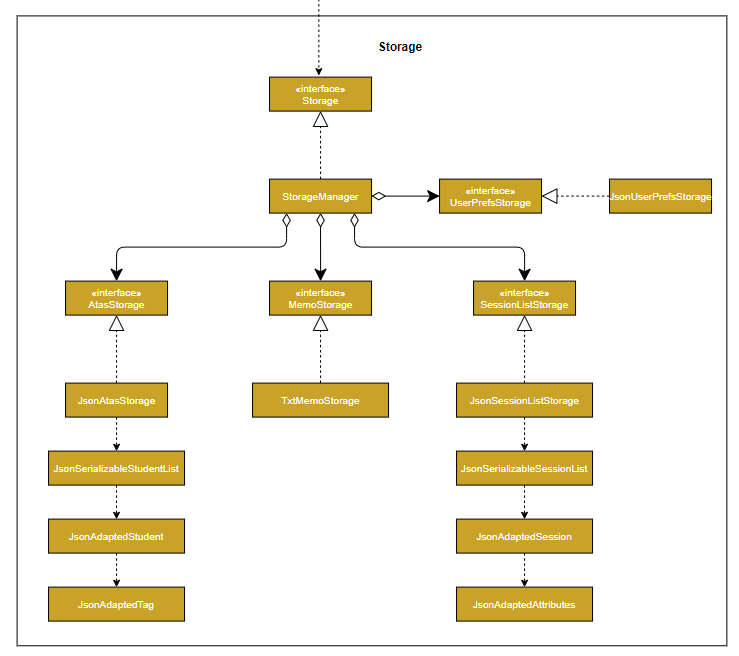
Figure 3.5.1: Class diagram of the Storage component
API : Storage.java
The Storage component,
- can save
UserPrefobjects in json format and read it back. - can save the student list data in json format and read it back.
- can save the session list data in json format and read it back.
- can save the memo data in txt file and read it back.
{ end of design#storage_component written by: Zhang Sheng Yang }
{ start of design#common_classes written by: Zhang Sheng Yang }
3.6. Common classes
Classes used by multiple components are in the atas.commons package.
{ end of design#common_classes written by: Zhang Sheng Yang }
4. Implementation
This section describes some noteworthy details on how certain features are implemented.
{ start of implementation#switch_between_tabs written by: Ngoh Wei Yue }
4.1. Switching between different tabs
To allow users to switch between tabs using the CLI, the switch command is implemented.
The switching of tabs is facilitated by SwitchCommand, LogicManager, MainWindow and Tab. Tab is contained in Ui and is an enum class that represents the various tabs that exist in ATAS.
SwitchCommand implements the method:
-
SwitchCommand#execute(Model)— Returns aCommandResultcontaining theTabto be switched to.
MainWindow implements the method:
-
MainWindow#handleSwitchTab()— Switches theTabPaneto the specifiedTab
Given below is an example usage scenario and how the switch mechanism behaves at each step.
Step 1. The user launches the application for the first time. The default ATAS tab is displayed.
Step 2. The user executes switch sessions command to view the sessions tab. MainWindow#executeCommand() is called and LogicManager calls AtasParser#parseCommand(). This results in the creation of a SwitchCommandParser to parse the user input.
Step 3. SwitchCommandParser#parse() checks if there is an argument being passed by the user. If an argument is passed, a SwitchCommand will be created and SwitchCommand#execute() will be called by the LogicManager.
ParseException will be thrown and the execution terminates.
Step 4. SwitchCommand#execute() will check if the argument passed in is an existing tab name. If the argument is valid, a CommandResult containing a variable switchTab with the value of the target Tab will be returned to MainWindow.
CommandException will be thrown and the execution terminates.
Step 5. MainWindow#handleSwitchTab() will then be called, which will check if the current Tab is the same as the target Tab to switched to. If it is not the same, MainWindow will utilise TabPane to execute the switch, thus updating the screen for the user.
Tab is the same as the target Tab, a CommandException will be thrown and the execution terminates.
The following sequence diagram shows how the switch operation works:
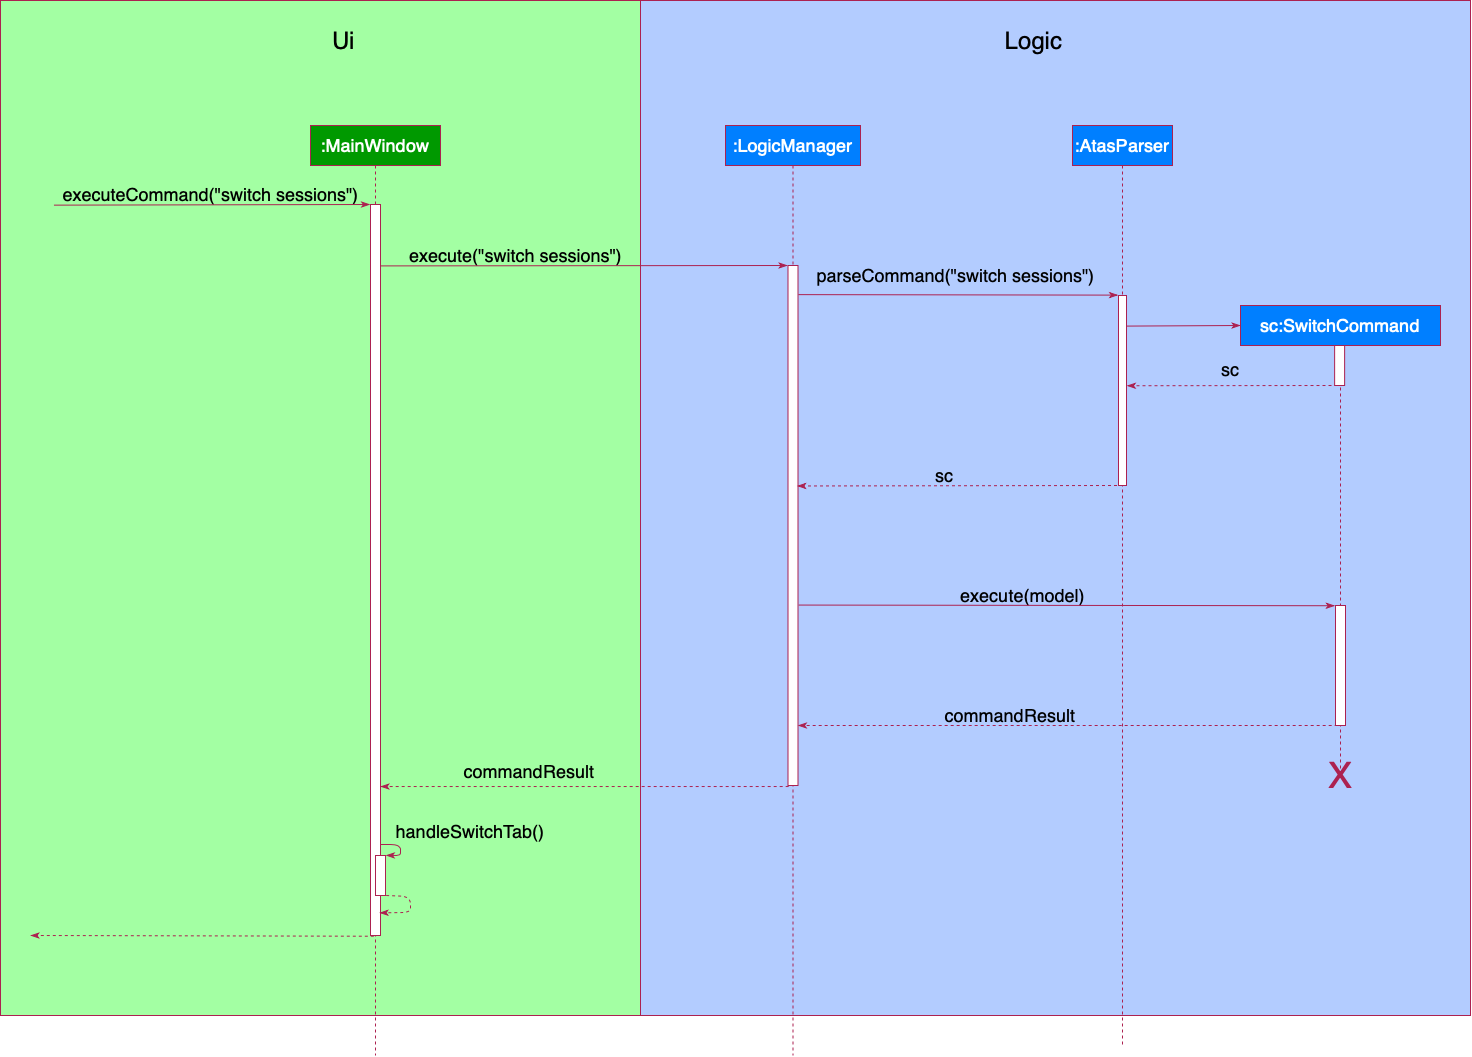
Figure 4.1.1: Sequence diagram showing the switching of tabs
The following activity diagram summarizes what happens when a user executes a switch command:
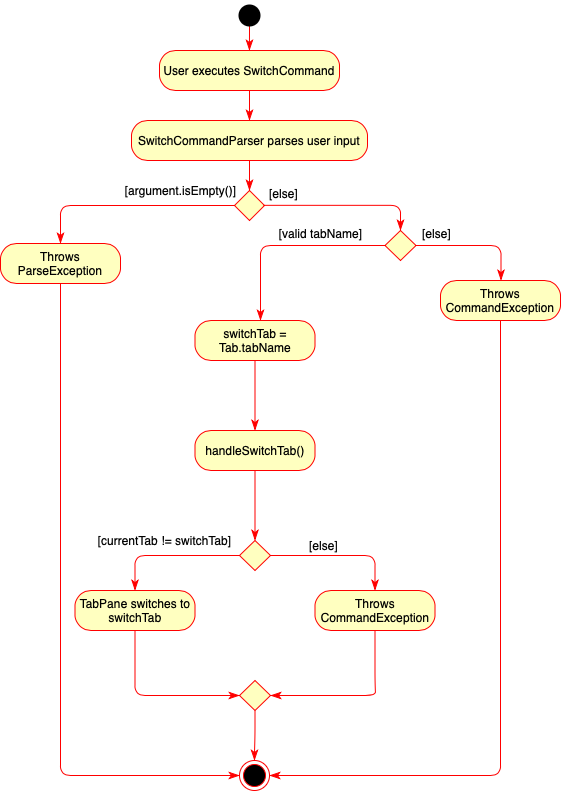
Figure 4.1.2: Activity diagram showing the switching of tabs
4.1.1. Design consideration
-
Tabis being implemented as an enum class because there is a fixed set of tabs that are available to be switched to. This prevents invalid values to be assigned toTab.
{ end of implementation#switch_between_tabs written by: Ngoh Wei Yue }
{ start of implementation#user_confirmation written by: Marcus Tan Wei }
4.2. User confirmation
This feature (henceforth referred to as ‘user confirmation’) is facilitated by ConfirmCommand, DangerousCommand, Logic, LogicManager, Model and ModelManager.
There are 6 DangerousCommand(s) that will change the existing local data upon execution, namely:
- deletestu (deleting a student)
- editstu (editing the particulars of a student)
- clearstu (clearing the student list)
- deleteses (deleting a sesion)
- editses (editing the information of a session)
- clearses (clearing the session list)
DangerousCommand implements the method:
-
DangerousCommand#execute(Model)- Returns aCommandResultof theDangerousCommand.
ConfirmationCommand implements the method:
-
ConfirmationCommand#execute(Model)- Returns aCommandResultcontaining a user confirmation prompt to confirm the execution of theDangerousCommand.
‘ConfirmationAcceptCommand’ implements the method:
-
ConfirmationAcceptCommand#execute(Model)- Executes theDangerousCommandand returns aCommandResultfromDangerousCommand#execute(Model).
ConfirmationRejectCommand implements the method:
-
ConfirmationRejectCommand#execute(Model)- Returns aCommandResultindicating theDangerousCommandis not executed.
Given below is an example usage scenario and how the user confirmation prompt feature behaves at each step.
Step 1. The user launches the application with all his/her students already added to the student list. The ModelManager should already contain the list of students assigned to the user.
Step 2. The user executes a dangerous command, for example deletestu 1, to delete the first student in the student list. A DeleteStudentCommandParser is created by LogicManager.
If the input delete command is valid, a DeleteStudentCommand will be created by DeleteStudentCommandParser#parse() and passed into a ConfirmationCommand as a DangerousCommand.
Step 3. The ConfirmationCommand is executed, and the ResultDisplay window shows a confirmation prompt Delete 1? (yes/no), where the user needs to input a yes or no to confirm or reject the execution of the DangerousCommand respectively.
Step 4. If the confirmation input is valid, a ConfirmationCommandParser is created by the LogicManager and either a ConfirmationAcceptCommand or ConfirmationRejectCommand is returned by ConfirmationCommandParser#parser().
Step 5. The ConfirmationAcceptCommand or ConfirmationRejectCommand is then executed in LogicManager#execute(String) and a CommandResult is returned, which is displayed on ResultDisplay.
The following sequence diagram shows how the user confirmation feature works:
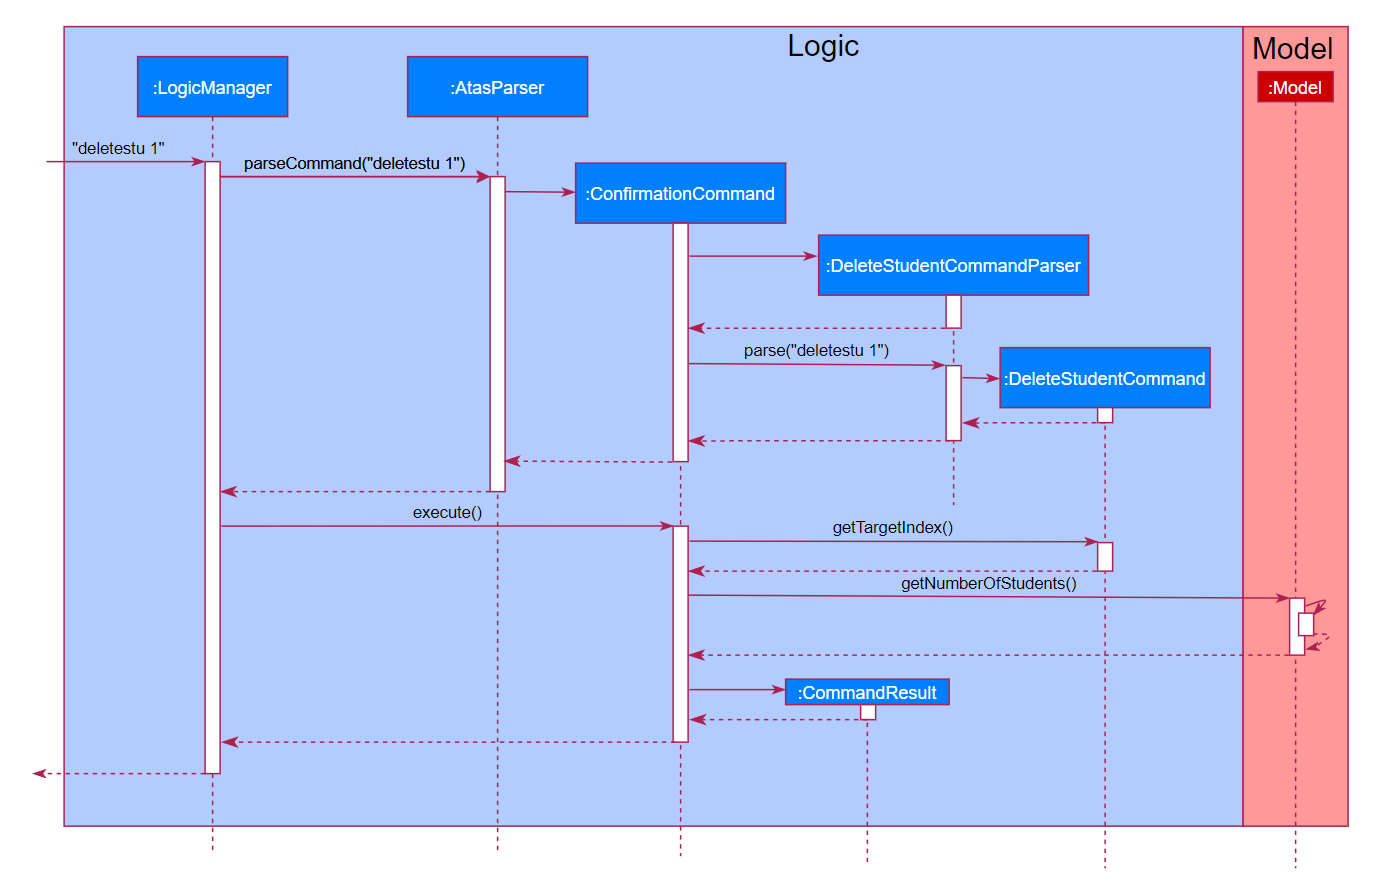
Figure 4.2.1: Sequence diagram to show how Logic component works with Model component to provide user confirmation of delete student command
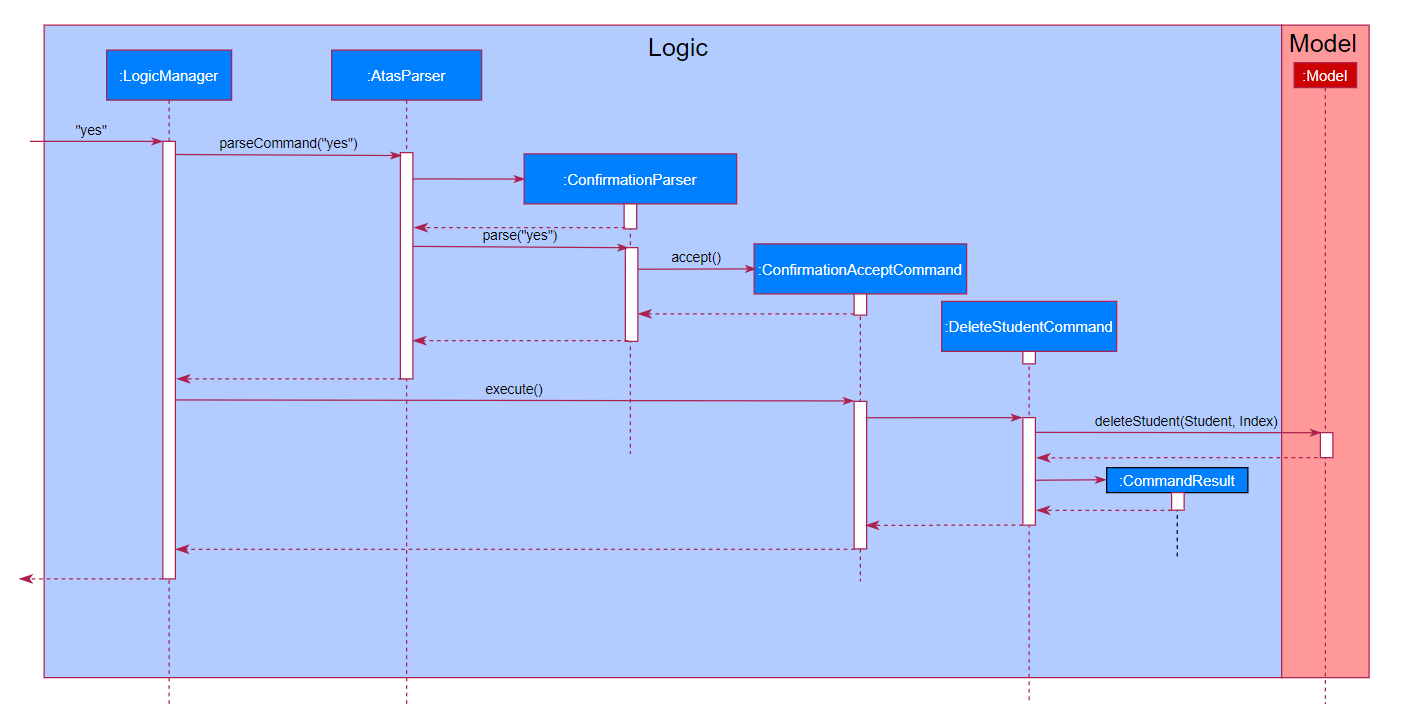
Figure 4.2.2: Sequence diagram to show how Logic component works with Model component after entering user confirmation
The following activity diagram summarizes what happens when a user executes a dangerous command (for eg. DeleteStudentCommand).
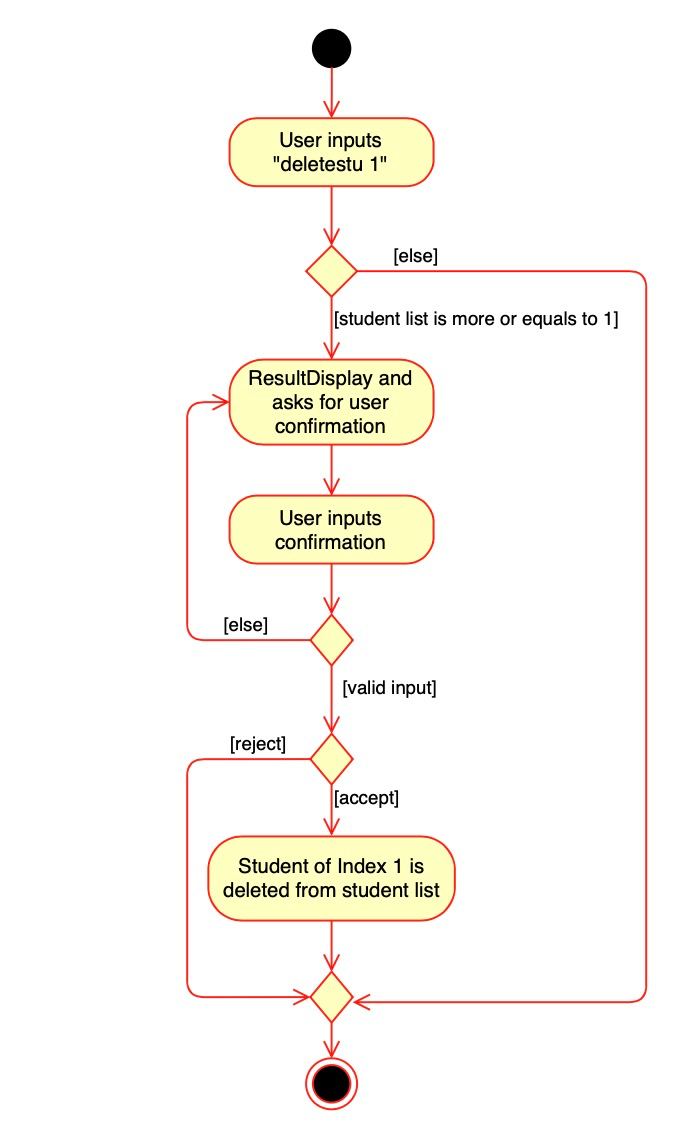
Figure 4.2.3: Activity diagram showing the implementation of delete student command
{ end of implementation#user_confirmation written by: Marcus Tan Wei }
{ start of implementation#adding_a_session written by: Zhang Sheng Yang }
4.3. Adding a session
Adding a session to a class requires user input from the CLI. The parser will parse the user input to obtain the name and the date of the session. The newly added session will also be filled with students’ default presence and participation.
The below example given assumes that the user inputs addses s/Tutorial 1 d/1/1/2020, which ‘Tutorial 1’ and
‘1/1/2020’ are the name and the date of the session to be added, and addses command has already been parsed.
Step 1: Parse input and create session
An AddSessionCommandParser is created by LogicManager and calls AddSessionCommandParser#parse() with the given
user input. Input is parsed according to the prefix s/ and d/ to identify the parts of the
user input and split it into String slices. If both the name and date are present in the input,
those String will be used to create a SessionName and a SessionDate object, which will be used to
create and initialize a Session object. The Session object created will be the one being added to
the current session list later.
AddSessionCommandParser#parse() returns a AddSessionCommand object that contains the session object
back to the LogicManager.
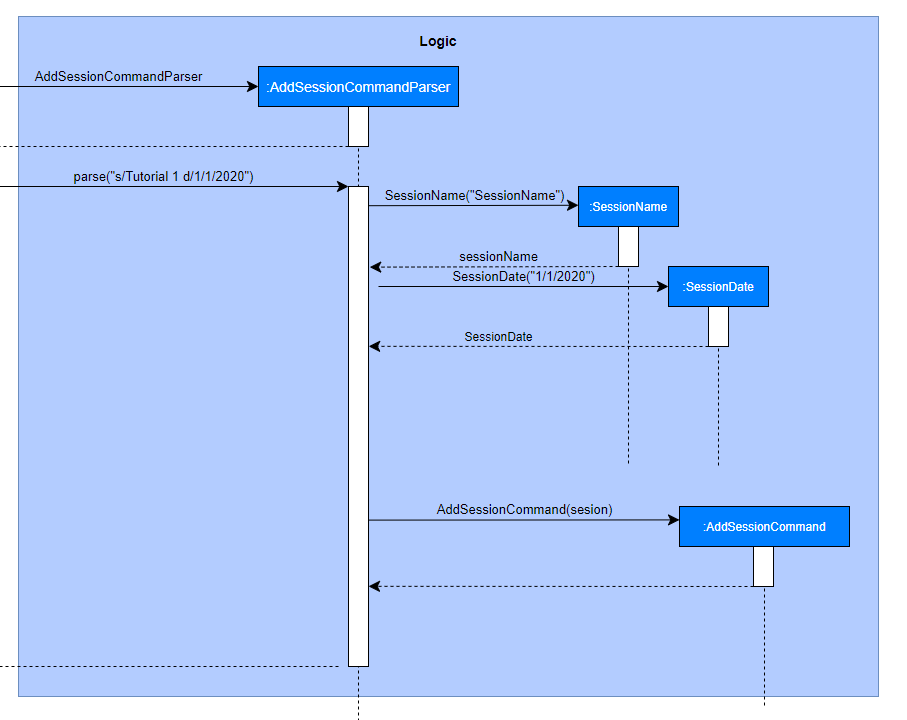
Figure 4.3.1: Sequence diagram showing the Logic component when adding session command
Step 2: Add session to the model/session list
LogicManager calls AddSessionCommand#execute() to proceed on to adding the session to the model.
The AddSessionCommand will first check if the same session is already in the session list, if the
session exists in the current session list, then the session will not be added to the session list.
Assuming that the session to add is not a session already in the list, ModelManager will update
the internal student list of the session list, then it uses addSession method to add the session to the
list.
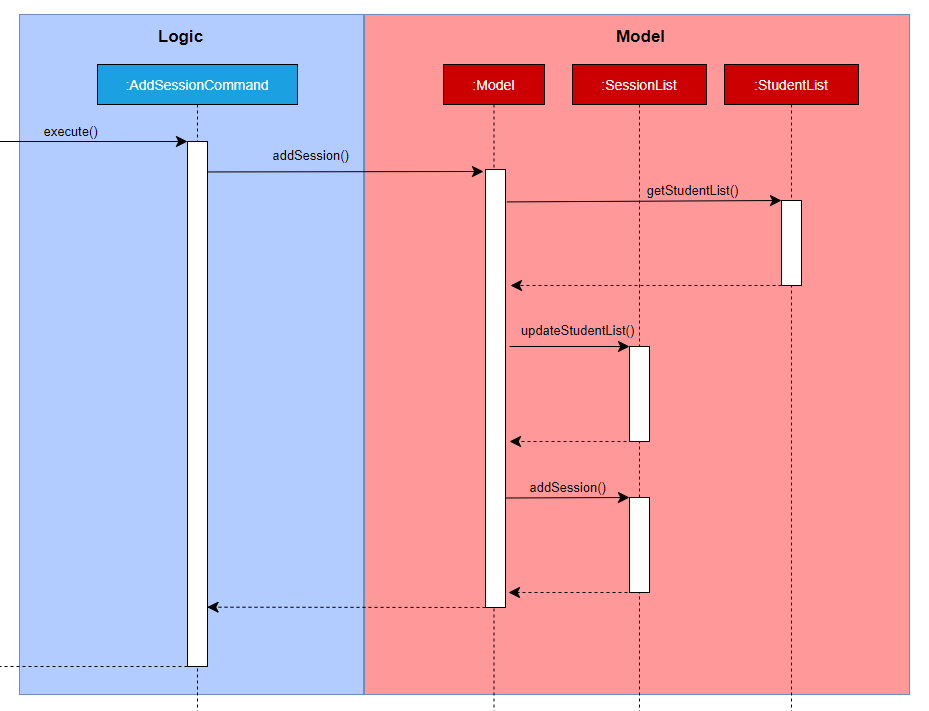
Figure 4.3.2: Sequence diagram showing how Logic component works with Model component to add session command
The following activity diagram summarizes what happens when a user executes an addses command:
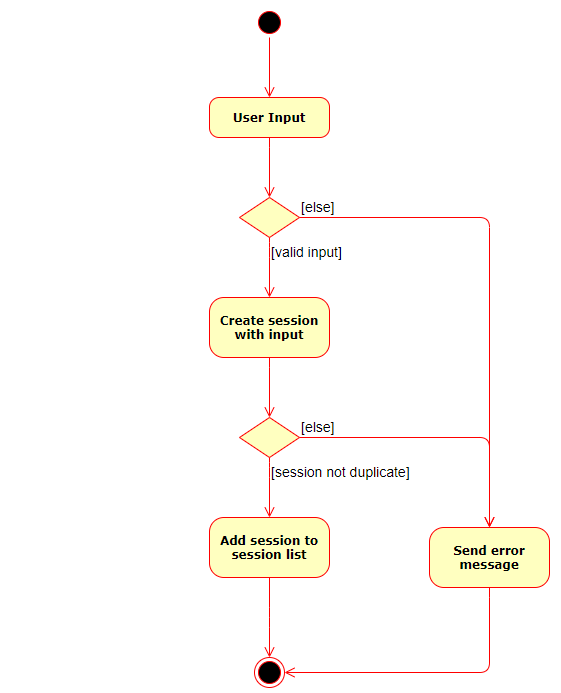
Figure 4.3.3: Activity diagram showing the implementation of add session command
{ end of implementation#adding_a_session written by: Zhang Sheng Yang }
{ start of implementation#entering_a_session written by: Alvin Chee Teck Weng }
4.4. Entering a session
This feature (henceforth referred to as ‘enter session’) is facilitated by EnterSessionCommand, Logic, LogicManager, Model and ModelManager.
LogicManager implements the method:
-
LogicManager#execute(Model)— Returns aCommandResultcontaining the session index of the session.
EnterSessionCommand implements the method:
-
EnterSessionCommand#execute(Model)— Returns aCommandResultcontaining the session index of the session.
ModelManager implements the method:
-
ModelManager#enterSession(Index)— Enters a session based on session index.
Given below is an example usage scenario and how the enter session mechanism behaves at each step.
Step 1. The user launches the application with all his/her students already added to the student list. The ModelManager should already contain the list of students assigned to the user.
Step 2. The user executes enterses 1 to enter session 1. The enterses 1 command calls LogicManager#execute().
Step 3. EnterSessionCommandParser#parse() checks if there argument passed is valid. If the argument is valid, a EnterSessionCommand will be created and EnterSessionCommand#execute() will be called by the LogicManager.
ParseException will be thrown and the execution terminates.
Step 4. ModelManager#enterSession() will be called by EnterSession#execute() and the displayed tab will be switched to Current Session. Details of session 1 will be displayed to the user.
The following sequence diagram shows how the enter session operation works:

Figure 4.4.1: Sequence diagram showing how Logic component works with Model component to enter session command
The following activity diagram summarizes what happens when a user executes an enter session command:
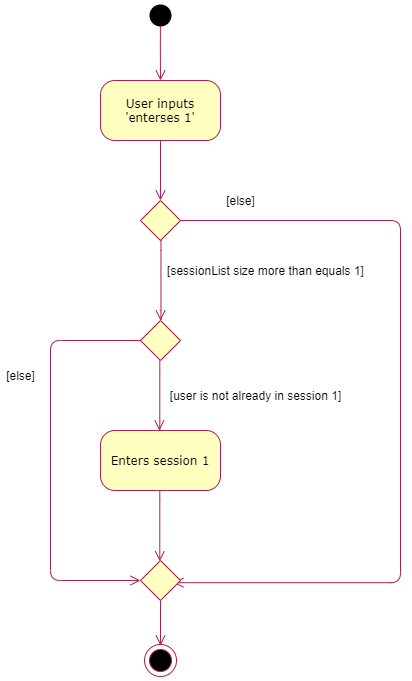
Figure 4.4.2: Activity diagram showing the implementation of enter session command
{ end of implementation#entering_a_session written by: Alvin Chee Teck Weng }
{ start of implementation#presence_and_participation written by: Zhang Sheng Yang }
4.5. Presence and participation
Below only shows the flow of participate command since presence command works the same way.
Toggling the presence and participation status of students requires CLI input. The parser will parse the user input to obtain an index range in order to toggle students in that range. The toggled presence or participation will change in color(either green or red) and statistics will be affected.
The below example given assumes that the user inputs participate 1-4, which ‘1-4’ is the index range
, and participate command has already been parsed.
Step 1: Parse input
An ParticipateCommandParser is created by LogicManager and calls ParticipateCommandParser#parse()
with the given user input. Input is parsed according as a preamble to identify the parts of the
user input and split it into String slices. If the input index range is valid, checked by validation method in
IndexRange class itself, a IndexRange object will be created and initialized with the a default session name as
a placeholder. The ParticipateCommand object created will be passed back to LogicManager to execute.
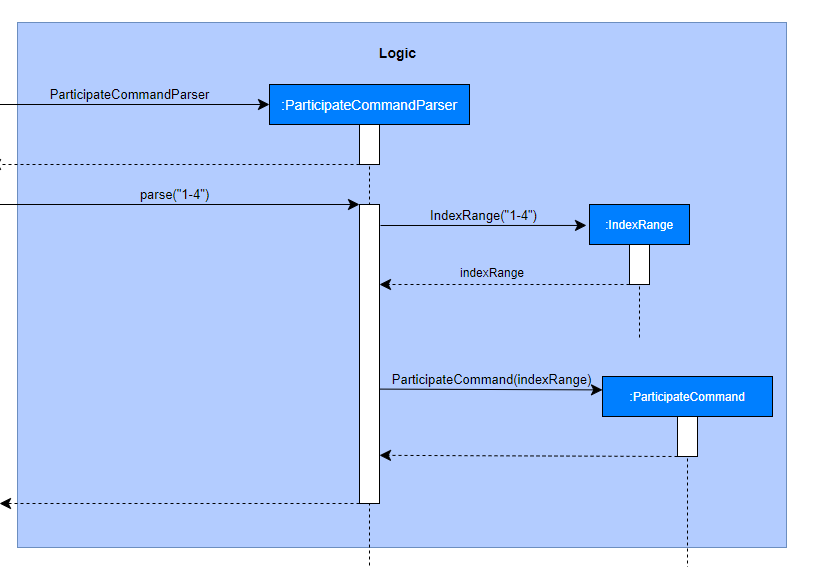
Figure 4.5.1: Sequence diagram showing the Logic component for participate command
Step 2: Toggling participation
LogicManager calls ParticipateCommand#execute() to proceed on to toggling the participation status of students in
the student list in this current session.
The ParticipateCommand will first check if we have entered a session, if model#returnCurrentSessionEnabledStatus()
return false, then an exception will be thrown to signal that we are currently not in a session.
Assuming that we are in a session, ModelManager#updateParticipationBySessionName() will be called. The session
name of the current session is obtained and passed as a parameter together with index range during the invocation
of SessionList#updateStudentPresence(). Session list will now search through the list of sessions for a match,
when a matching session is found, Session#updatePresence() is called to toggle the participation status of students
according to the index range.
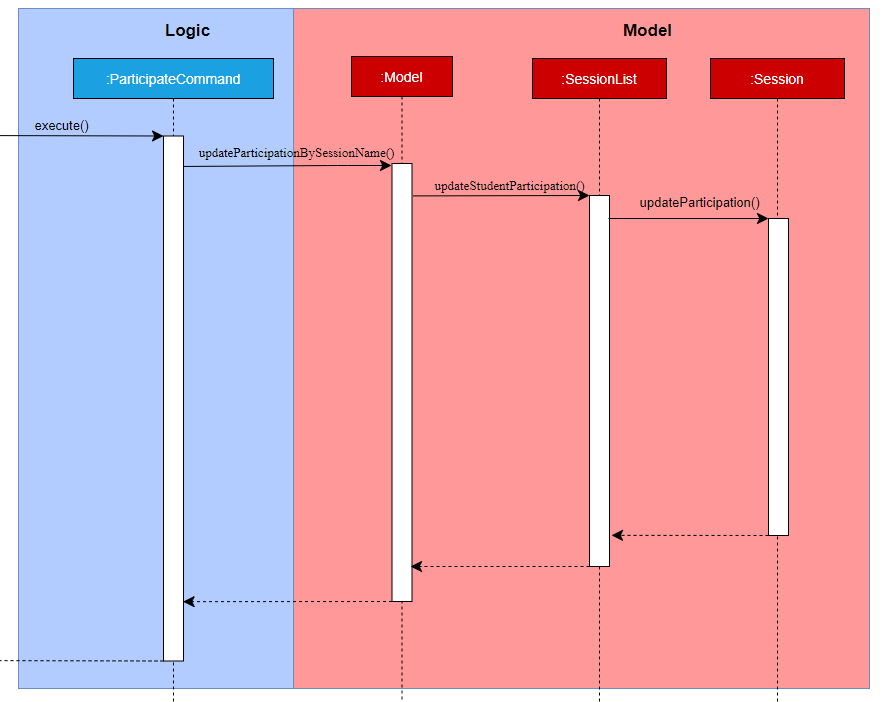
Figure 4.5.2: Sequence diagram showing how Logic component works with Model component for participate command
The following activity diagram summarizes what happens when a user executes an participate command:
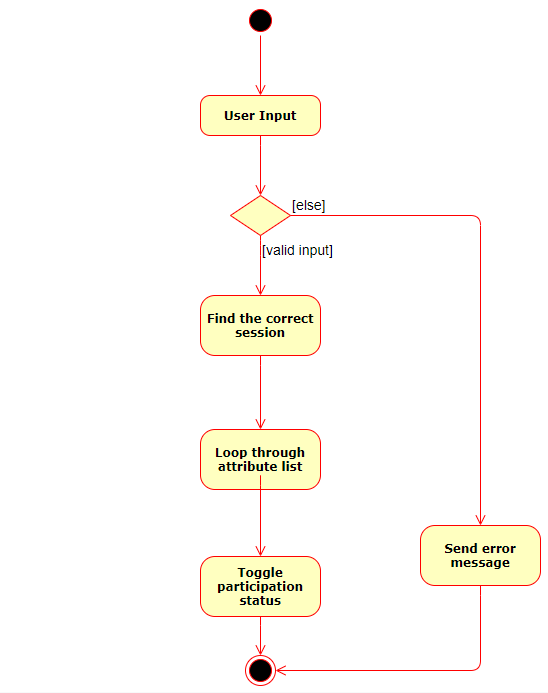
Figure 4.5.3: Activity diagram showing the implementation of participate command
{ end of implementation#presence_and_participation written by: Zhang Sheng Yang }
{ start of implementation#random_name_generation written by: Masagca Eris Jacey }
4.6. Generating the name of a randomly-selected student
This feature (henceforth referred to as ‘RNG’) is facilitated by RngCommand and RandomGenerator.
RngCommand implements the method:
-
RngCommand#execute(Model)— Returns aCommandResultcontaining the name of a randomly-selected student.
RandomGenerator implements the method:
-
RandomGenerator#getNextInt(int)— Returns the index of the next randomly-generated student.
The RandomGenerator is contained in Model. It implements the method:
-
ModelManager#generateRandomStudentIndex()— Returns the index of a randomly-generated student in the student list.
The operation above is exposed in the Model interface as Model#generateRandomStudentIndex().
Given below is an example usage scenario and how the RNG mechanism behaves at each step.
Step 1. The user launches the application with all his/her students already added to the student list. The ModelManager should already contain the list of students assigned to the user.
Step 2. The user executes rng to pick a random student in his/her student list. The rng command calls Model#generateRandomStudentIndex(), which in turn calls RandomGenerator#getNextInt(int).
Step 3. The Index returned during the execution of RngCommand#execute(Model) is used to fetch the name of the corresponding student (in the student list) to be selected. The student’s name is then displayed to the user.
The following sequence diagram shows how the RNG operation works:
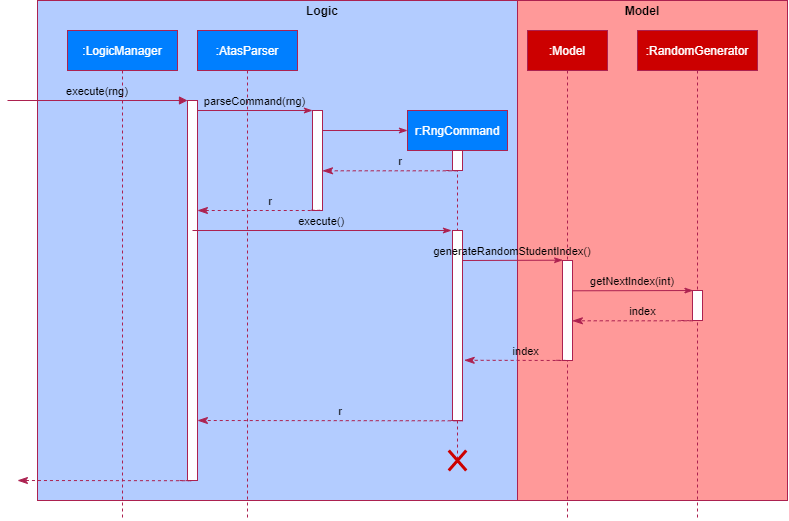
Figure 4.6.1: Sequence diagram showing how Logic component works with Model component for the rng command
The following activity diagram summarizes what happens when a user executes an RNG command:
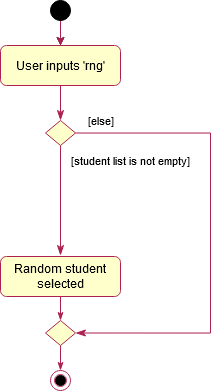
Figure 4.6.2: Activity diagram showing the series of events upon the user entering an rng command
{ end of implementation#random_name_generation written by: Masagca Eris Jacey }
{ start of implementation#undo_redo written by: Masagca Eris Jacey }
4.7. Undo/redo feature
The undo/redo mechanism is facilitated by ModelManager.
It contains the following entities:
VersionedStudentListVersionedSessionListVersionedAttributesList
Each versioned entity extends its corresponding non-versioned class (e.g. VersionedStudentList extends from StudentList)
with an undo/redo history, stored internally as an <<entity>>StateList and currentStatePointer.
Additionally, each entity implements the following operations:
-
Versioned<<Entity>>List#commit()— Saves the current entity state in its history. -
Versioned<<Entity>>List#undo()— Restores the previous entity state from its history. -
Versioned<<Entity>>List#redo()— Restores a previously undone entity state from its history.
The operations above are called in ModelManager under their respective methods within the class:
ModelManager#commit()ModelManager#undo()ModelManager#redo()
These operations are exposed in the Model interface as Model#commit(), Model#undo() and Model#redo() respectively.
![]() Note: Whenever a command that commits is made,
Note: Whenever a command that commits is made, Model#commit() is called, which means that
all 3 of <<Versioned<<Entity>>List>>#commit() will be called.
A similar mechanism occurs for Model#undo() and Model#redo().
Given below is an example usage scenario and how the undo/redo mechanism behaves at each step.
Step 1. The user launches the application for the first time. Each Versioned<<Entity>> will be initialized with the initial entity state, and the currentStatePointer pointing to that single entity state.

Figure 4.7.1: Each versioned entity state upon initialization
Step 2. The user executes deletestu 5 command to delete the 5th student in the student list.
The deletestu command calls Model#commit(), causing the modified state of all versioned entities after the deletestu 5 command executes to be saved in the <<entity>>StateList,
and the currentStatePointer for each Versioned<<Entity>>List>> is shifted to the newly inserted entity state.

Figure 4.7.2: Each versioned entity state upon executing the deletestu command
Step 3. The user executes addstu n/David … to add a new student. The addstu command also calls Model#commit(), causing another modified address entity state (for each state) to be saved into the <<entity>>StateList.

Figure 4.7.3: Each versioned entity state upon executing the addstu command
Model#commit(), so any entity state will not be saved into the <<entity>>StateList.
Step 4. The user now decides that adding the student was a mistake, and decides to undo that action by executing the undo command.
The undo command will call Model#undo(), which will shift the currentStatePointer for all versioned entities once to the left, pointing it to the previous entity state, and restores each entity to that state.

Figure 4.7.4: Each versioned entity state upon executing a single undo command
currentStatePointer is at index 0, pointing to the initial entity state, then there are no previous entity states to restore.
The undo command uses Model#canUndo() to check if this is the case.
If so, it will return an error to the user rather than attempting to perform the undo.
The following sequence diagram shows how the undo operation works:
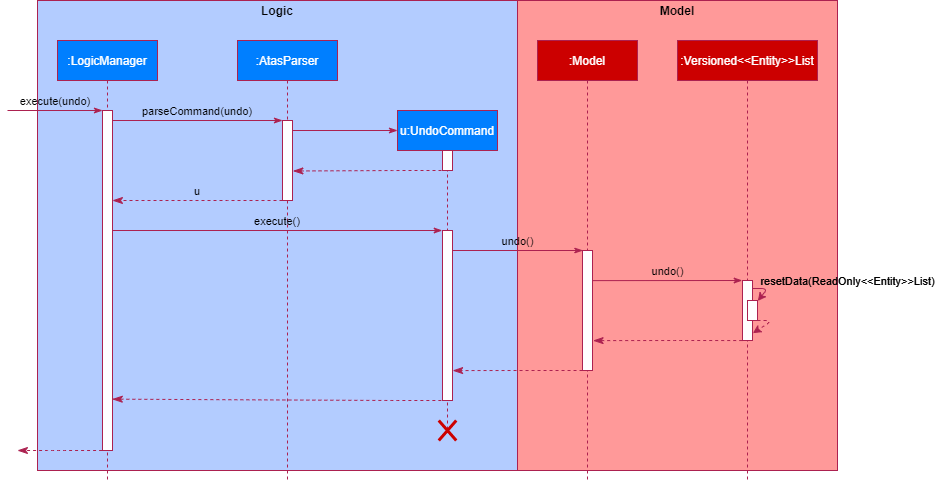
Figure 4.7.5: Sequence diagram showing how the Logic component works with Model component for the undo operation
The redo command does the opposite — it calls Model#redo(), which shifts the currentStatePointer for each versioned entity once to the right, pointing to the previously undone state, and restores each entity to that state.
currentStatePointer is at index <<entity>>StateList.size() - 1, pointing to the latest entity state, then there are no undone entity states to restore.
The redo command uses Model#canRedo() to check if this is the case. If so, it will return an error to the user rather than attempting to perform the redo.
Step 5. The user then decides to execute the command liststu. Commands that do not modify any entity, such as liststu, will usually not call Model#commit(), Model#undo() or Model#redo().
Thus, the <<entity>>StateList for each versioned entity remains unchanged.

Figure 4.7.6: Each versioned entity state upon executing the liststu command
Step 6. The user executes clearstu, which calls Model#commit().
Since the currentStatePointer for each versioned entity is not pointing at the end of the <<entity>>StateList, all entity states after the currentStatePointer will be purged.
Reason: It no longer makes sense to redo the addstu n/David … command. This is the behavior that most modern desktop applications follow.

Figure 4.7.7: Each versioned entity state upon executing the clearstu command
The following activity diagram summarizes what happens when a user executes a new command:
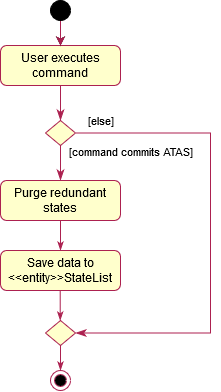
Figure 4.7.8: An activity diagram showing the series of events upon a user executing a command
4.7.1. Design consideration
Aspect: how undo & redo execute
-
Alternative 1 (current choice): For each versioned entity, saves the entire entity.
- Pros: Easy to implement.
- Cons: May have performance issues in terms of memory usage.
-
Alternative 2: Individual command knows how to undo/redo by itself.
- Pros: Will use less memory (e.g. for
deletestu, just save the student being deleted). - Cons: We must ensure that the implementation of each individual command are correct.
- Pros: Will use less memory (e.g. for
Aspect: data structure to store the different entity states
-
Alternative 1 (current choice): List
- Pros: Very straightforward.
- Cons: May have performance issues in terms of runtime (linear).
-
Alternative 2: Search tree
- Pros: Much more time-efficient than a list due to logarithmic time complexity for most its functions (search, add, etc.)
- Harder to implement.
{ end of implementation#undo_redo written by: Masagca Eris Jacey }
{ start of implementation#adding-a-note written by: Ngoh Wei Yue }
4.8. Adding a note
To allow users to add notes into the memo without switching to the Memo tab, adding a note is implemented.
Adding a note is facilitated by AddNoteCommand, Memo, TxtMemoStorage and MemoBox.
This implementation of this feature can be split into 3 main parts:
- Updating the content in
Memo. - Updating the data in the hard disk.
- Updating the content in
MemoBoxto be displayed to the user.
AddNoteCommand implements the method:
-
AddNoteCommand#execute()— CallsModel#addNoteCommand()and returns aCommandResultwhich notifies theUicomponent to edit the content inMemoBox.
Memo is contained in Model. It implements the method:
-
Memo#addNote()— Appends the note to the current content and sets the new content to be the new content ofMemo.
TxtMemoStorage implements MemoStorage which is contained in Storage. It implements the method:
-
TxtMemoStorage#saveMemo()— Writes the content inMemoto the hard disk.
MemoBox is contained in Ui. It implements the method:
-
Memo#setTextContent()— Sets text into a text box contained onMemoBoxto be displayed to the user.
Given below is an example usage scenario and how addnote behaves at each step.
Step 1. The user executes addnote note to add the word “note” onto a new line in the memo box.
Step 2. An AddNoteCommand is created, and the AddNoteCommand#execute() is called by the LogicManager.
Step 3. AddNoteCommand#execute() will then call Model#addNoteToMemo() to update the content in Memo.
Step 4. ModelManager#addNoteToMemo() calls Memo#addNote() which concatenates “note” to the end of the original content and sets it to be the new content of Memo.
The following sequence diagram shows how adding a note updates the content in Memo:
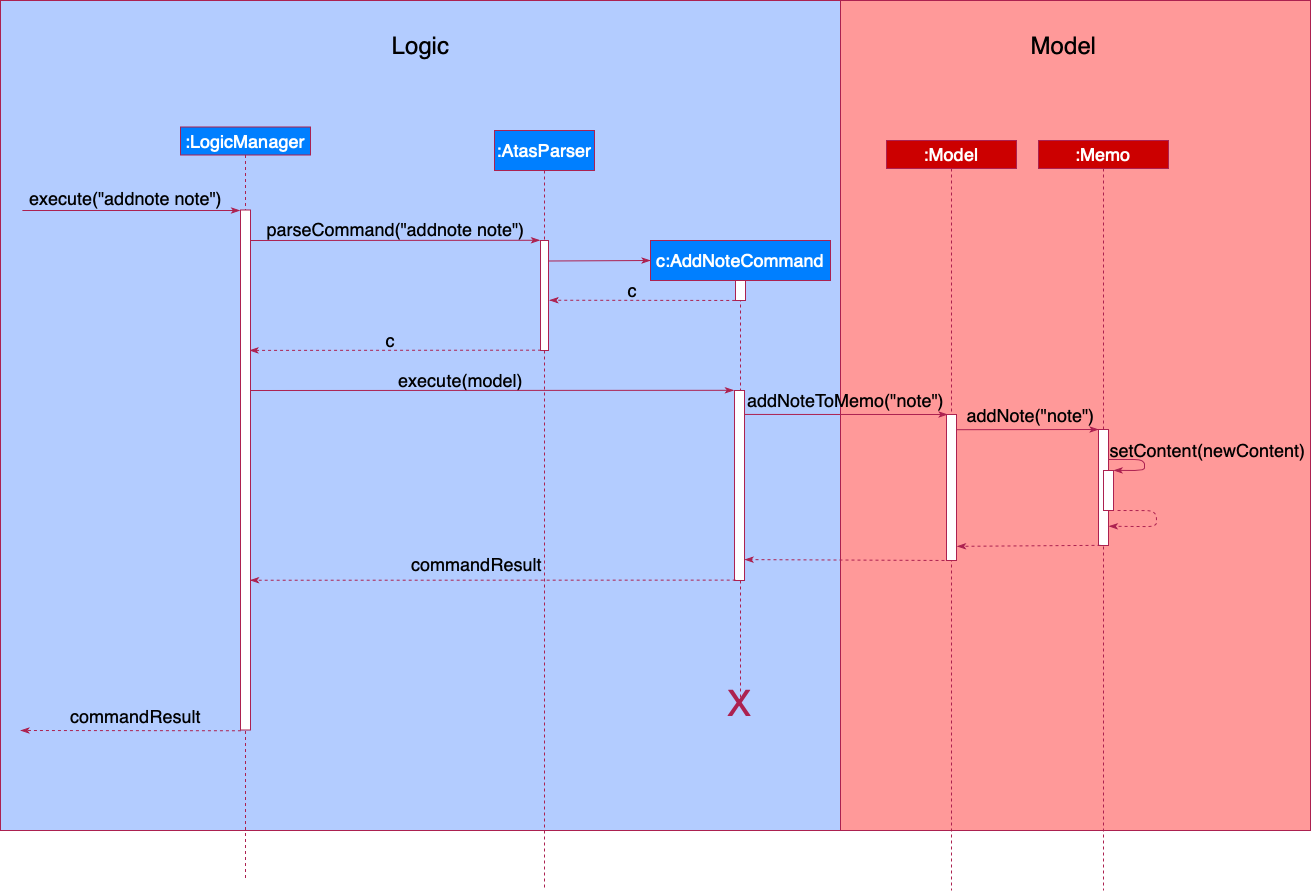
Figure 4.8.1: Sequence diagram showing how the content in Memo is updated
Step 5: After the content in Memo is updated, Storage#saveMemo() is called by the LogicManager.
Step 6: StorageManager#saveMemo() calls TxtMemoStorage#saveMemo() which retrieves the updated content in Memo and writes in to a hard disk, following a specified file path.
The following sequence diagram shows how adding a note updates the data in the hard disk:
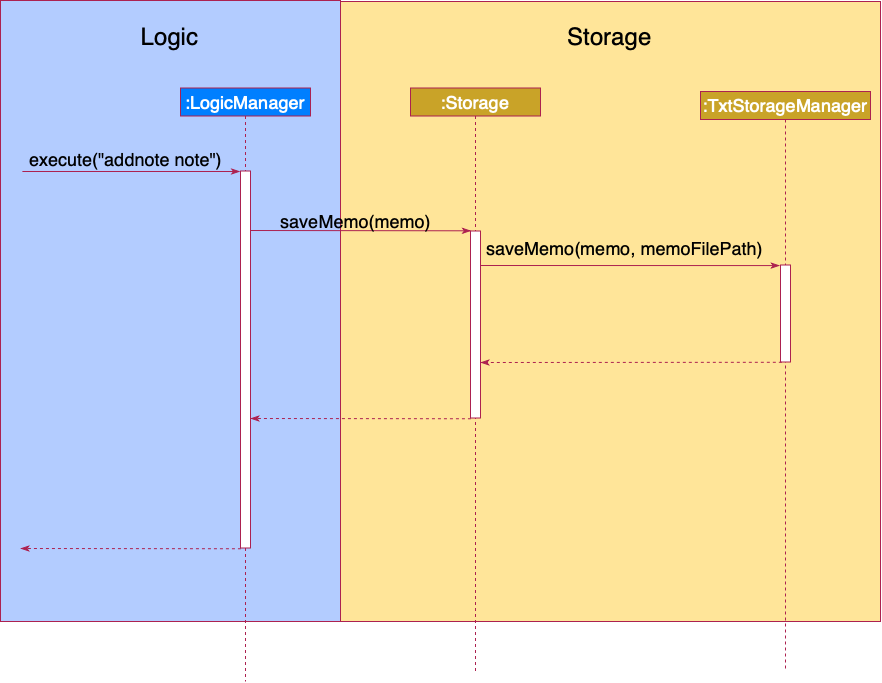
Figure 4.8.2: Sequence diagram showing how the memo content in the hard disk is updated
Step 7: A CommandResult containing a variable isEditMemo with the value True, returned from AddNoteCommand#execute() is returned to MainWindow#executeCommand(). This results in MainWindow#handleEditMemo() being called.
Step 8: MainWindow#handleEditMemo() retrieves the updated Memo content using LogicManager#getMemoContent() and calls MemoBox#setTextContent() to set the updated content into the text box contained in MemoBox.
The following sequence diagram shows how adding a note updates the text box of MemoBox to be displayed to the user:
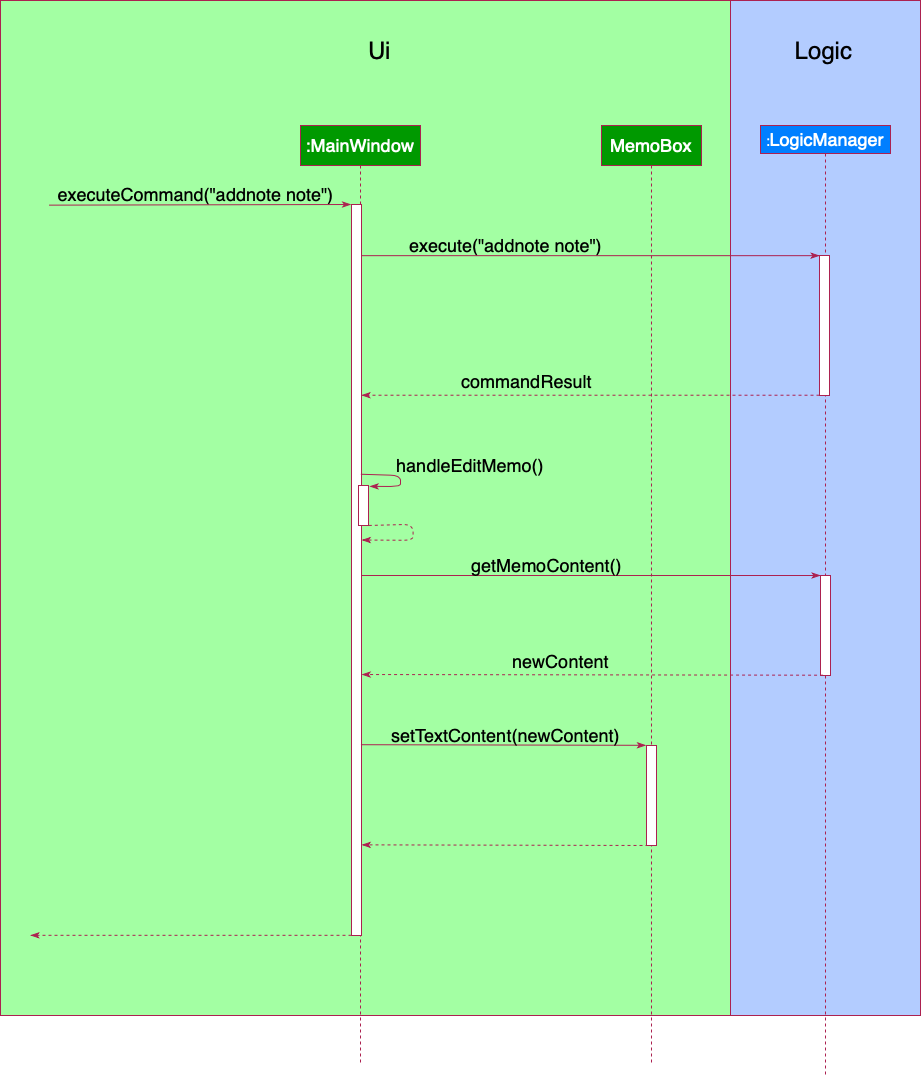
Figure 4.8.3: Sequence diagram showing how the MemoBox content is updated
{ end of implementation#adding_a_note written by: Ngoh Wei Yue }
{ start of implementation#exporting_data written by: Alvin Chee Teck Weng }
4.9. [Proposed] Exporting data to csv
A data exporting feature to csv can be implemented in the future.
Pros: Data are now more organised can be opened by apps such as Microsoft Excel.
Cons: Not easy to implement because it requires the knowledge of how to organise the data into csv format.
{ end of implementation#exporting_data written by: Alvin Chee Teck Weng }
{ start of implementation#data_encryption written by: Marcus Tan Wei }
4.10 [Proposed] Data encryption
Data encryption can be implemented in the future versions. This is to further protect the students’ particulars.
4.10.1 Solution 1
Encrypt and store data locally.
- Pros:
- Easy to implement. One example is through the usage of Java Cryptography API.
- Cons:
- Performance reduction may occur since every call to save to storage requires encrypting a lot of data.
- Security issues may still arise if we store the encryption key in the same machine.
4.10.2 Solution 2
Store data outside the user’s machine and issue the user an access token.
- Pros:
- Data will be bounded to multiple machines, hence, can be restored if the user forgets his or her credentials.
- Cons:
- There will be generation of access tokens and checking them.
- Require changes to the current implementation to work with external storage.
{ end of implementation#dat_encryption written by: Marcus Tan Wei }
{ start of documentation written by: Ngoh Wei Yue }
5. Documentation
Refer to this guide here.
{ end of documentation written by: Ngoh Wei Yue }
{ start of logging written by: Marcus Tan Wei }
6. Logging
Refer to this guide here.
{ end of logging written by: Marcus Tan Wei }
{ start of testing written by: Alvin Chee Teck Weng }
7. Testing
Refer to this guide here.
{ end of testing written by: Alvin Chee Teck Weng }
{ start of configuration written by: Zhang Sheng Yang }
8. Configuration
Refer to this guide here.
{ end of configuration written by: Zhang Sheng Yang }
{ start of devops written by: Masagca Eris Jacey }
9. DevOps
Refer to this guide here.
{ end of devops written by: Masagca Eris Jacey }
10. Appendix: requirements
{ start of requirements#product_scope written by: Masagca Eris Jacey }
10.1. Product scope
Target user profile:
- Bob is a passionate CS1010S TA and he likes to track his students’ progress.
- Bob currently uses Excel to keep track of his student’s particulars.
- Bob finds the features on Excel clunky at times and he finds them difficult to learn.
- Bob is looking for an application with a sleeker and cleaner UI so he doesn’t have to remember where the different features in Excel are.
- Bob has limited memory in his computer and wants to install smaller softwares.
- Bob is looking for an application that specifically enhances in-class management efficiency.
- Bob is a fast typist.
- Bob hates to move his mouse at all (to save file, to categorise data fields and student data)
- Bob uses a laptop and doesn’t have a mouse with him all the time(or he doesn’t have a place to use his mouse when on the bus or mrt).
Value proposition:
- Manage students faster than a typical mouse/GUI driven app
- Sleeker and cleaner UI, less clunky
- Less memory
- Intuitive command-line interface - easy to learn and pick up, especially for technologically savvy individuals
- CS student-friendly
- Current features:
- Manage students’ particulars (name, matriculation number, email, additional tag(s))
- Manage sessions’ particulars (name, date)
- Track students’ progress for each session (attendance/presence, participation)
- Random name generation to easily randomly select a student
- Memo box for user to note down sticky notes in a pinch
- Potential features (in future iterations):
- Mass sending of emails/files
- Import/export data files from Excel, csv files
- Track student’s progress (assignments, tests)
- Record student’s attendance
- Profile pictures for recognisability
- Schedule consultations/Zoom meeting
- Automate formation of Telegram groups
{ end of requirements#product_scope written by: Masagca Eris Jacey }
{ start of requirements#user_stories written by: Alvin Chee Teck Weng }
10.2. User stories
Priorities: High (must have) - * * *, Medium (nice to have) - * *, Low (unlikely to have) - *
| Priority | As a … | I want to … | So that I can… |
|---|---|---|---|
* * * |
user | see usage instructions | refer to instructions when I forget how to use the app |
* * * |
tutor | add a new student | add details of the students in my class |
* * * |
tutor | delete a student | remove details of the students who are no longer taking the module |
* * * |
tutor | find a student by name | locate details of students without having to go through the entire list |
* * * |
tutor with many students in my class | sort students by name | locate a student easily |
* * |
tutor | track my students’ attendance | take note of the tutorial participation for each student |
* * |
tutor with limited class time | have a random number generator that generates a random number quickly | get a random student to answer my question more efficiently instead of having to rely on online generators |
* * |
tutor | add non-registered Christian names or nicknames to my students | remember my students more easily |
* * |
tutor who likes to do my administrative work on just one platform | send important emails to my students | not have to rely on external apps like Microsoft Outlook/LumiNUS |
* * |
tutor | have diagrams tracking students’ progress | pick out easily which student is not catching up with lecture material |
* * |
tutor who can be quite forgetful | create a list of announcements | remember to convey them to my students |
* * |
tutor who wants to protect the particulars of my students | encrypt files with passwords | keep the module and students’ data safe |
* * |
tutor who often overshoots the time allocated for my lesson | be reminded at certain intervals | be on track throughout the lesson |
* * |
tutor who wants the class to participate actively in class discussions | quickly record who has spoken | call on those who haven’t spoken for subsequent questions |
* |
user who likes customization | customize my own keyboard shortcuts | so I can update session and student details more efficiently |
* |
user who likes colors | customize the UI to whatever color scheme I want | enjoy using the app more |
{ end of requirements#user_stories written by: Alvin Chee Teck Weng }
{ start of requirements#use_cases written by: Zhang Sheng Yang }
10.3. Use cases
(For all use cases below, the System is ATAS and the Actor is the user, unless specified otherwise)
Use case: UC01 - Add a student
Guarantees :
- Student will be added only if the input name, Matriculation number, NUS email and tags are valid.
- The student list will not have duplicate students.
MSS
- User requests to add a student with specified Matriculation number and NUS email, as well as any additional tags (if any).
- ATAS checks if the input is valid and scans through the student list for duplication.
- ATAS adds the student.
Use case ends.
Extensions
- 2a. A student in the list has the same Matriculation number.
- 2b1. ATAS shows an error message.
Use case ends.
- 2b. Matriculation number provided is invalid.
- 2b1. ATAS shows an error message.
Use case ends.
- 2c. A student in the list has the same NUS email.
- 2c1. ATAS shows an error message.
Use case ends.
- 2d. The email provided is not NUS email.
- 2d1. ATAS shows an error message.
Use case ends.
Use case: UC02 - Delete a student
MSS
- User requests to list students.
- ATAS shows a list of students.
- User requests to delete a specific student in the list.
- ATAS sends confirmation message.
- User confirms.
- ATAS deletes the student.
Use case ends.
Extensions
-
2a. The list is empty.
Use case ends.
- 3a. The given index is invalid.
- 3a1. ATAS shows an error message.
Use case resumes at step 2.
-
4a. User denies confirmation
Use case ends.
Use case: UC03 - Edit a student
Guarantees :
- Student will be edited only if the edited name, Matriculation number, NUS email and tags are valid.
- The student list will not have duplicate students after edit.
MSS
- User requests to edit a student with name, Matriculation number, NUS email and tags with the student index of that student.
- ATAS checks if the input is valid and scans through the student list for duplication.
- ATAS sends confirmation message.
- User confirms.
- ATAS edits the student.
Use case ends.
Extensions
- 2a. A student in the list has the same Matriculation number.
- 2b1. ATAS shows an error message.
Use case ends.
- 2b. Matriculation number provided is invalid.
- 2b1. ATAS shows an error message.
Use case ends.
- 2c. A student in the list has the same NUS email.
- 2c1. ATAS shows an error message.
Use case ends.
- 2d. The email provided is not NUS email.
- 2d1. ATAS shows an error message.
Use case ends.
- 2e. The given student index is invalid.
- 2e1. ATAS shows an error message.
Use case ends.
-
3a. User denies confirmation.
Use case ends.
Use case: UC04 - Clear the student list
MSS
- User requests to clear the student list.
- ATAS ask for confirmation.
- User confirms.
- ATAS clears the student list.
Use case ends.
Extensions
-
1a. The list is empty. Use case ends.
-
2a. User denies confirmation.
Use case ends.
Use case: UC05 - List the registered students
MSS
- User requests to see the list of students that have been added to ATAS.
- ATAS shows the list of students.
Use case ends.
Use case: UC06 - Find a student
MSS
- User requests to find a student with one or more keywords.
- ATAS searches for students’ names that contain any of the keywords.
-
ATAS shows the filtered list of students to User.
Use case ends.
Extensions
-
2a. The list is empty.
Use case ends.
Use case: UC07 - Add a session
Guarantees :
- Session will be added only if the input session name and session date are valid.
- The session list will not have duplicate sessions after adding.
MSS
- User requests to add a session with a session name and date.
- ATAS checks if the inputs are valid and scans though the session list for duplication.
- ATAS adds the session to the session list.
-
ATAS sorts the session list according to date.
Use case ends.
Extensions
- 2a. The given date is invalid.
- 2a1. ATAS shows an error message.
Use case ends.
- 2b. A session in the session list has the same session name.
- 2b1. ATAS shows an error message.
Use case ends.
Use case: UC08 - Delete a session
MSS
- User requests to delete a session with the given index.
- ATAS asks for confirmation.
- User confirms.
- ATAS deletes the session.
Use case ends.
Extensions
- 1a. The given session index is invalid.
- 1a1. ATAS shows an error message.
Use case ends.
-
2a. User denies confirmation.
Use case ends.
Use case: UC09 - Edit a session
Guarantees :
- Session will be edited only if the edited session name and session date are valid.
- The session list will not have duplicate sessions after edit.
MSS
- User requests to edit a session with session name and date with the session index of that session.
- ATAS checks if the input is valid and scans through the session list for duplication.
- ATAS asks for confirmation.
- User confirms.
- ATAS edits the session
Use case ends.
Extensions
- 2a. The given session index is invalid
- 2a1. ATAS shows an error message.
Use case ends.
- 2b. The session date given is invalid
- 2b1. ATAS shows an error message.
Use case ends.
-
3a. User denies confirmation.
Use case ends.
Use case: UC10 - Clear the session list
MSS
- User requests to clear the session list.
- ATAS asks for confirmation.
- User confirms.
- ATAS clears the session list.
Use case ends.
Extensions
- 1a. The session list is empty
- 1a1. ATAS shows an empty session list.
Use case ends.
-
2a. User denies confirmation.
Use case ends.
Use case: UC11 - Enter a session
MSS
- User requests to enter a session with a session index.
- ATAS shows the attributes of that session.
Use case ends.
Extensions
- 1a. The session index is invalid.
- 1a1. ATAS shows an error message.
Use case ends.
- 1b. The session index is the same as current session.
- 1b1. ATAS shows an error message.
Use case ends.
Use case: UC12 - Toggle presence
Preconditions : User has entered a session
MSS
- User requests to toggle students’ presence status of the given student index range.
- ATAS toggles the presence status of students.
- ATAS updates the statistics in session and student list.
Use case ends.
Extensions
- 1a. The given index range is invalid.
- 1a1. ATAS shows an error message.
Use case ends.
Use case: UC13 - Toggle participation
Preconditions : User has entered a session
MSS
- User requests to toggle students’ participation status of the given student index range.
- ATAS toggles the participation status of students.
- ATAS updates the statistics in session and student list.
Use case ends.
Extensions
- 1a. The given index range is invalid.
- 1a1. ATAS shows an error message.
Use case ends.
Use case: UC14 - Choose random name
MSS
- User requests to choose a random name from the student list.
- ATAS shows the name of a random student in the student list.
Use case ends.
Extensions
- 1a. The student list is empty
- 1a1. ATAS shows an error message.
Use case ends.
Use case: UC15 - Exit ATAS
MSS
- User requests to exit ATAS
- ATAS closes
Use case ends.
{ end of requirements#use_cases written by: Zhang Sheng Yang }
{ start of requirements#non_functional_requirements written by: Ngoh Wei Yue }
10.4. Non-functional requirements
- This product should work on any mainstream OS as long as it has Java
11or above installed. - This product should be able to hold up to 500 students and 500 sessions without a noticeable sluggishness in performance for typical usage.
- This product should be optimised for users who can type regular English text (i.e. not code, not system admin commands) fast and prefer typing over other means of input (e.g., mouse).
- This product should be for a single user and should not be a multi-user product.
- This product should not depend on remote servers.
- This product should be able to function without being connected to a network.
- This product should be able to work without requiring an installer.
- Data generated by the product should be stored locally in human-editable file.
- This product should not contain very large file sizes (JAR files - 100Mb, PDF files - 15Mb/file).
{ end of requirements#non_functional_requirements written by: Ngoh Wei Yue }
{ start of requirements#glossary written by: Marcus Tan Wei }
10.5. Glossary
- Mainstream OS: Windows, Linux, Unix, OS-X.
- Matriculation number: A unique alphanumeric number attributed to each NUS student. Follows the format A0123456X, where each digit can be from 0-9 and the last letter can be any alphabet A-Z.
- Tag: A word or phrase the user labels the student as.
{ end of requirements#glossary written by: Marcus Tan Wei }
11. Appendix: instructions for manual testing
Given below are instructions to test the app manually.
{ start of manual_testing#launch_and_shutdown written by: Masagca Eris Jacey }
11.1. Launch and shutdown
-
Initial launch
-
Download the jar file and copy into an empty folder
-
Double-click the jar file Expected: Shows the GUI with a set of sample students and sample sessions. The window size may not be optimum.
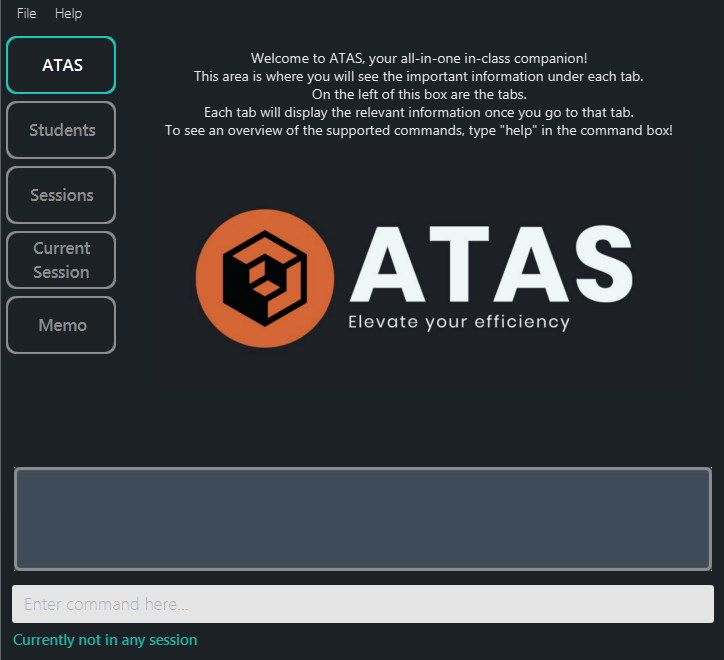
Figure 11.1.1: Application view of the expected window appearance upon launch
-
-
Saving window preferences
-
Resize the window to an optimum size. Move the window to a different location. Close the window.
-
Re-launch the app by double-clicking the jar file.
Expected: The most recent window size and location is retained.
-
{ end of manual_testing#launch_and_shutdown written by: Masagca Eris Jacey }
{ start of manual_testing#switching_between_tabs written by: Ngoh Wei Yue }
11.2. Switching between tabs
-
Prerequisites: Currently on
Studentstab-
Test case:
switch sessions
Expected: ATAS switches to theSessionstab. -
Test case:
switch current
Expected: Tab is not switched. Error message is shown. -
Other incorrect switch commands to try:
switch,switch x,...(where x is not a valid tab name)
Expected: Similar to previous.
-
{ end of manual_testing#switching_between_tabs written by: Ngoh Wei Yue }
{ start of manual_testing#random_name_generator written by: Ngoh Wei Yue }
11.3. Random name generator
-
Prerequisites: At least 1 student exist.
- Test case:
rng
Expected: A student name is randomly generated and displayed to the user.
- Test case:
-
Prerequisites: No student exist.
- Test case:
rng
Expected: No student name is generated. Error message is shown.
- Test case:
{ end of manual_testing#random_name_generator written by: Ngoh Wei Yue }
{ start of manual_testing#undo written by: Ngoh Wei Yue }
11.4. Undo
-
Prerequisites: At least 1 command that can be undone is executed beforehand.
- Test case:
undo
Expected: ATAS returns to the state prior to performing the previous command that can be undone.
- Test case:
-
Prerequisites: No command that can be undone is executed beforehand.
- Test case:
undo
Expected: Error message is shown.
- Test case:
{ end of manual_testing#undo written by: Ngoh Wei Yue }
{ start of manual_testing#redo written by: Ngoh Wei Yue }
11.5. Redo
-
Prerequisites: At least 1 command that can be redone is executed beforehand.
- Test case:
redo
Expected: ATAS returns to the state after performing the previous command that can be redone.
- Test case:
-
Prerequisites: No command that can be redone is executed beforehand.
- Test case:
redo
Expected: Error message is shown.
- Test case:
{ end of manual_testing#redo written by: Ngoh Wei Yue }
{ start of manual_testing#adding_a_student written by: Ngoh Wei Yue }
11.6. Adding a student
-
Prerequisites: List all students using the list command. No students with the same matriculation number or NUS email address as any of the students to be added during testing.
-
Test case:
addstu n/Alvin Boon m/A0123456X e/alvinboon@u.nus.edu
Expected: A student is added to the bottom of the student list. A success message including the particulars of the added student is shown in the result box.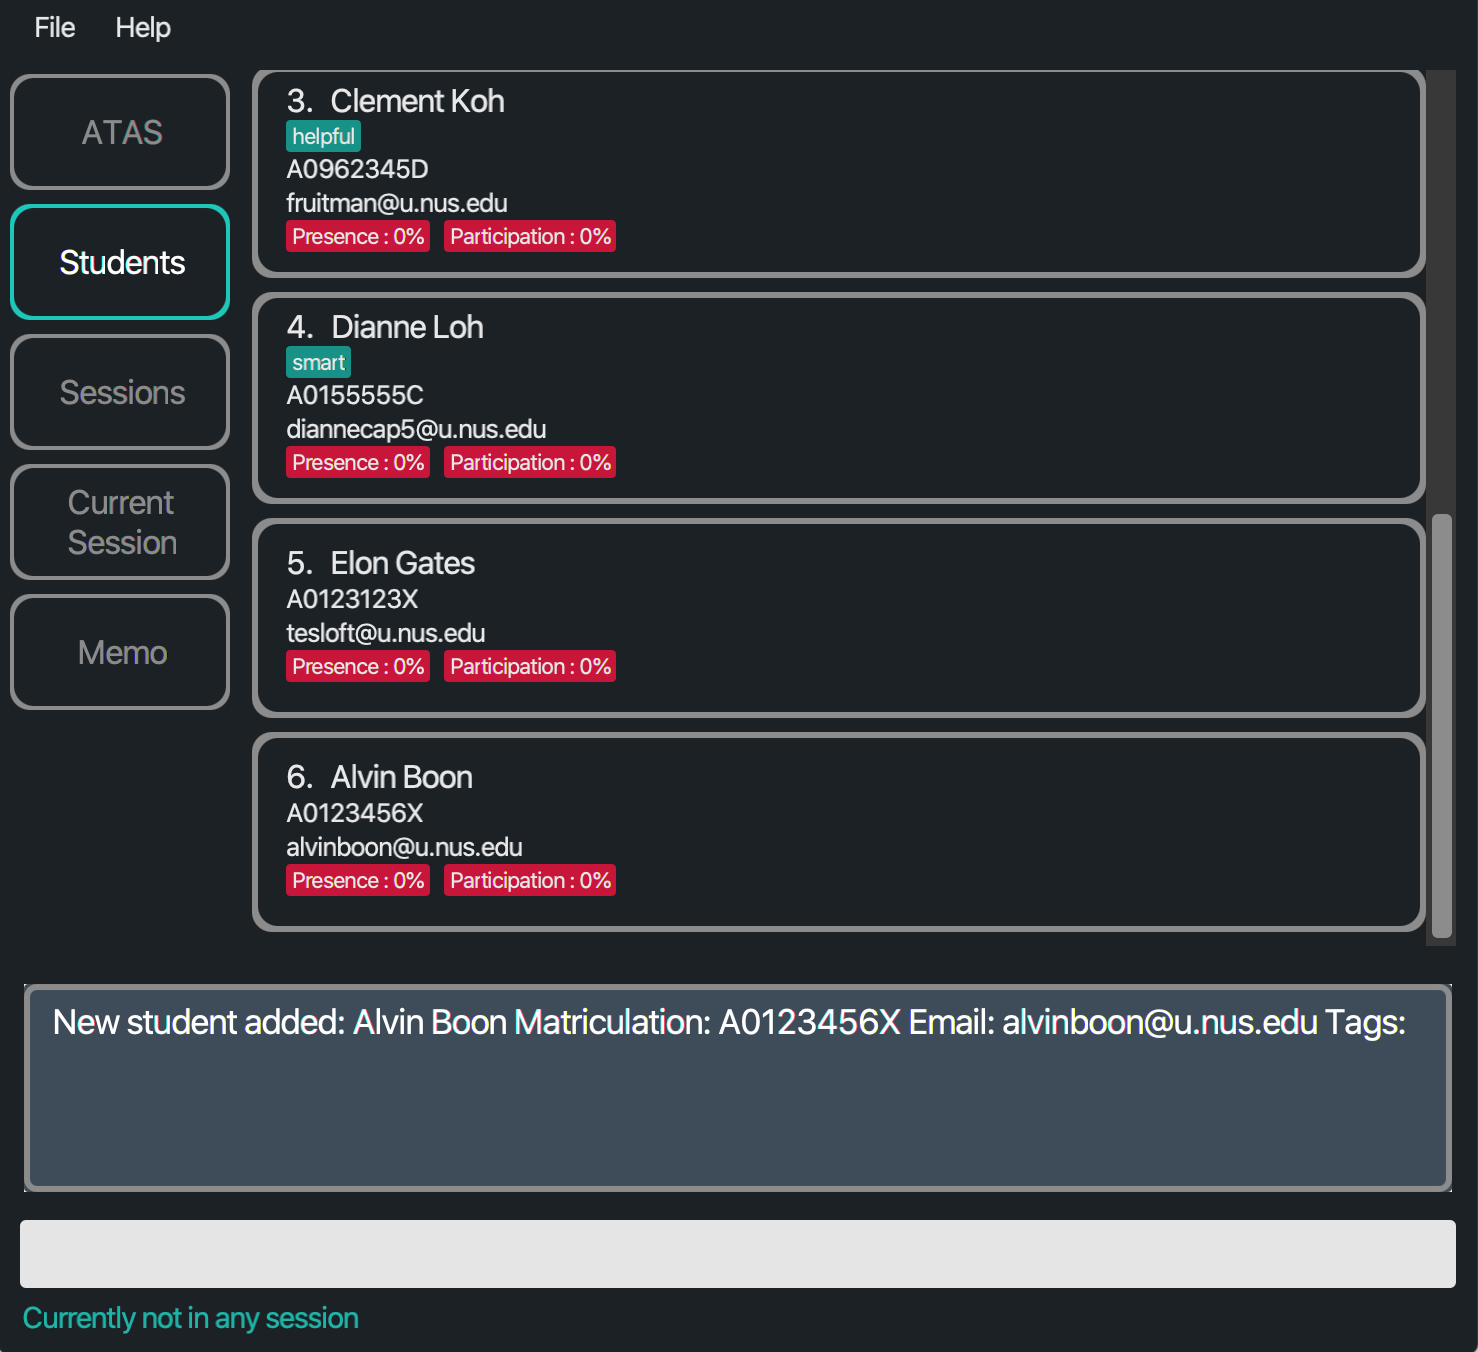
Figure 11.6.1: Application view when a student is successfully added
-
Test case:
addstu n/Cathy Duigan m/A1123456X e/cathyduigan@u.nus.edu t/helpful
Expected: Similar to previous. -
Test case:
addstu m/A2123456X n/Elbert Foo e/elbertfoo@u.nus.edu
Expected: Similar to previous. -
Test case:
addstu n/Gina Ho m/A3123456X
Expected: No student is added. Error message indicating an invalid command format is shown in the result box.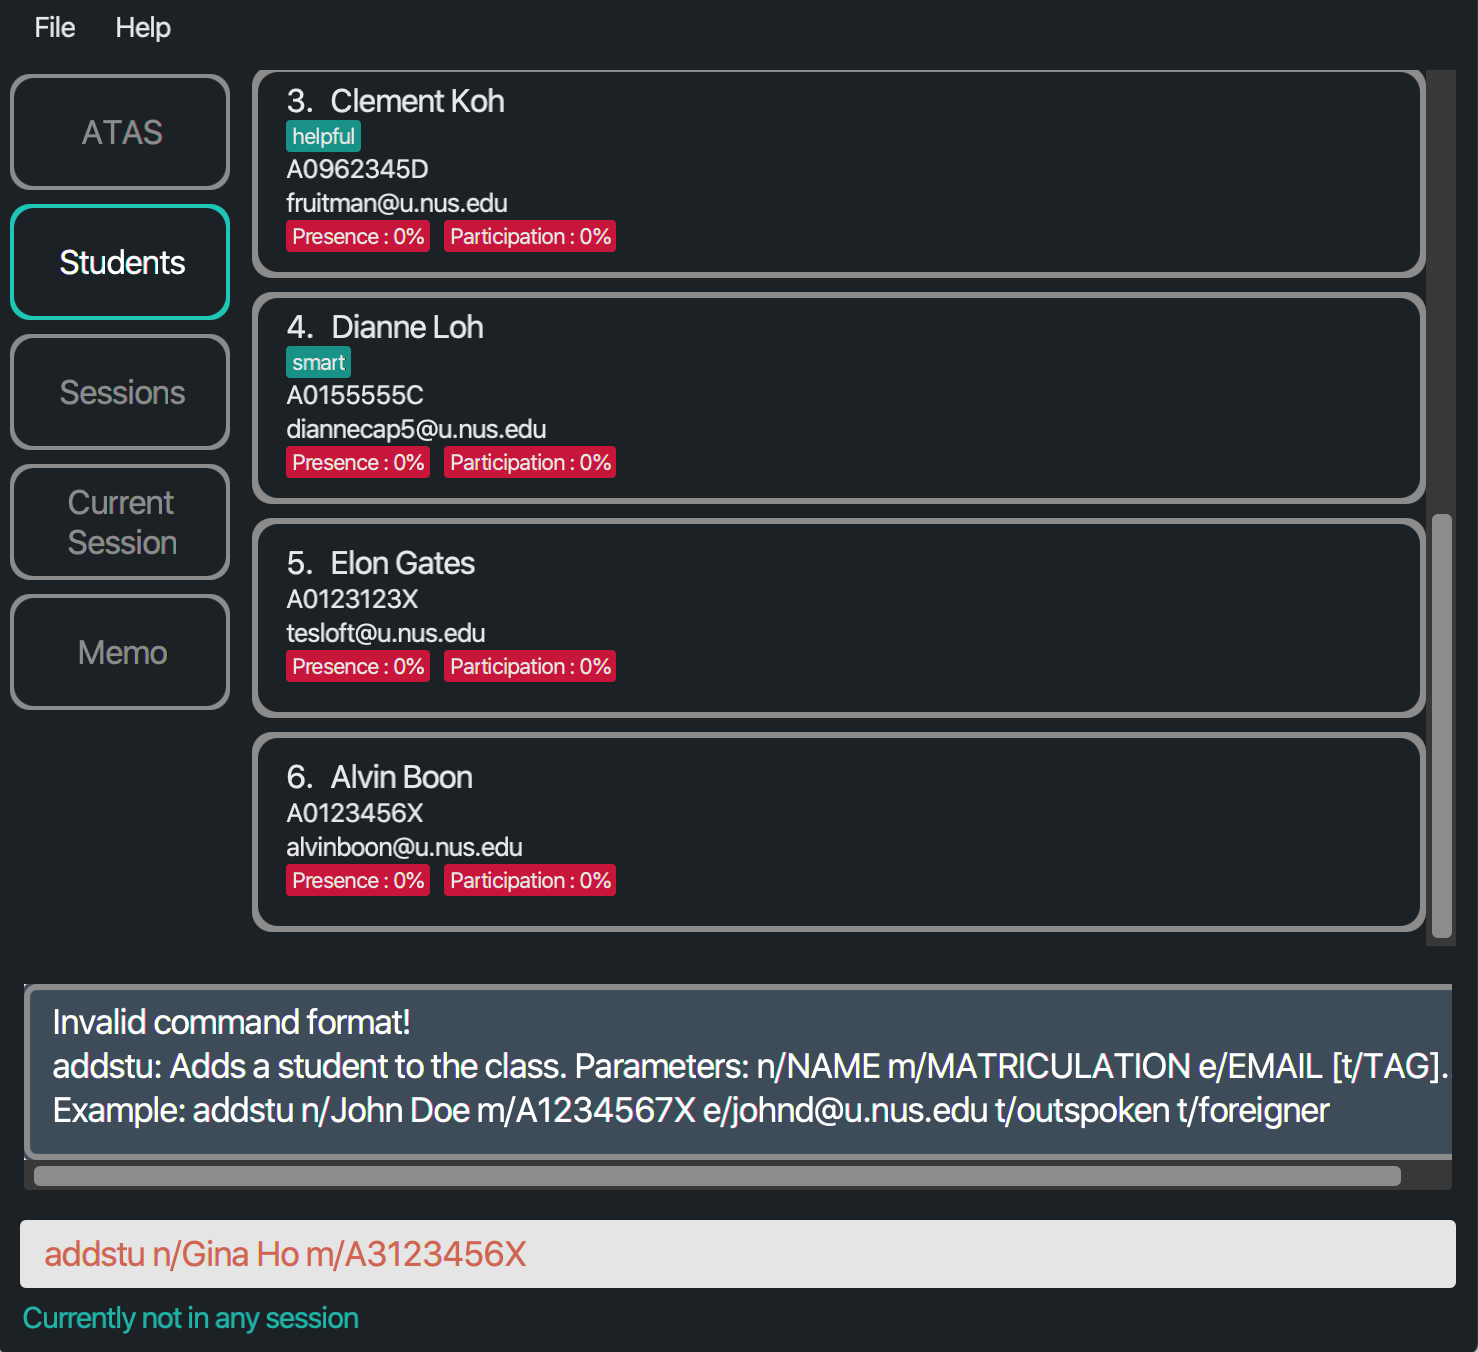
Figure 11.6.2: Application view when a student is not successfully added
-
Test case:
addstu n/Gina Ho e/ginaho@u.nus.edu
Expected: Similar to previous. -
Test case:
addstu m/A3123456X e/ginaho@u.nus.edu
Expected: Similar to previous. -
Test case:
addstu n/Gina Ho m/A31234567 e/ginaho@u.nus.edu
Expected: No student is added. Error message indicating an invalid matric number is shown in the result box. -
Test case:
addstu n/Gina Ho m/A3123456X e/ginaho@u.ntu.edu
Expected: No student is added. Error message indicating an invalid NUS email address is shown in the result box. -
Test case:
addstu n/Gina Ho m/A0123456X e/ginaho@u.nus.edu
Expected: No student is added. Error message indicating that the student already exists is shown in the result box. -
Test case:
addstu n/Gina Ho m/A3123456X e/elbertfoo@u.nus.edu
Expected: No student is added. Error message indicating that the student already exists is shown in the result box. -
Other incorrect commands to try:
addstu,addstu Gina Ho,...
Expected: Similar to previous.
-
{ end of manual_testing#adding_a_student written by: Ngoh Wei Yue }
{ start of manual_testing#deleting_a_student written by: Marcus Tan Wei }
11.7. Deleting a student
Delete a student while ALL student(s) are shown:
-
Prerequisites: List all students using the
liststucommand. Multiple (but less than 100) students in the list.-
Test case:
deletestu 1
Expected: Confirmation prompt to delete the first student from the list. Message of confirmation prompt is shown in the result box. -
Test case 3.1:
yes
Expected: First student on the list is deleted from the list. Message regarding student deletion is shown in the result box. -
Test case 3.2:
no
Expected: First student on the list is not deleted from the list. Message regarding command not executed is shown in the result box. -
Test case:
deletestu 0
Expected: No student is deleted. Invalid index error details shown in the result box. -
Test case:
deletestu 101
Expected: No student is deleted. Invalid index error details shown in the result box. -
Other incorrect delete student commands to try:
deletestu,deletestu x,...(where x is larger than the list size)
Expected: Similar to previous.
-
Delete a student while SOME student(s) are shown:
-
Prerequisites: List some students using
findstucommand. Multiple (but less than 100) students are in the list. One or more (but less than 100) student is shown in the StudentListPanel.-
Test case:
deletestu 1
Expected: Confirmation prompt to delete the first student from the list. Message of confirmation prompt is shown in the result box. -
Test case:
yes
Expected: First student on the list is deleted from the list. Message regarding student deletion is shown in the result box. -
Test case:
no
Expected: First student on the list is not deleted from the list. Message regarding command not executed is shown in the result box. -
Test case:
deletestu 0
Expected: No student is deleted. Invalid index error details shown in the result box. -
Test case:
deletestu 101
Expected: No student is deleted. Invalid index error details shown in the result box. -
Other incorrect delete student commands to try:
deletestu,deletestu x,...(where x is larger than the list size)
Expected: Similar to previous.
-
{ end of manual_testing#deleting_a_student written by: Marcus Tan Wei }
{ start of manual_testing#adding_a_session written by: Alvin Chee Teck Weng }
11.8. Adding a session
-
Prerequisites: Multiple (but less than 100) sessions in the session list.
-
Test case:
addses s/Tutorial 6 d/12/7/2020
Expected: A session is added to the bottom of the session list. A success message including the details of the added session is shown in the result box. -
Test case:
addses s/Tutorial 7 d/25/12/2020
Expected: A session is added to the top of the session list. A success message including the details of the added session is shown in the result box. -
Test case:
addses s/Tutorial 8 d/30/12/2020
Expected: Similar to previous. -
Test case:
addses s/Tutorial 9
Expected: No session is added. Error message indicating an invalid command format is shown in the result box. -
Test case:
addses d/30/12/2020
Expected: Similar to previous. -
Test case:
addses s/Tutorial 6 d/25/7/2020
Expected: No session is added. Error message indicating that the session already exists is shown in the result box. -
Test case:
addses s/Tutorial 8 d/30/12/2020
Expected: No session is added. Error message indicating that the session already exists is shown in the result box.
-
{ end of manual_testing#adding_a_session written by: Alvin Chee Teck Weng }
{ start of manual_testing#deleting_a_session written by: Marcus Tan Wei }
11.9. Deleting a session
-
Prerequisites: Multiple (but less than 100) sessions in the session list.
-
Test case:
deleteses 1
Expected: Confirmation prompt to delete the first session from the session list. Message of confirmation prompt is shown in the result box. -
Test case:
yes
Expected: First session on the list is deleted from the list. Message regarding session deletion is shown in the result box. -
Test case:
no
Expected: First session on the list is not deleted from the list. Message regarding command not executed is shown in the result box. -
Test case:
deleteses 0
Expected: No session is deleted. Invalid index error details shown in the ResultDisplay. -
Test case:
deleteses 101
Expected: No session is deleted. Invalid index error details shown in the ResultDisplay.
-
-
Prerequisites: Multiple (but less than 100) sessions in the session list. Multiple students in the student list. Some sessions have marked participation and presence.
-
Test case:
deleteses 1
Expected: Confirmation prompt to delete the first session from the session list. Message of confirmation prompt is shown in the result box. -
Test case:
yes
Expected: First session on the list is deleted from the list. Message regarding session deletion is shown in the result box. Statistics of students will change accordingly, taking into account of removed session.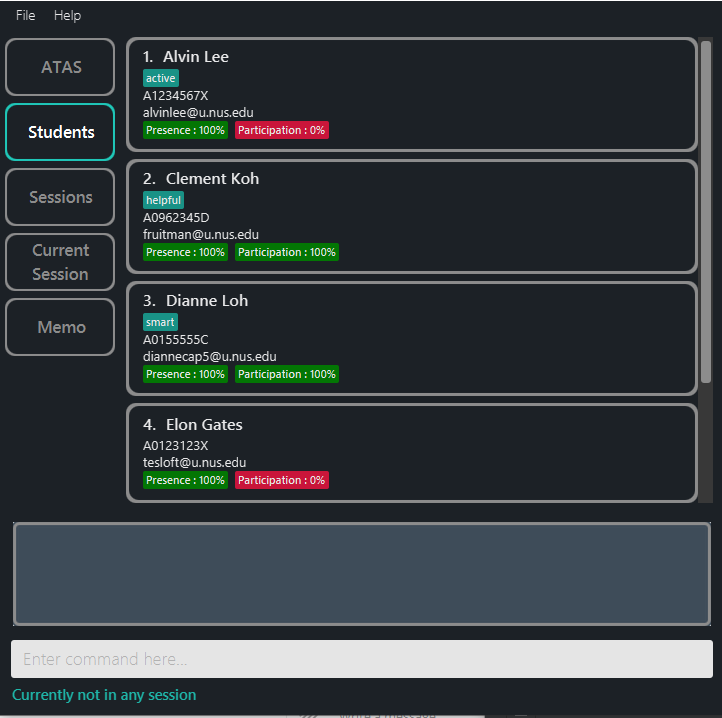
Figure 11.9.1: Application view of students statistics before deleting session
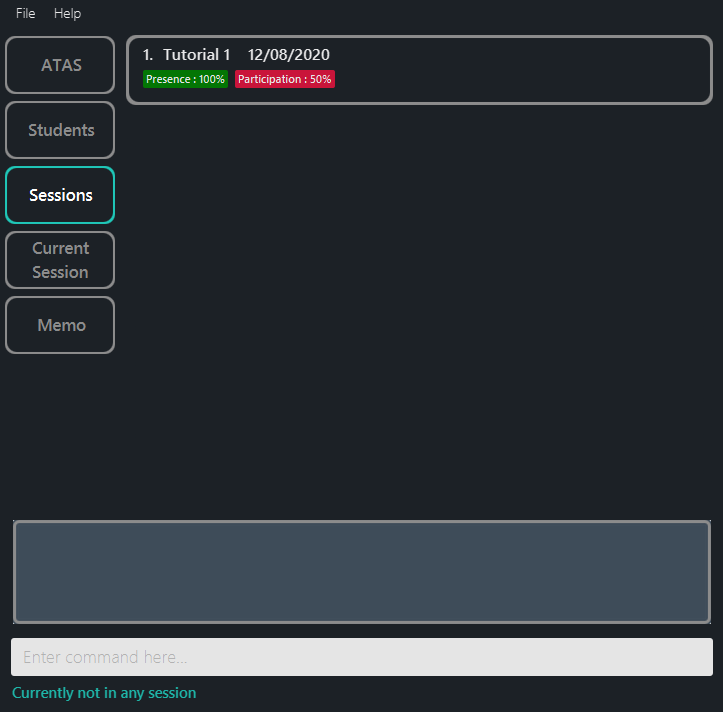
Figure 11.9.2: Application view of sessions in the session list
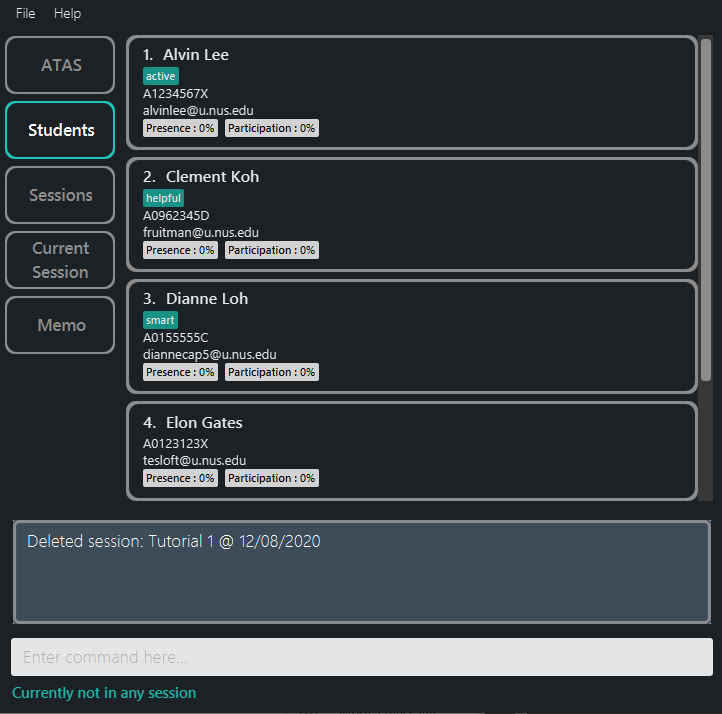
Figure 11.9.3: Application view of students statistics after session is deleted
-
Test case:
no
Expected: First session on the list is not deleted from the list. Message regarding command not executed is shown in the result box. -
Test case:
deleteses 0
Expected: No session is deleted. Invalid index error details shown in the result box. -
Test case:
deleteses 101
Expected: No session is deleted. Invalid index error details shown in the result box.
-
{ end of manual_testing#deleting_a_session written by: Marcus Tan Wei }
{ start of manual_testing#enter_session written by: Ngoh Wei Yue }
11.10. Entering a session
-
Prerequisites: At least 1 session exist.
-
Test case:
enterses 1
Expected: ATAS switches to theCurrent Sessiontab and the first session is entered. A simplified student list is shown. -
Test case:
enterses 0
Expected: No session is entered. Error message is shown. -
Other incorrect enter session commands to try:
enterses,enterses x,...(where x is larger than the size of the session list)
Expected: Similar to previous.
-
-
Prerequisites: No session exist.
- Test case:
enterses 1
Expected: Error message is shown.
- Test case:
{ end of manual_testing#enter_session written by: Ngoh Wei Yue }
{ start of manual_testing#participate written by: Ngoh Wei Yue }
11.11. Participate
-
Prerequisites: User has entered a session. At least three students exist.
-
Test case:
participate 1
Expected: Participation label of student at index 1 is toggled and changes color. -
Test case:
participate 1-3
Expected: Participation labels of students at index 1 to 3 are toggled and changes color. -
Test case:
participate 0
Expected: Participation labels remain the same. Error message is shown. -
Other incorrect participate commands to try:
participate,participate x,participate 1-x,...(where x is larger than the size of the student list)
Expected: Similar to previous.
-
-
Prerequisites: User has not entered session.
-
Test case:
participate 1
Expected: Error message is shown. -
Test case:
participate 0
Expected: Similar to previous. -
Other incorrect participate commands to try:
participate,participate x,participate 1-x,...(where x is larger than the size of the student list)
Expected: Similar to previous.
-
{ end of manual_testing#participate written by: Ngoh Wei Yue }
{ start of manual_testing#presence written by: Ngoh Wei Yue }
11.12. Presence
-
Prerequisites: User has entered a session. At least three students exist.
-
Test case:
presence 1
Expected: Presence label of student at index 1 is toggled and changes color. -
Test case:
presence 1-3
Expected: Presence labels of students at index 1 to 3 are toggled and changes color. -
Test case:
presence 0
Expected: Presence labels remain the same. Error message is shown. -
Other incorrect presence commands to try:
presence,presence x,presence 1-x,...(where x is larger than the size of the student list)
Expected: Similar to previous.
-
-
Prerequisites: User has not entered session.
-
Test case:
presence 1
Expected: Error message is shown. -
Test case:
presence 0
Expected: Similar to previous. -
Other incorrect presence commands to try:
presence,presence x,presence 1-x,...(where x is larger than the size of the student list)
Expected: Similar to previous.
-
{ end of manual_testing#presence written by: Ngoh Wei Yue }
{ start of manual_testing#adding_a_note written by: Ngoh Wei Yue }
11.13. Adding a note
-
Prerequisites: None
-
Test case:
addnote hello
Expected: “Hello” is added on to a new line at the end ofMemoBox. -
Test case:
addnote
Expected: “ “ is added on to a new line at the end ofMemoBox. -
Test case:
addnoteExpected: Error message is shown.
-
{ end of manual_testing#adding_a_note written by: Ngoh Wei Yue }
{ start of manual_testing#saving_the_memo written by: Ngoh Wei Yue }
11.14. Saving the memo
-
Prerequisites: Focus is on
MemoBox(outline ofMemoBoxis in turquoise). User is using a Windows/Linux machine.-
Test case: The
ctrlkey is pressed and held down while theskey is being pressed.
Expected: Content inMemoBoxis saved into hard disk. -
Test case: Other keys besides the one mentioned previously is pressed.
Expected: Nothing happens.
-
-
Prerequisites: Focus is on
MemoBox(outline ofMemoBoxis in turquoise colour). User is using a MacOS machine.-
Test case: The
commandkey is pressed and held down while theskey is being pressed.
Expected: Memo is saved into hard disk. Success message is shown. -
Test case: Other keys or key combinations besides the one mentioned previously is pressed.
Expected: Nothing happens.
-
-
Prerequisites: User is not in
Memotab or focus is not onMemoBox(outline ofMemoBoxis not in turquoise colour).- Test case: Any keys or key combinations is pressed.
Expected: Nothing happens.
- Test case: Any keys or key combinations is pressed.
{ end of manual_testing#saving_the_memo written by: Ngoh Wei Yue }
{ start of appendix written by: Masagca Eris Jacey }
12. Appendix: effort
Difficulty level:
The overall difficulty level of the project was relatively high. For most of our team, this was our first significant foray into the world of software engineering, and specifically our first time working in a group to develop a medium-sized application.
Challenges faced:
- It was our first time working on a brown-field project, so a few weeks were needed just to get used to the existing codebase.
- It was also our first time dealing with some of the libraries and frameworks used in this project (like Jackson), so a bit of time was needed to be familiar with them.
- (in the beginning especially) We faced issues regarding project management (specifically role delegation), and we had troubles with resolving merge conflicts and meeting deadlines in our first iteration.
- With each new iteration, we would sometimes face regression issues, as some new features would cause older ones to be buggy.
- AB3 only dealt with a single entity type, but for ATAS, we had to deal with multiple entity types (students, sessions, attributes) which had their own specific set of complications and subtle differences in implementations.
- Significant time had to be spent on fixing and refining the following features:
- “current session”: This was an integration feature done during an early iteration when we were still relatively unfamiliar with the codebase.
- “undo/redo”: This was a feature that was hard to get right because of the different entity types being slightly different in nature. (“students” were a “one-layer” entity while each “session” had their own list of “attributes”, making it a “two-layer” entity)
Effort required:
- Weekly meetings were held (about 2 hours every Wednesday) to review what had been done in the week prior, as well as discuss future tasks for the next week.
- Our team worked tirelessly week in and week out for several (~7) weeks, sparing no effort during each iteration (on both new implementations as well as making sure the older ones aren’t buggy).
- We emphasized on communication being key and ensured the following:
- No PR (made by one teammate) would be merged unless explicitly reviewed and approved by another teammate.
- Queries, no matter how small, would be answered promptly in our shared Telegram group channel.
- Each meeting was productive and preparations were made prior to each in the form of a meeting agenda.
- Conflicts were resolved amicably.
Achievements:
- Overall, we managed to develop a product that we could be proud of.
- Each team member was absolutely vital to the success of the completion of ATAS. Everyone had a distinct role to play and was more than willing to help one another out with their respective tasks.
- Our team has learned a lot throughout the development of ATAS.
We have become significantly more adept to handling the different aspects of software engineering, including (but not limited to):
- General programming competencies (especially in Java) (adhering to code style, improved OOP skills, etc.)
- Project management (meeting deadlines and deliverables)
- Good documentation writing (user guide, developer guide, etc.)
- Conflict resolution
- This project has only made us hungrier and ready to overcome more challenges in the realm of software development in the future.
{ end of appendix written by: Masagca Eris Jacey }