User Guide
{ start of table_of_contents written by: Masagca Eris Jacey }
{ end of table_of_contents written by: Masagca Eris Jacey }
1. Introduction
{ start of introduction#elevate_your_efficiency written by: Masagca Eris Jacey }
1.1. Elevate your efficiency
Hello, fellow teaching assistants of CS1010S!
Have you ever struggled with keeping track of all your students’ attendance and participation status for each of your classes?
Have you ever needed to make a mental note in class, only to forget about it because there was no convenient place to write it in?
Have you ever wished an application would have a more streamlined Command Line Interface to suit your typing prowess?
If you found yourself saying yes to any of the above, then ATAS (Addendum for Teaching Assistants) is the in-class management application for you! Made by teaching assistants, for teaching assistants, ATAS aims to elevate your efficiency and make your experience handling administrative tasks while in class as seamless as possible.
{ end of introduction written by: Masagca Eris Jacey }
{ start of introduction#overview written by: Masagca Eris Jacey }
1.2. Overview
ATAS is a desktop application designed to be your handy in-class companion, optimized for use via a Command Line Interface (CLI) while still having the benefits of a Graphical User Interface (GUI). If you can type really quickly, ATAS will help you to manage your in-class administrative needs more efficiently than traditional GUI apps.
![]() Going forward, to minimize ambiguity, the following terms will be named as such:
Going forward, to minimize ambiguity, the following terms will be named as such:
-
classeswill be henceforth referred to assessions. -
attendance(of student(s)) will be henceforth referred to aspresence.
See the parts under session and presence in the glossary for more information.
Specifically, ATAS allows you to keep track of four different aspects (see Section 4 - Layout of ATAS for a graphical visualization for each aspect):
-
Students
- Keep track of all students assigned to you
- Store their matriculation number, NUS email address, and relevant tag(s) (if any)
-
Sessions
- Keep track of all sessions you will be holding for the academic year
- These will likely mostly consist of tutorial sessions, but can include consultations as well
-
Current session
- Keep track of student progress within each session itself
- Specifically, for each session, keep track of each student’s
participationandpresence
-
Memo:
- Keep track of any note you think you will need to remember for later use
- For example, take note of any interesting question raised by your student so you can follow it up with him/her after the session
{ end of introduction#overview written by: Masagca Eris Jacey }
{ start of introduction#preview written by: Marcus Tan Wei }
1.3. Preview
The following is the GUI of our application:
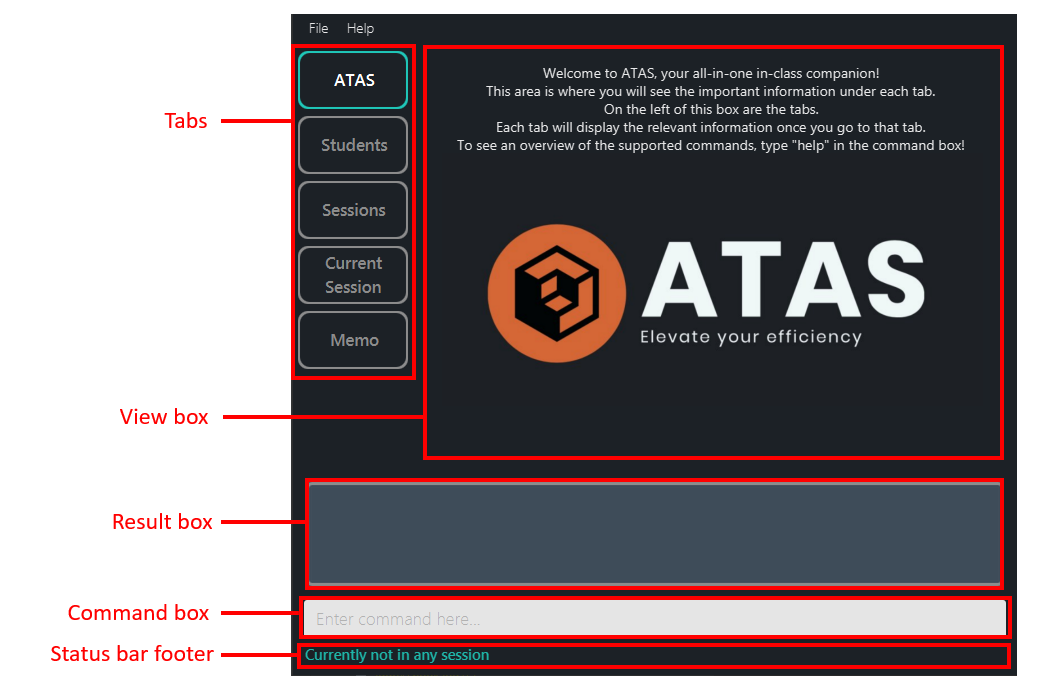
Figure 1.3.1: UI Preview
GUI Components:
- Command box: where you enter your commands.
- Result box: where the result of a command will be shown. It can show a success message, or a failure message if something wrong happens.
- Status bar footer: shows which session you are currently in.
- Tabs: shows what item type you are viewing.
- View box: where the details of the items will be shown.
{ end of introduction#preview written by: Marcus Tan Wei }
{ start of about_this_user_guide written by: Masagca Eris Jacey }
2. About this user guide
Our aim when writing this user guide is to help you - a new user - to get started with ATAS as quickly as possible. This includes providing you with all the information you will need as concisely as possible to start using ATAS. This guide features all the available commands, their syntax, as well as specific examples for illustration purposes.
{ end of about_this_user_guide written by: Masagca Eris Jacey }
{ start of about_this_user_guide#navigation written by: Masagca Eris Jacey }
2.1. Navigation
To help ease your navigation within this document, we have included numbers for each header, as well as links to their respective part (in the table of contents, and whenever they are referenced) in the guide.
Additionally, here are the relevant places you can go to if you would like to seek clarification on more specific parts:
- If you would like to get started on using ATAS, head over to Section 3 - Quick start.
- If you would like to see the features available for ATAS, head over to Section 5 - Features.
- If you would like a quick summary of the available commands for ATAS, head over to Section 7 - Command summary.
{ end of about_this_user_guide#navigation written by: Masagca Eris Jacey }
{ start of about_this_user_guide#glossary written by: Marcus Tan Wei }
2.2. Glossary
You will come across some of these terms in this document, and it will be good to have a clear understanding of what these terms mean.
| Term | Explanation |
|---|---|
| command | A line of text that you can type into the command box for the application to execute. |
| GUI | Graphical User Interface (GUI) is a type of user interface through which user interacts with electronic devices through visual representations. |
| index | The position of an item (student or session) in a displayed list. For simplicity, indexes start from 1. |
| memo | A brief written message written by you for note-taking. |
| parameter | Specific information that you input. |
| participate | An attribute indicating if a student has participated in the session or not. |
| presence | An attribute indicating if a student is present in the session or not. |
| session | A tutorial session or lesson that you conduct. |
| student | A person that is in your tutorial class. |
| tag(s) | Keyword(s) tagged to a student for your own identification purpose. |
| Ui | User interface (Ui) is the means by which user and a computer system interact. |
{ end of about_this_user_guide#glossary written by: Marcus Tan Wei }
{ start of about_this_user_guide#symbols_and_formatting written by: Marcus Tan Wei }
2.3. Symbols and formatting
For the good majority of visual learners, we figured to present information in a unique format with symbols of different shapes and colours to help you along reading this guide.
| Symbol/Format | Explanation |
|---|---|
| Tips | |
| Example(s) | |
| Important information to take note | |
| Warning about the usage of a command | |
consolas font |
Representing a key term or a command |
{ end of about_this_user_guide#symbols_and_formatting written by: Marcus Tan Wei }
{ start of quick_start written by: Alvin Chee Teck Weng and Marcus Tan Wei }
3. Quick start
-
Ensure you have Java
11or above installed in your Computer. -
If you do not have Java version
11and above installed, download it from here. Remember to choose the installer that fits your computer. -
Download the latest
atas.jarfrom here. -
Copy the file to the folder you want to use as the home folder for your ATAS. All the data related to ATAS will be stored here.
-
Double-click the file to start the app.
-
If double-clicking do not work:
a. For Windows users, you can type “cmd” in the folder path bar to open up command prompt in that directory and type “java -jar atas.jar” in the command prompt. (Figure 3.1)
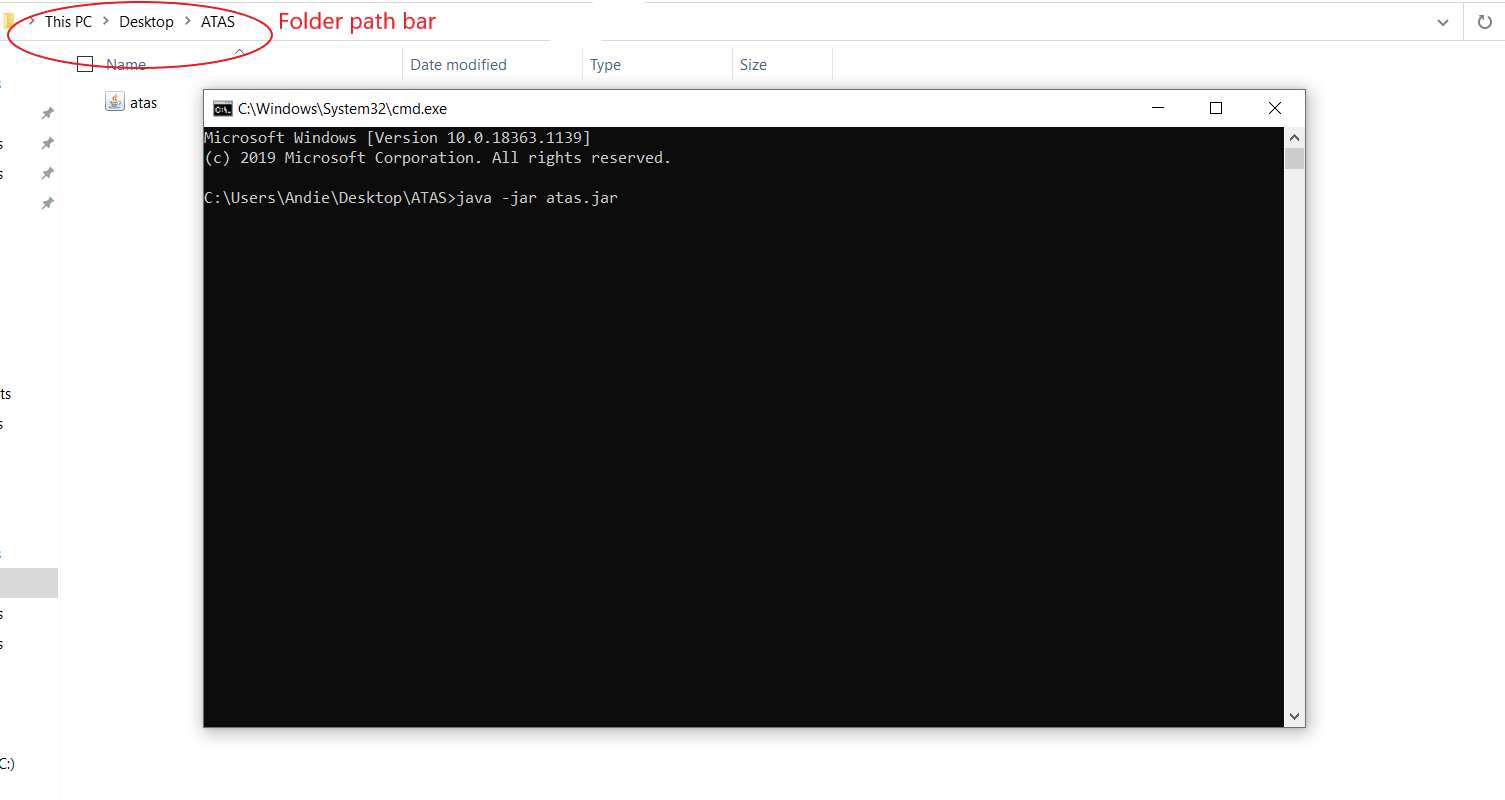
Figure 3.1: Welcome page
b. For Mac users, you can right click the folder you saved atas.jar in and click on “New Terminal at Folder” and type “java -jar atas.jar” in the terminal. (Figure 3.2)
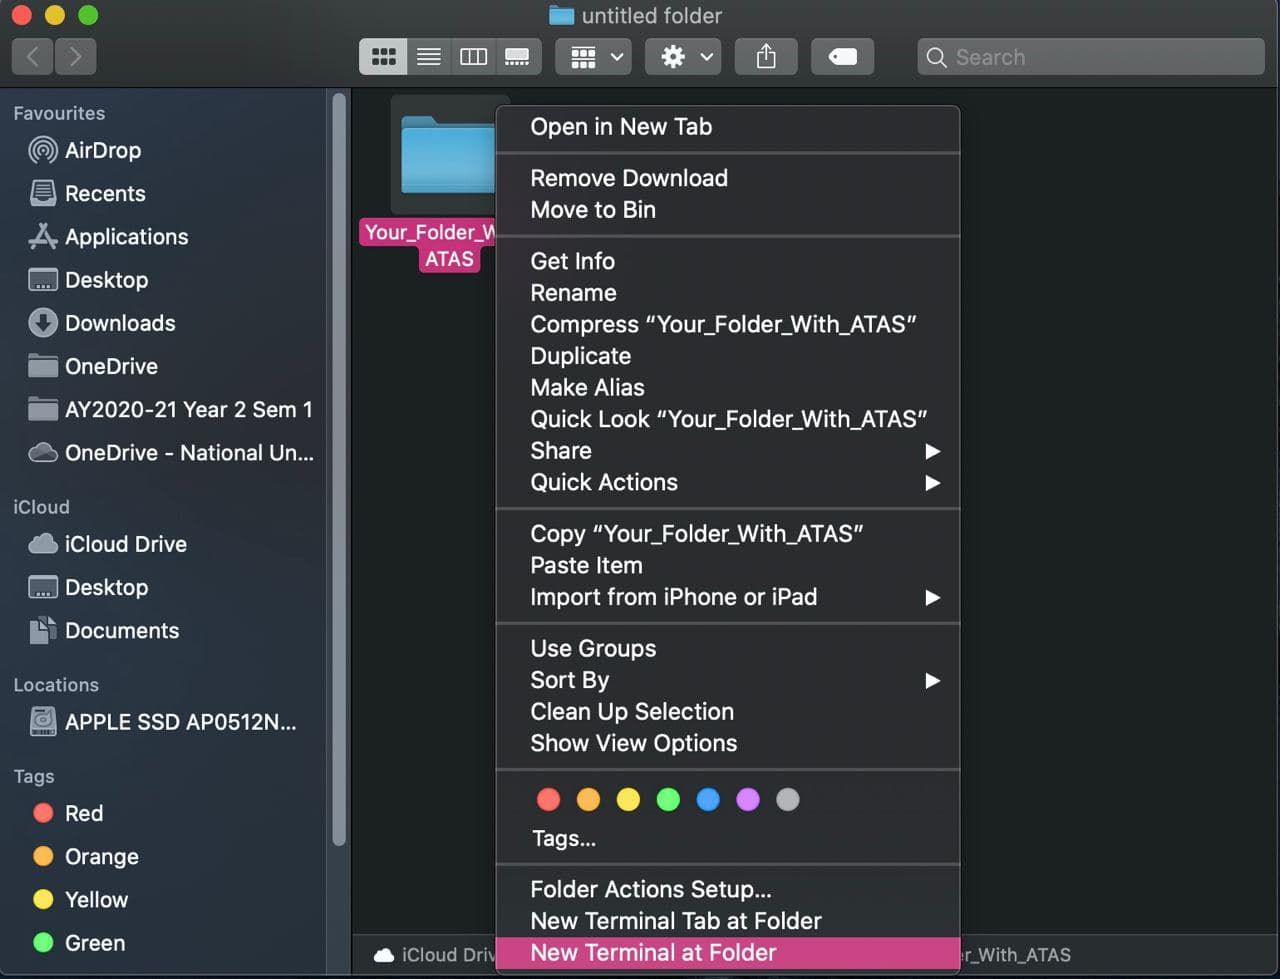
Figure 3.2: Welcome page
-
The GUI similar to the below image should appear in a few seconds.
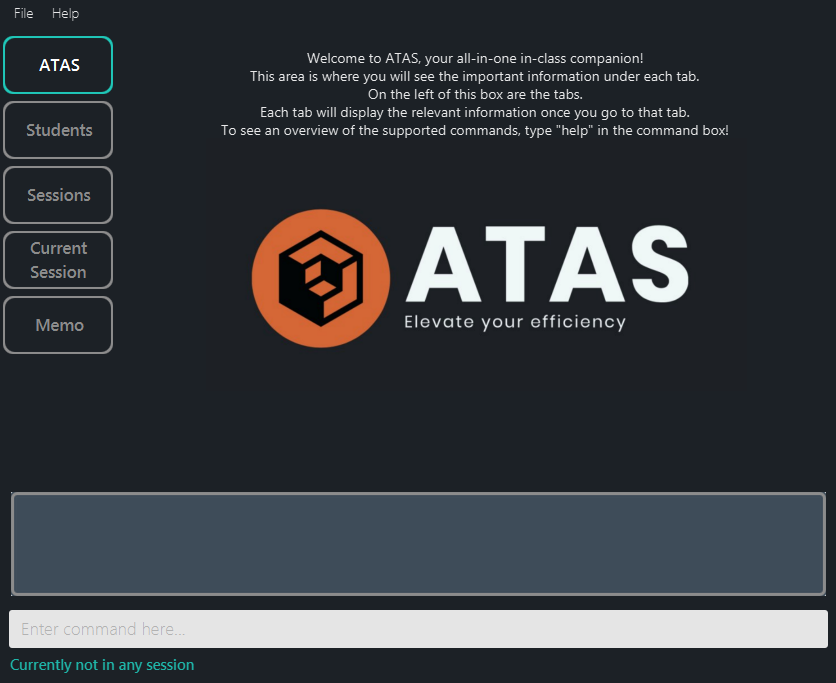
Figure 3.3: Welcome page
-
Now click on the Student tab and notice how the app contains some sample data.
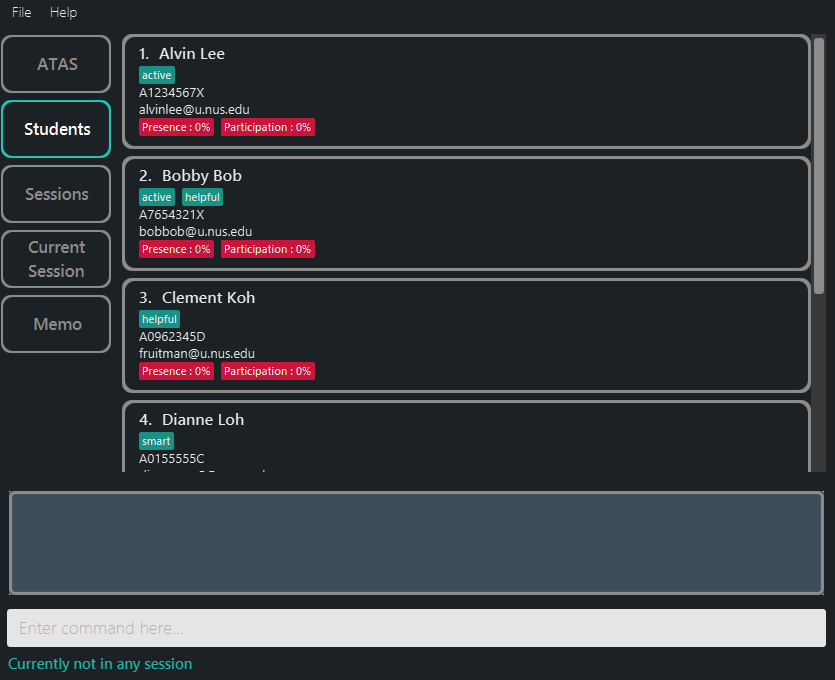
Figure 3.4: Student sample data
-
Type the command in the command box and press Enter to execute it. e.g. typing
helpand pressing theEnterkey will open the help window.
Some example commands you can try:-
liststu: Lists out all the students. -
addstu n/Elvin Ng m/A0123456X e/elvinng@u.nus.edu: Adds a student namedElvin Ngto the student list. -
deleteses 3: Deletes the 3rd session shown in the current session list. -
editses 3 s/Tutorial 2: Edits the 3rd session name toTutorial 2. -
clearstu: Deletes all the students. -
exit: Exits out of the application.
-
-
Refer to the Features below for details of each command.
{ end of quick_start written by: Alvin Chee Teck Weng and Marcus Tan Wei }
{ start of layout_of_atas written by: Ngoh Wei Yue }
4. Layout of ATAS
Over here, you can familiarise yourself with the different UI components of ATAS. ATAS comprises of five different tabs, including a default home tab which can be seen in Section 1.3 - Preview. Each of the remaining four tabs (Students, Sessions, Current Session and Memo) supports its respective section of features. All four of these tabs uses the same result box and command box.
To allow you to easily keep track of students presence and participation records, ATAS will automatically do some calculations and display them as statistics in the Students, Sessions and Current Session tabs. The details of the calculation differs for each tab, and you can find out more about them under each sub-header.
{ end of layout_of_atas written by: Ngoh Wei Yue }
{ start of layout_of_atas#students written by: Ngoh Wei Yue }
4.1. Students
The following is how the Students tab looks like:
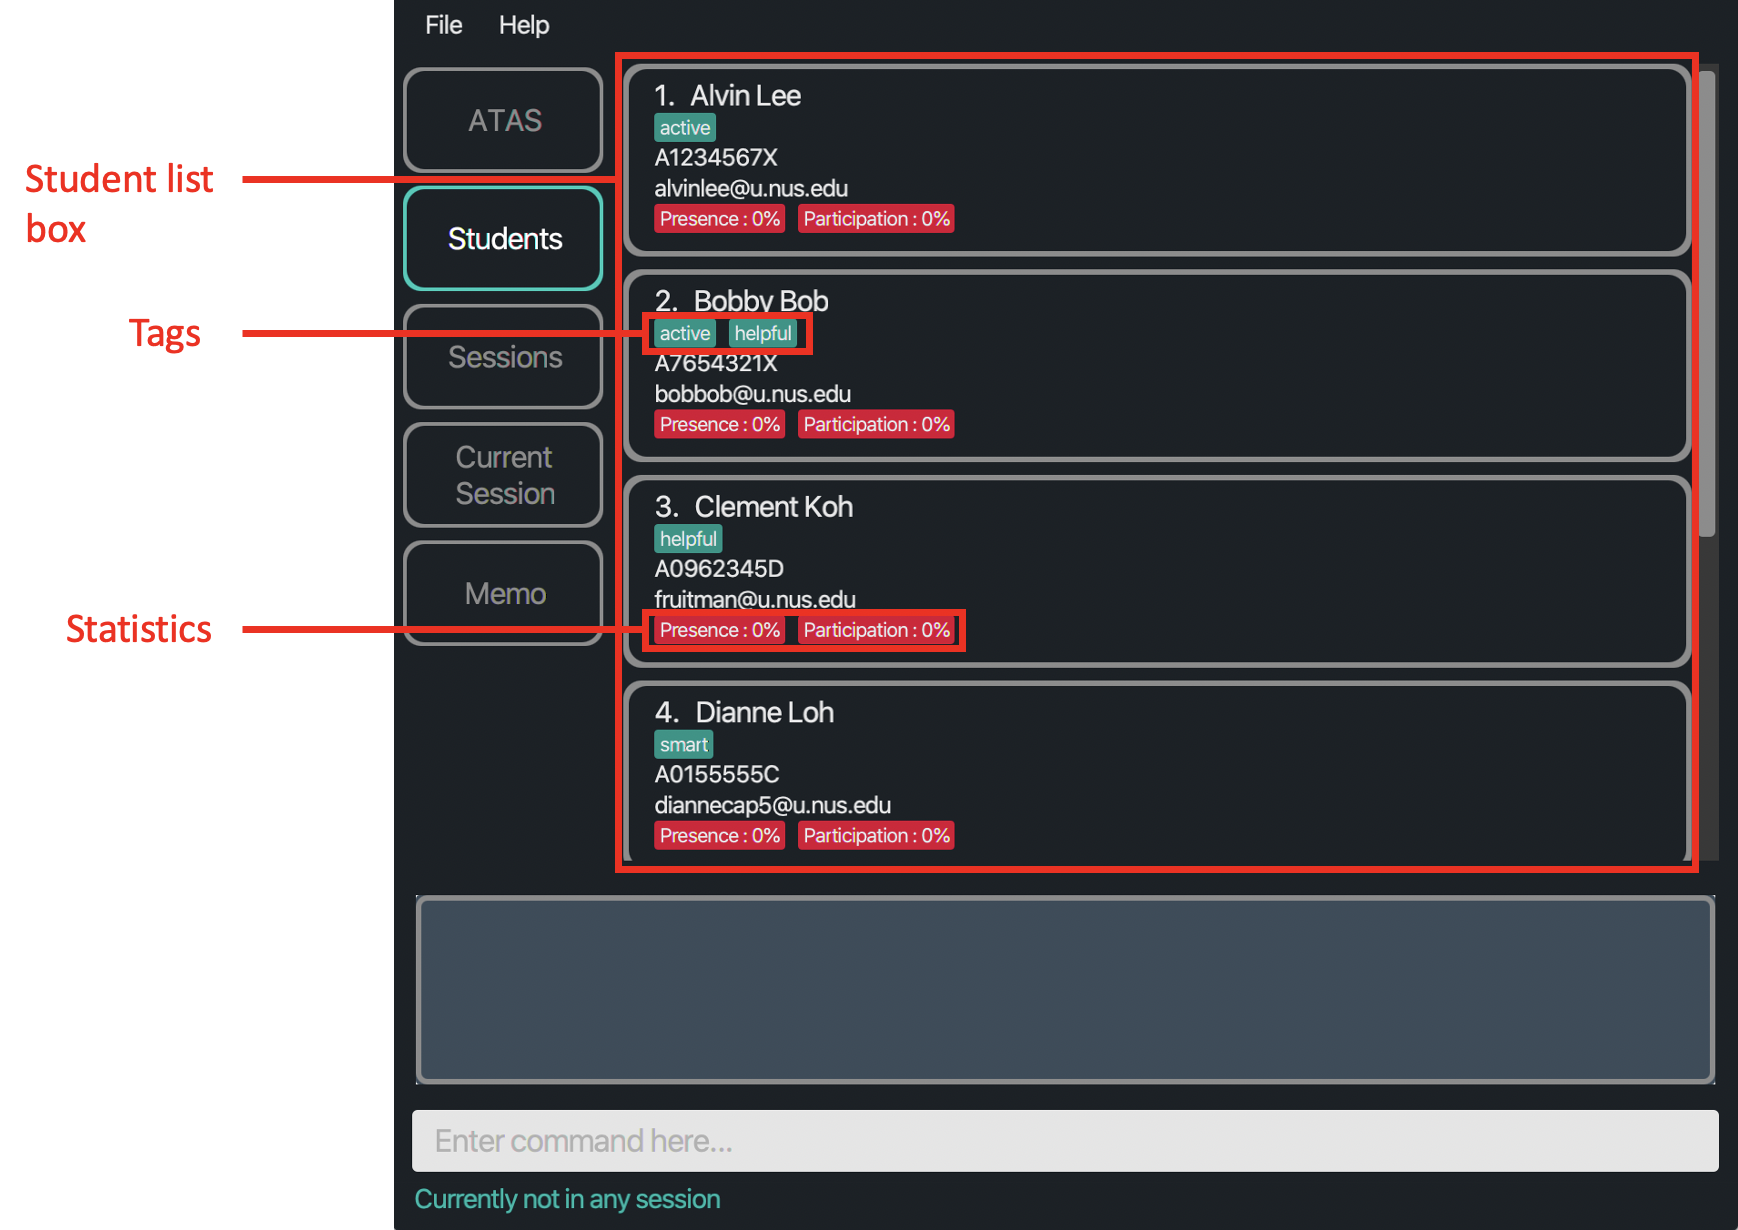
Figure 4.1.1: Layout of Students tab when there is at least one student
Notes:
- Student list box: Contains a list of students and their particulars such as their name, matriculation number, NUS email address and tag(s) (if any). Tags are highlighted in a turquoise colour and students are arranged in the order that you add them.
- Statistics: Calculated as a percentage of the number of sessions the student was present or has participated out of all the available sessions.
![]() Notes about the color code of a student’s statistics:
Notes about the color code of a student’s statistics:
| Colour | Meaning |
|---|---|
| Grey | There are no sessions |
| Red | Student was not present or did not participate in all the sessions (<100%) |
| Green | Student was present or has participated in all the sessions (100%) |
If there are no students in your list, you will see a message indicating as such.
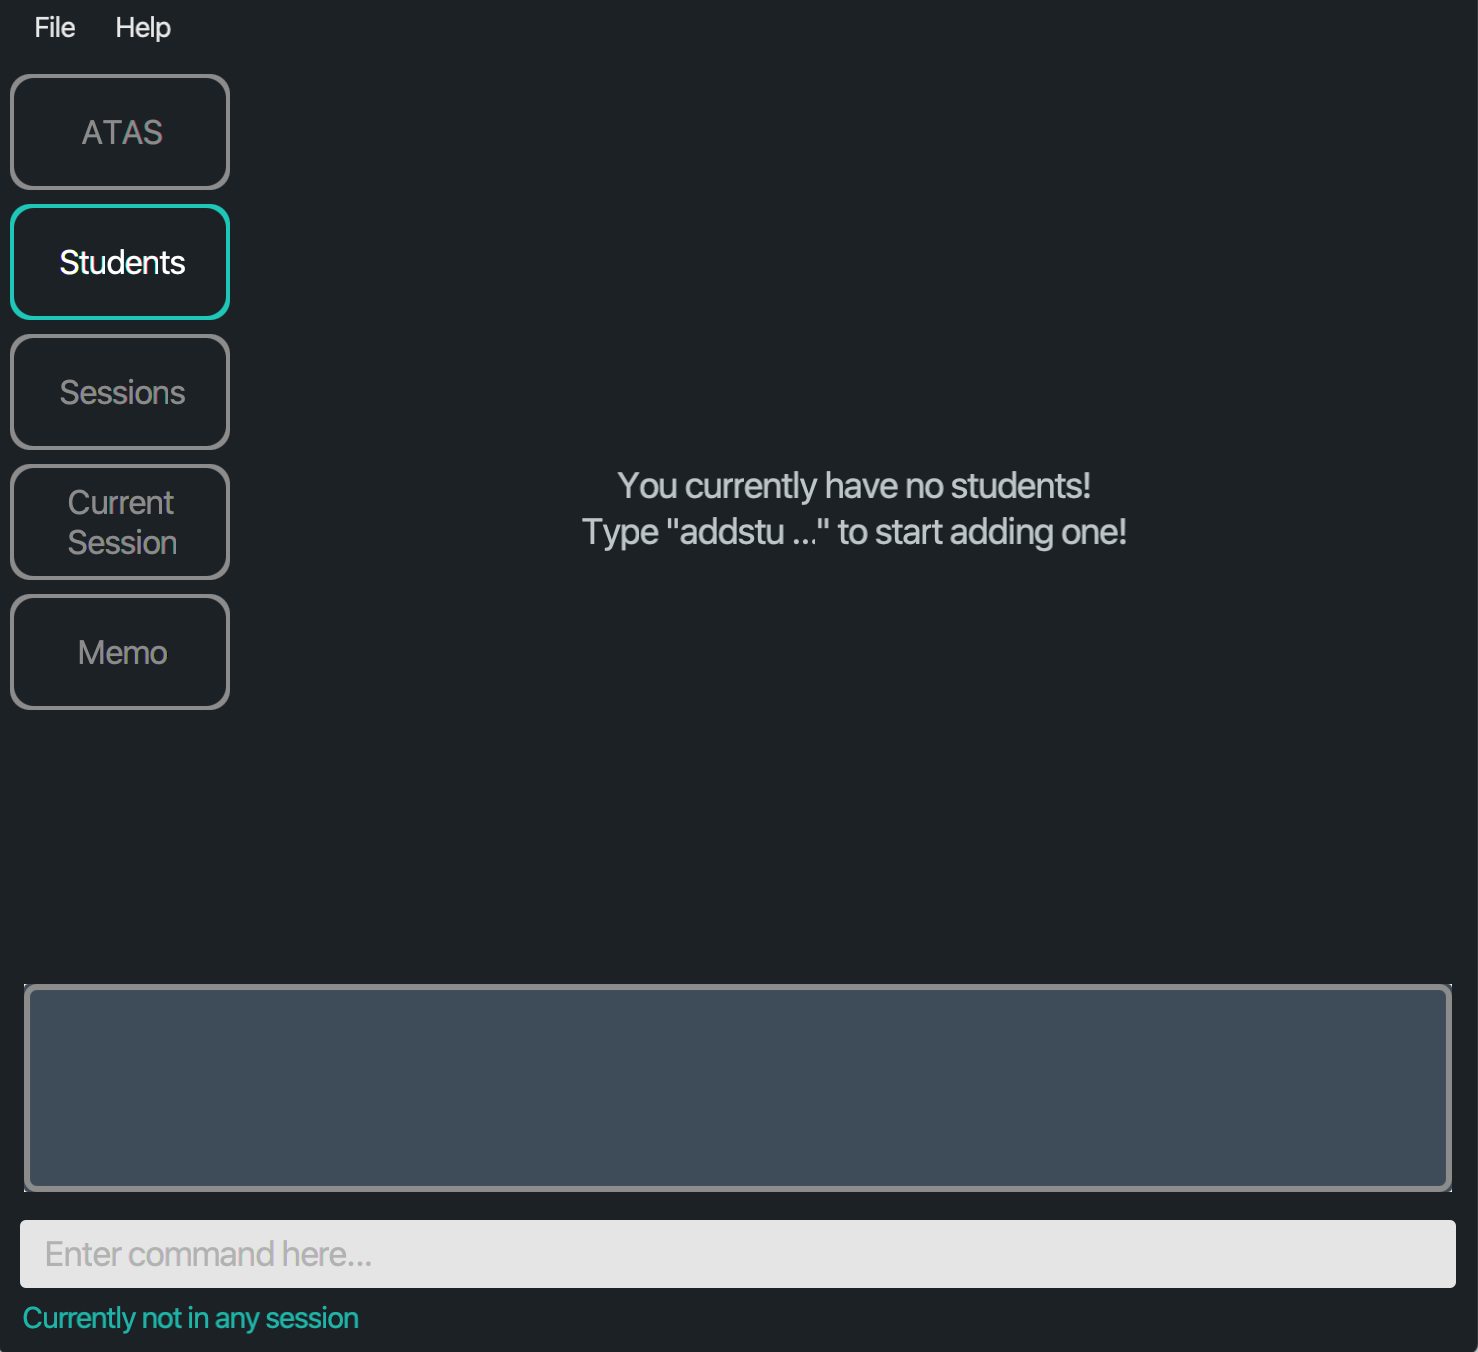
Figure 4.1.2: Layout of Students tab when there are no students
To find out which features are supported by the Students tab, you can head over to Section 5.3 - Students.
{ end of layout_of_atas#students written by: Ngoh Wei Yue }
{ start of layout_of_atas#sessions written by: Ngoh Wei Yue }
4.2. Sessions
The following is how the Sessions tab looks like:
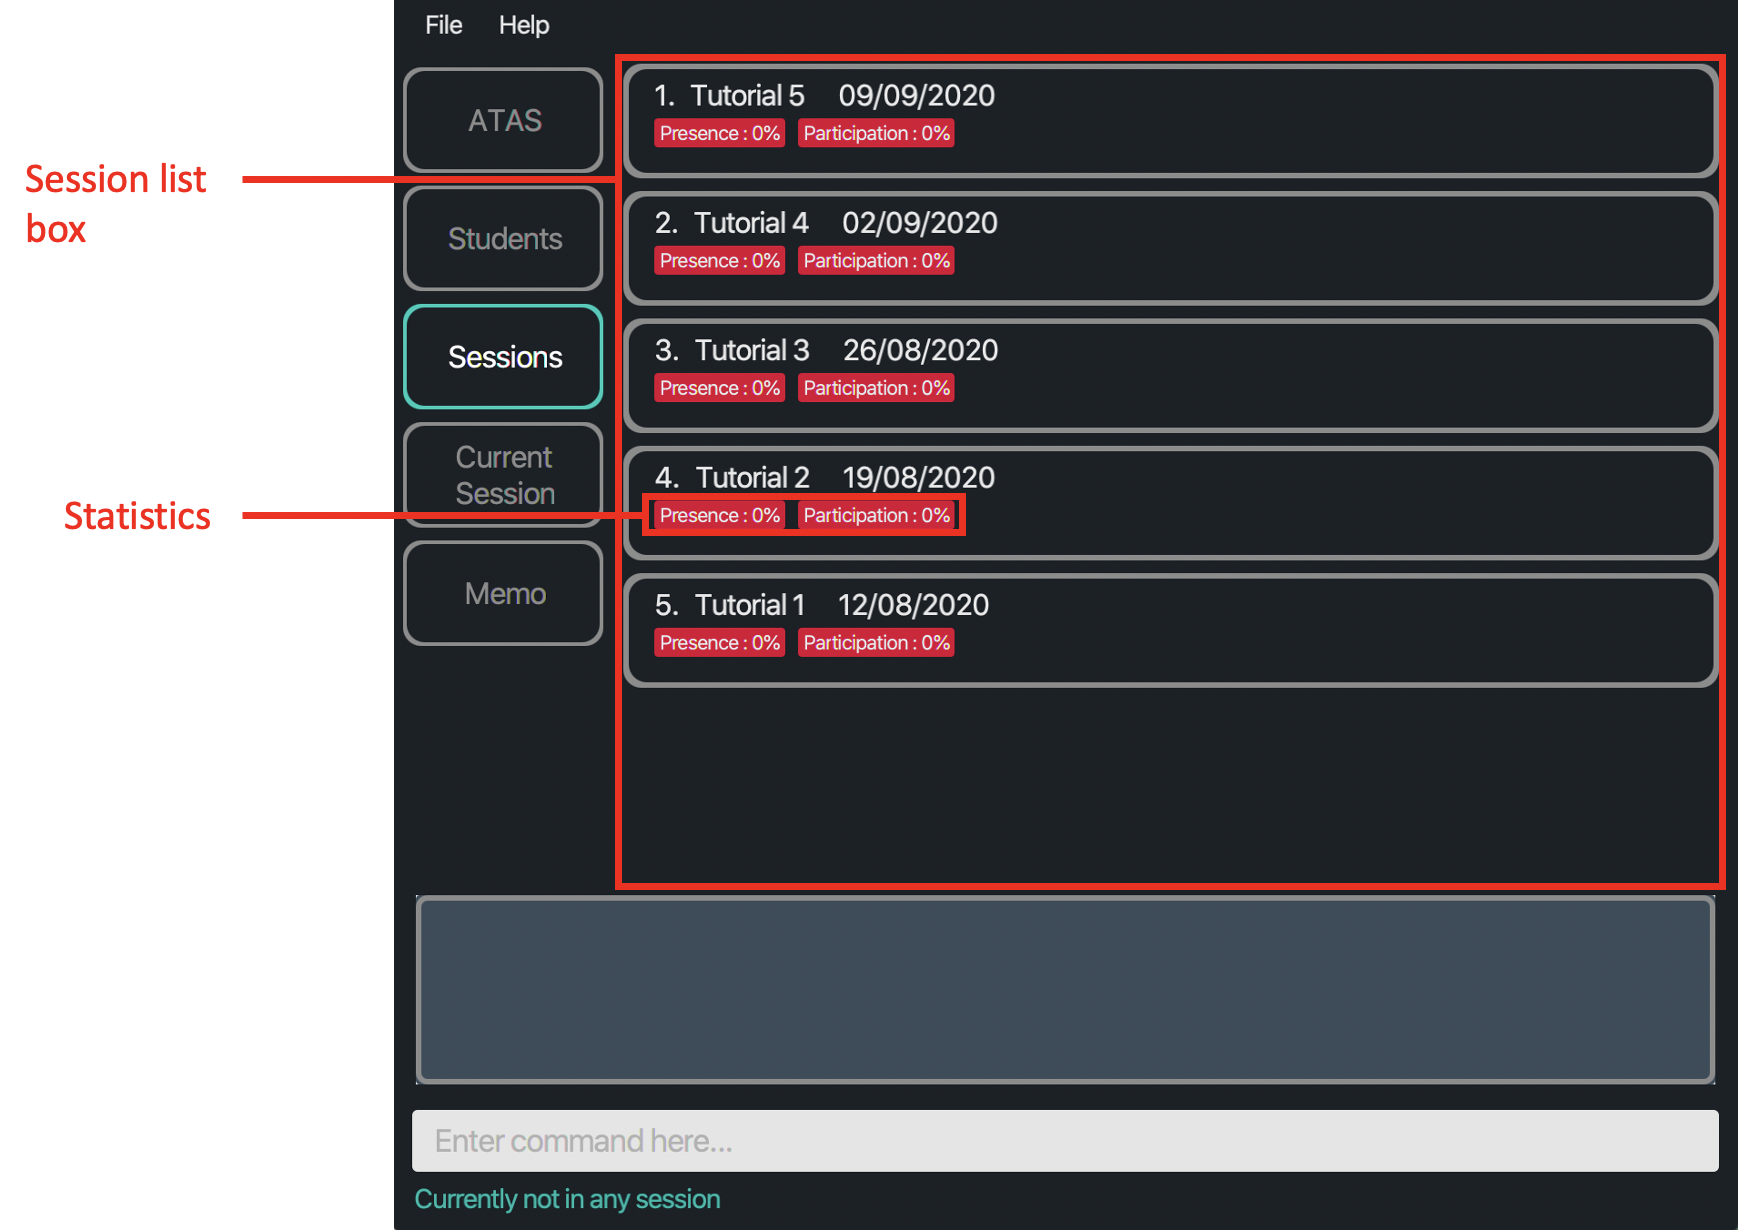
Figure 4.2.1: Layout of Sessions tab when there is at least one session
Notes:
- Session list box: Contains a list of sessions and their details such as their name and date. Sessions are arranged by their dates, starting from the latest at the top.
- Statistics: Calculated as a percentage of the number of students that was present or has participated out of all the students.
![]() Notes about the color code of a session’s statistics:
Notes about the color code of a session’s statistics:
| Colour | Meaning |
|---|---|
| Grey | There are no students |
| Red | Not all students were present or has participated (<100%) |
| Green | All the students were present or has participated (100%) |
If there are no sessions in your list, you will see a message indicating as such.
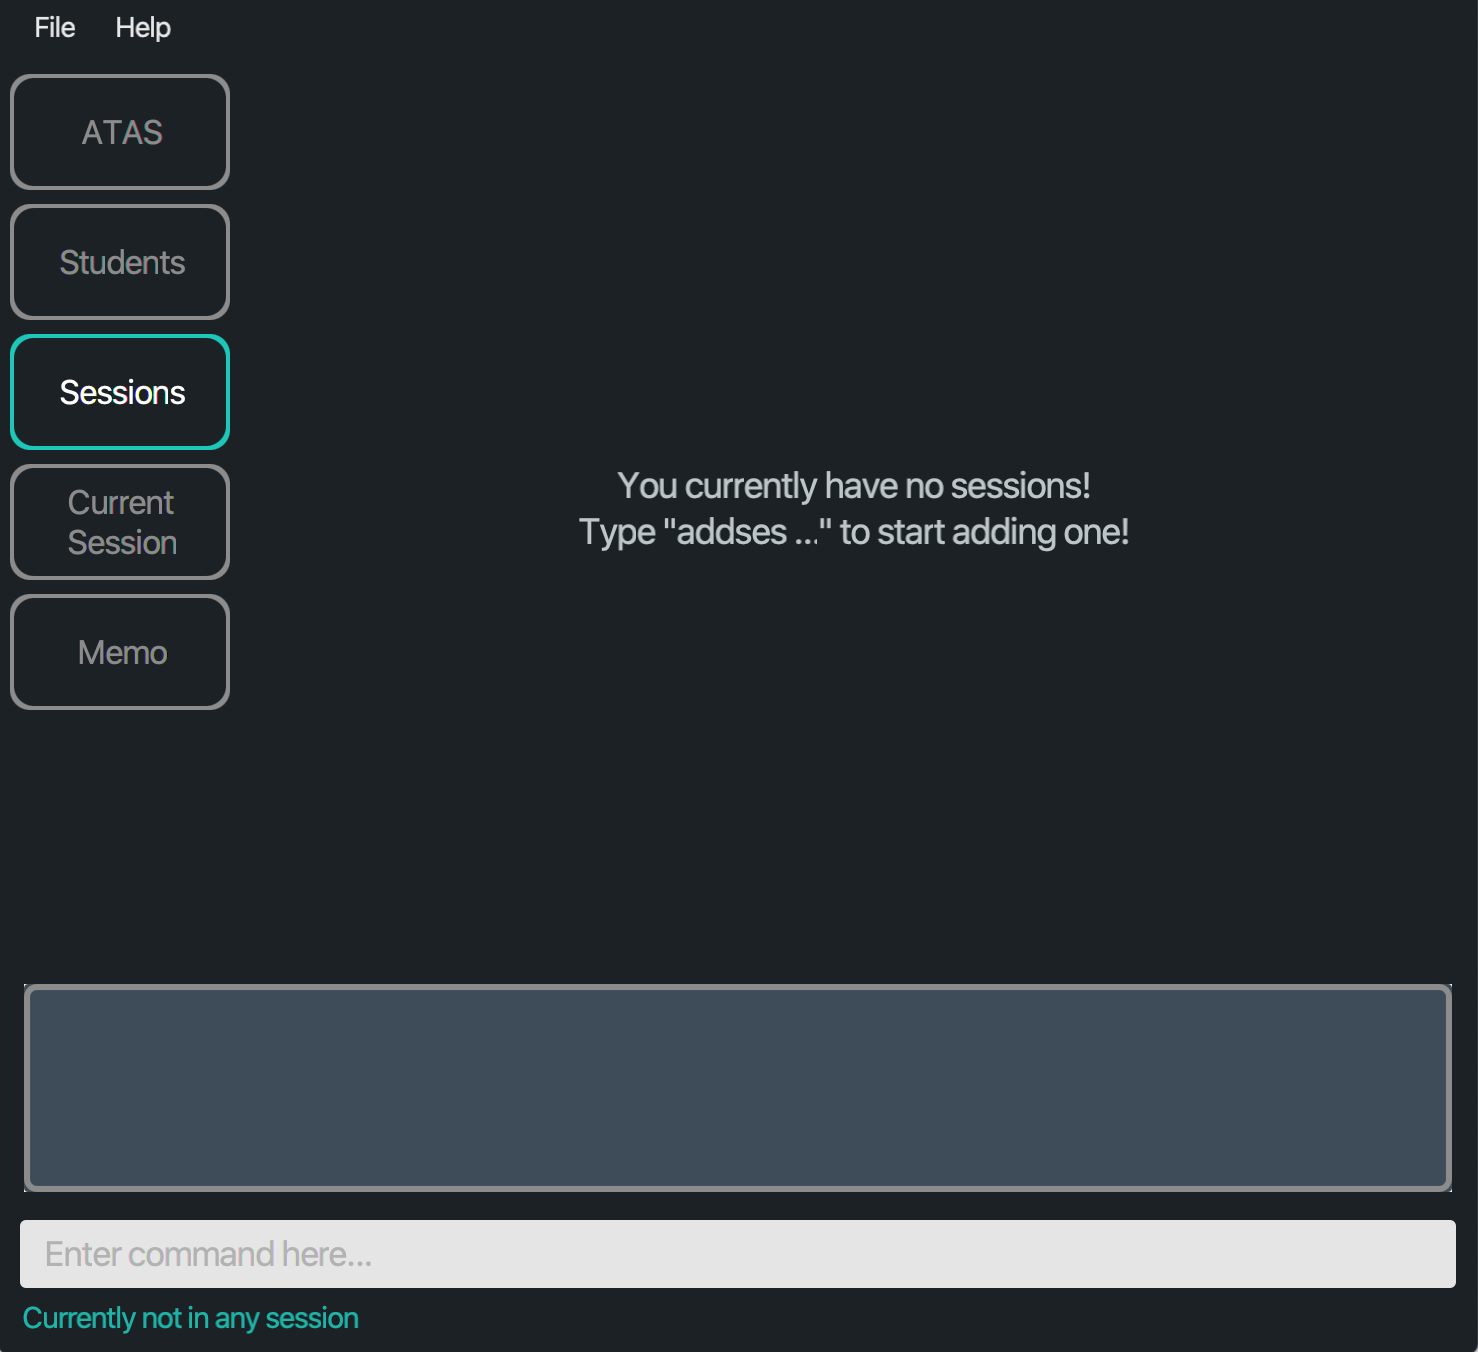
Figure 4.2.2: Layout of Sessions tab when there are no sessions
To find out which features are supported by the Sessions tab, you can head over to Section 5.4 - Sessions.
{ end of layout_of_atas#sessions written by: Ngoh Wei Yue }
{ start of layout_of_atas#current_session written by: Ngoh Wei Yue }
4.3. Current session
The following is how the Current Session tab looks like:
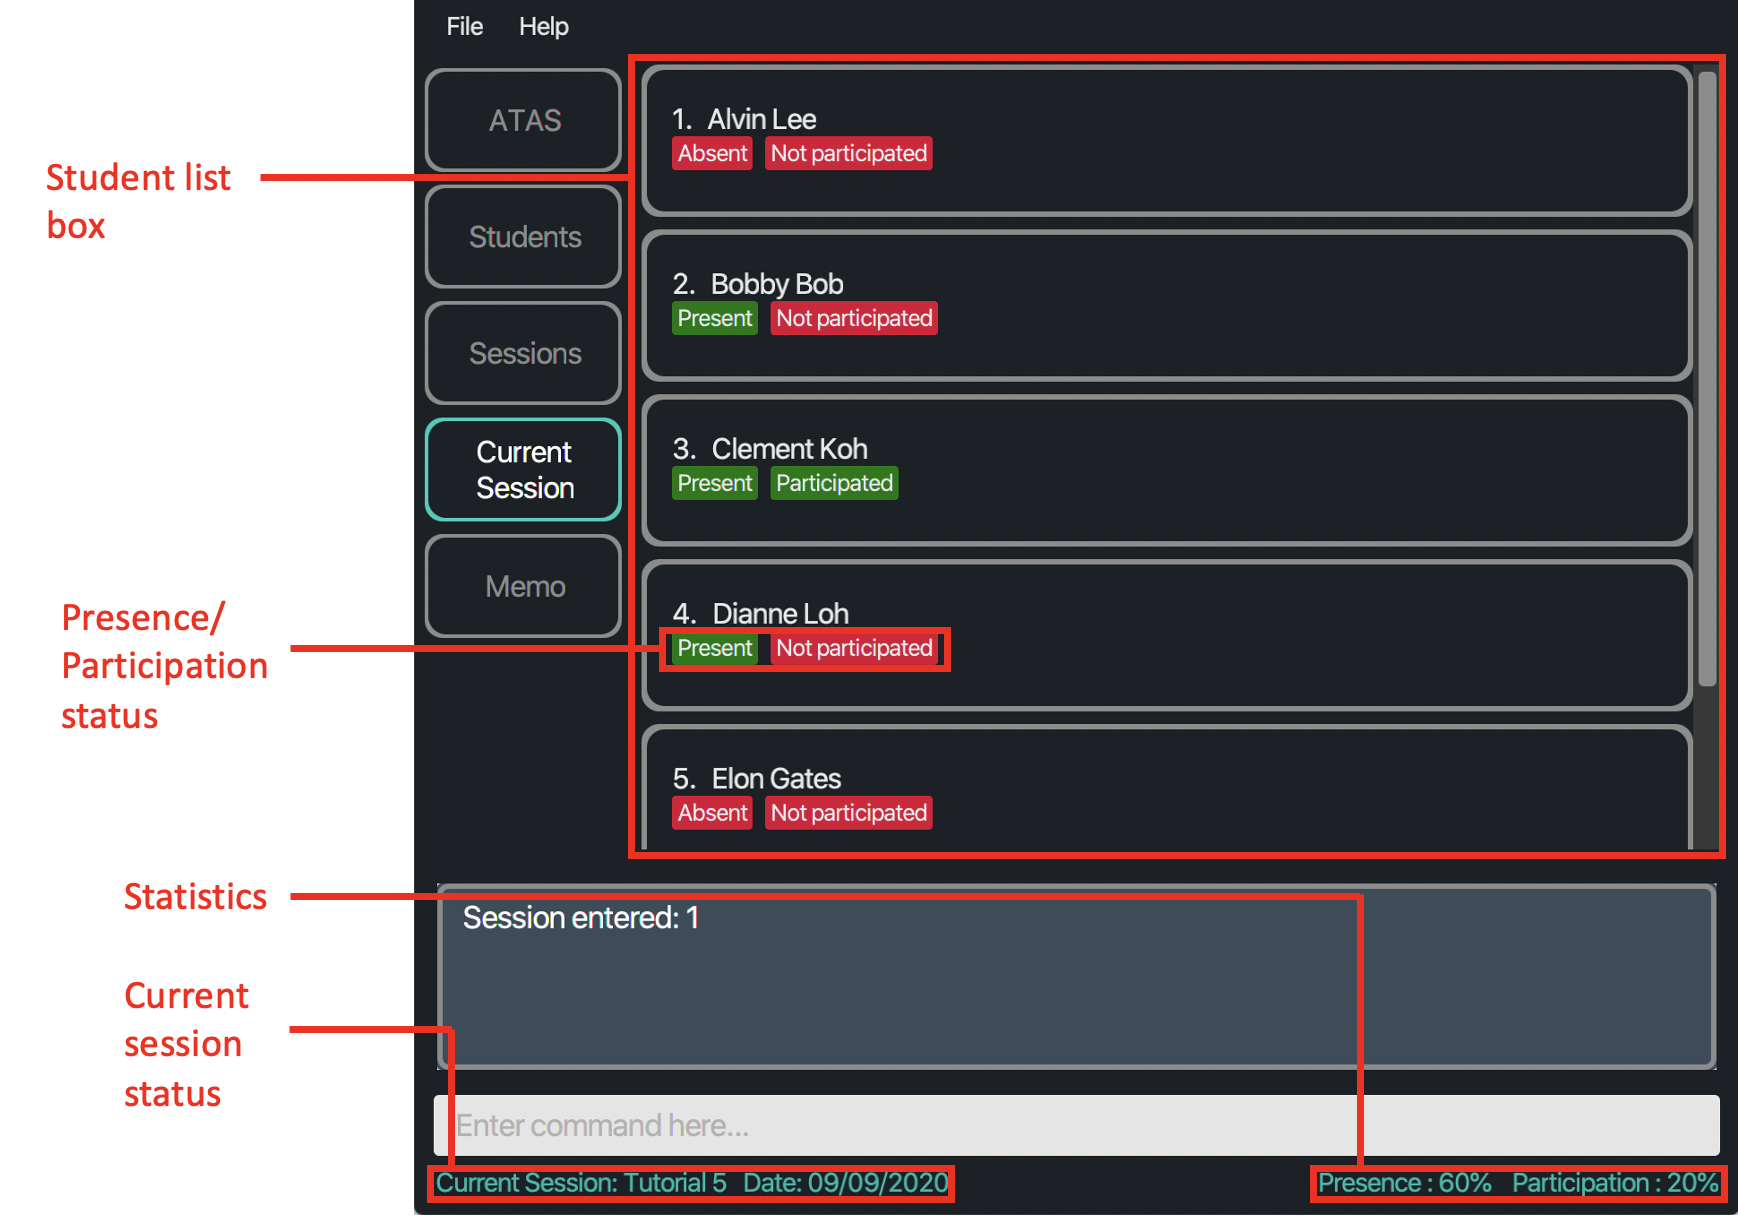
Figure 4.3.1: Layout of Current Session tab when a session is entered
Notes:
-
Student list box: Similar to the
Studentstab, this box contains a list of students. However, only their names are shown here. The order of students follows that of theStudentstab. - Presence/Participation status: If student is absent or has not participated, label will be red, whereas if student is present or has participated, then label is green.
- Current session’s status: Contains the session’s name and date that you are currently in. You will see “Currently not in session” if you are not in any session. This can be seen in all the tabs.
- Statistics: Calculated as a percentage of the number of students that was present or has participated out of all the students. You will see nothing here if you are not in any session. This can be seen in all the tabs.
Similar to the Students tab, if there are no students in that session, you will see a similar message as shown in Figure 4.1.2.
If you have not entered any session or left a session (by removing that session), you will see a message indicating as such. You can enter a session by using enterses INDEX as described in Section 5.4.5 - Entering a session.
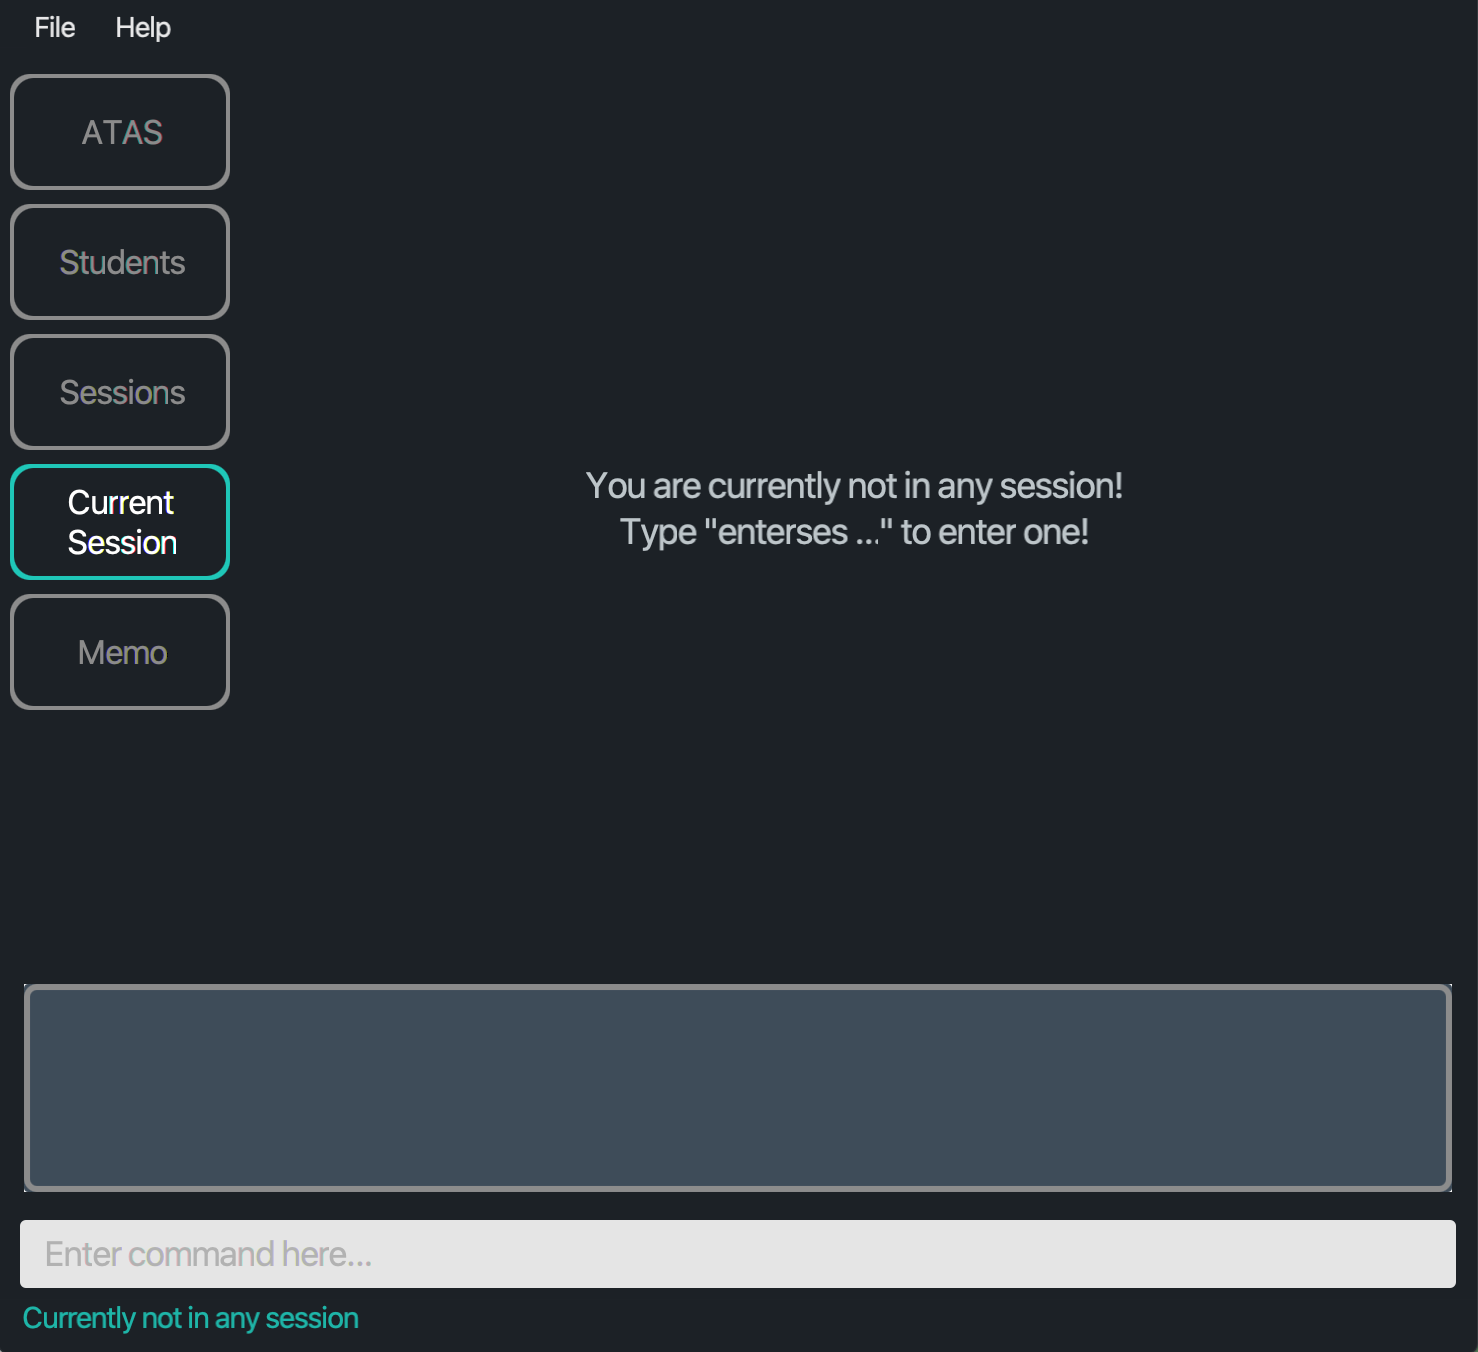
Figure 4.3.2: Layout of Current Session tab when no session is entered
To find out which features are supported by the Current Session tab, you can head over to Section 5.5 - Current session.
{ end of layout_of_atas#current_session written by: Ngoh Wei Yue }
{ start of layout_of_atas#memo written by: Ngoh Wei Yue }
4.4. Memo
The following is how the Memo tab looks like:
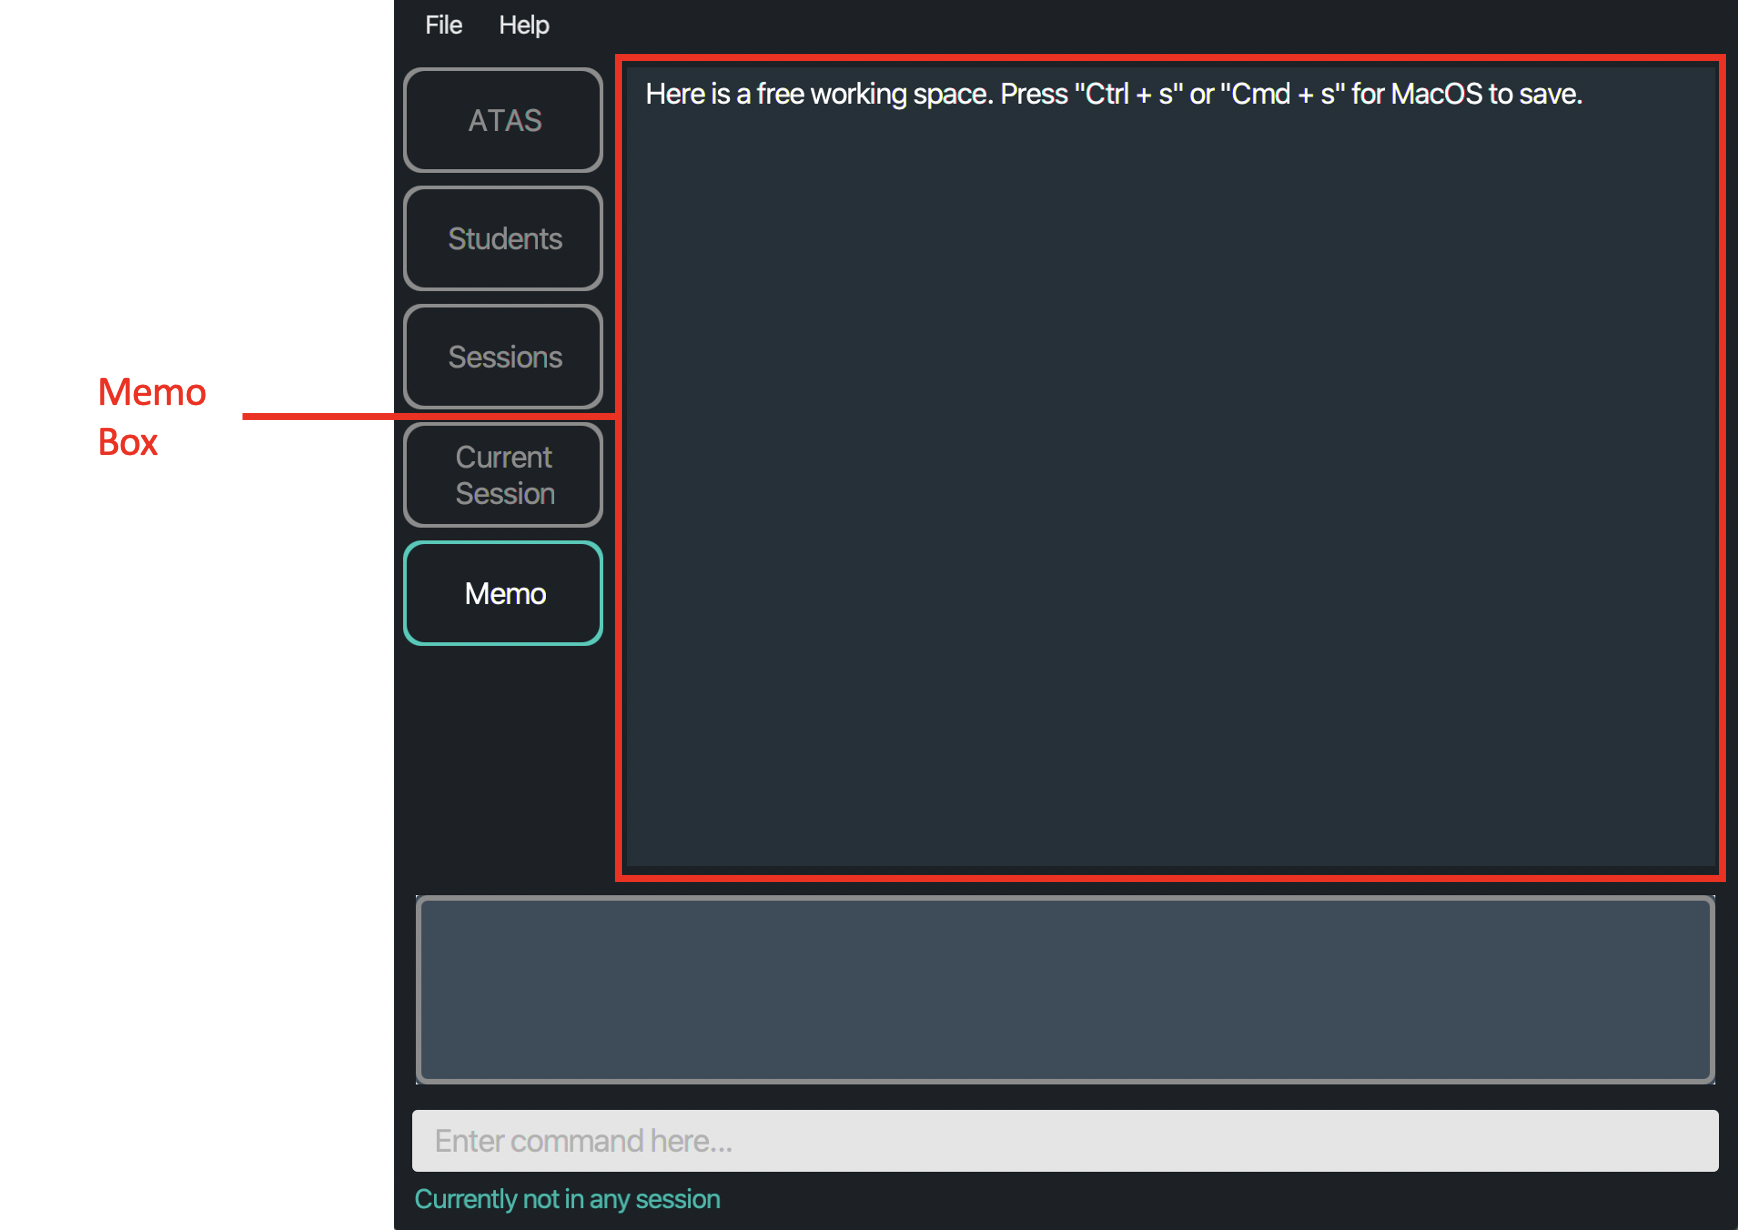
Figure 4.4.1: Layout of Memo tab
Note:
- Memo box: A text box where you can input any notes that you need for future references. The amount of space you can see is tied to size of your application window, but the actual text space that you can typed in will automatically be extended if you need more space.
To find out which features are supported by the Memo tab, you can head over to Section 5.6 - Memo.
{ end of layout_of_atas#memo written by: Ngoh Wei Yue }
5. Features
{ start of features#overview written by: Ngoh Wei Yue }
5.1. Overview
In this section, you can find the details of all the available features in ATAS such as their descriptions and formats. We have grouped the features into 7 main groups, namely General, Students, Sessions, Current session, Memo, User confirmation, and Saving the data.
There are 2 main types of features:
- Commands that you can execute in the command box or through keyboard shortcut
- Features that are already inplace and require no actions from you
With the exception of saving the memo, all commands that are available can be executed regardless of which tab you are in.
![]() Notes about the command format:
Notes about the command format:
-
Words in
UPPER_CASEare placeholders to be replaced by you.
e.g., you should changeaddstu n/STUDENT_NAMEtoaddstu n/Elvin Ng. -
Items in square brackets are optional.
e.g., you can usen/NAME [t/TAG]asn/Elvin Ng t/helpfulor simply asn/Elvin Ng. -
If there are multiple items in round brackets, at least one of them should be supplied.
e.g., you should use(n/UPDATED_NAME) (e/UPDATED_EMAIL_ADDRESS)separately asn/Elvin Ng/e/elvinng@u.nus.edu(i.e. 1 parameter), or together liken/Elvin Ng e/elvinng@u.nus.edu(i.e. 2 parameters). -
Items with
… after them can be used multiple times including zero times.
e.g., you can use[t/TAG]…as ` ` (i.e. 0 times),t/helpful(i.e. 1 time),t/helpful t/outspoken(i.e. 2 times) etc. -
Parameters can be in any order.
e.g., if the command specifiesn/NAME m/MATRICULATION_NUMBER,m/MATRICULATION_NUMBER n/NAMEis also acceptable.
{ end of features#overview written by: Ngoh Wei Yue }
{ start of features#general written by: Ngoh Wei Yue }
5.2. General
This category consists of conventional features (help, exit, undo and redo) that you can find in most applications. It also consists of features that are responsible for navigating through ATAS (switch) and those that have no specific relation to any of the other categories below (rng).
{ end of features#general written by: Ngoh Wei Yue }
{ start of features#general#help written by: Ngoh Wei Yue }
5.2.1. Viewing help : help
Opens a popup window which shows the list of available commands and a link to access this user guide.
Format:
help
![]() Notes about the usage of this command:
Notes about the usage of this command:
- Only a maximum of one help window can be open
![]() Example:
Example:
help
Outcome:
- A help window that look like the following will open up.
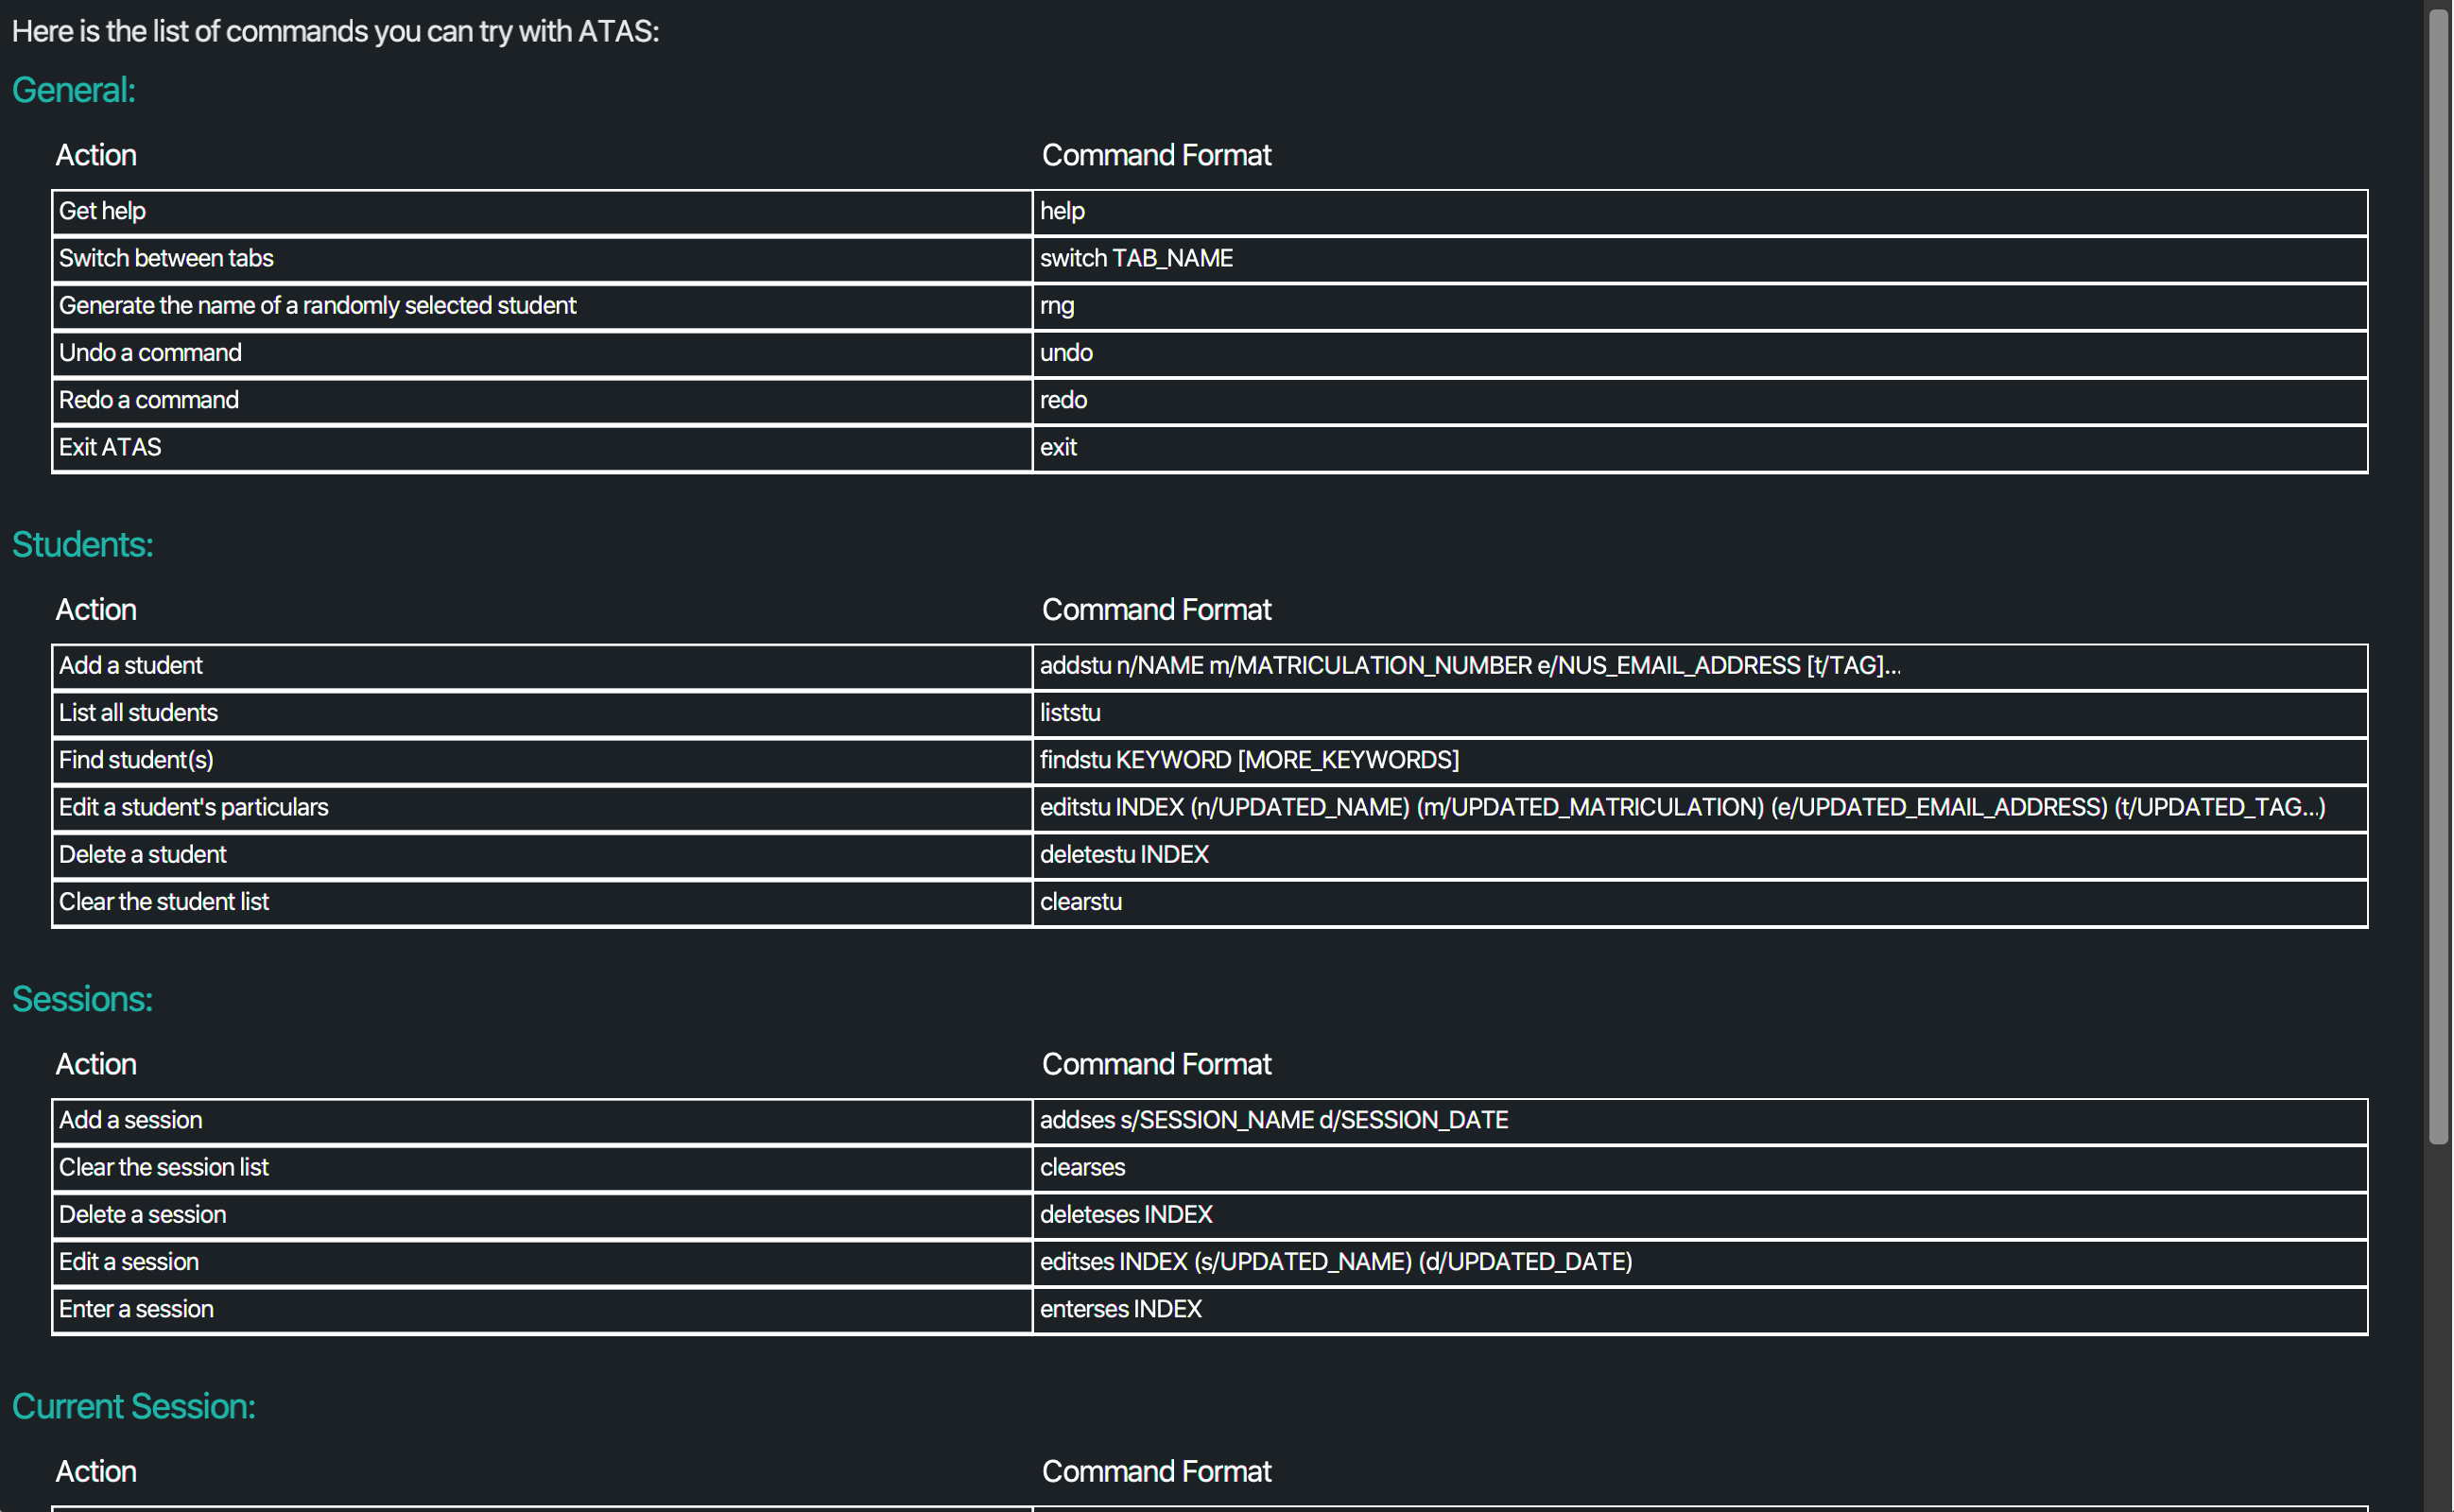
Figure 5.2.1.1: Help window
- A message indicating a help window has been opened will be displayed in the main ATAS window.
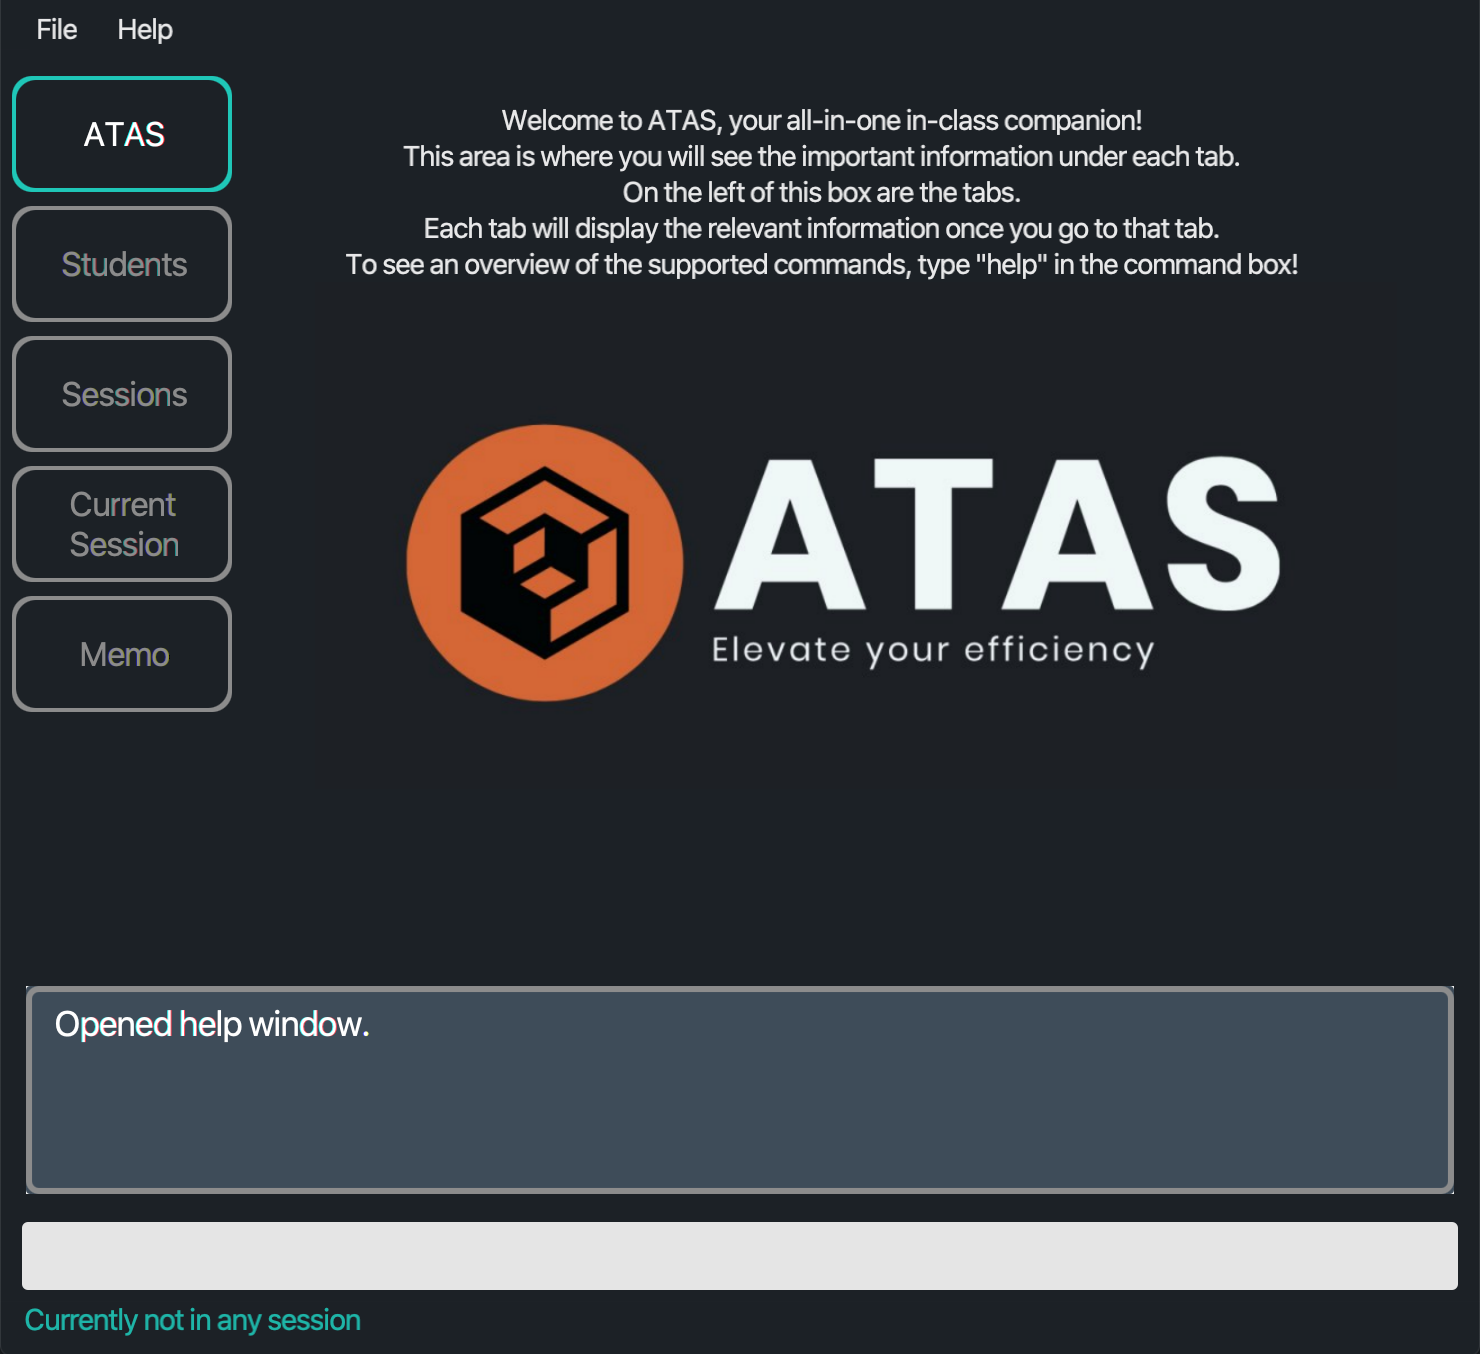
Figure 5.2.1.2: Main window view after opening help window
{ end of features#general#help written by: Ngoh Wei Yue }
{ start of features#general#switch written by: Ngoh Wei Yue }
5.2.2. Switching between tabs : switch
Switches between tabs.
Format:
switch TAB_NAME
![]() Notes about the usage of this command:
Notes about the usage of this command:
-
TAB_NAMEis case-insensitive. -
CurrentreplacesCurrent SessionasTAB_NAMEhere for simplicity. -
TAB_NAMEmust be an existing tab (ATAS,Students,Sessions,CurrentorMemo). - Switching to the same tab you are in will result in an error message.
![]() Example:
Example:
switch sessions
Outcome:
The sessions tab will be displayed.
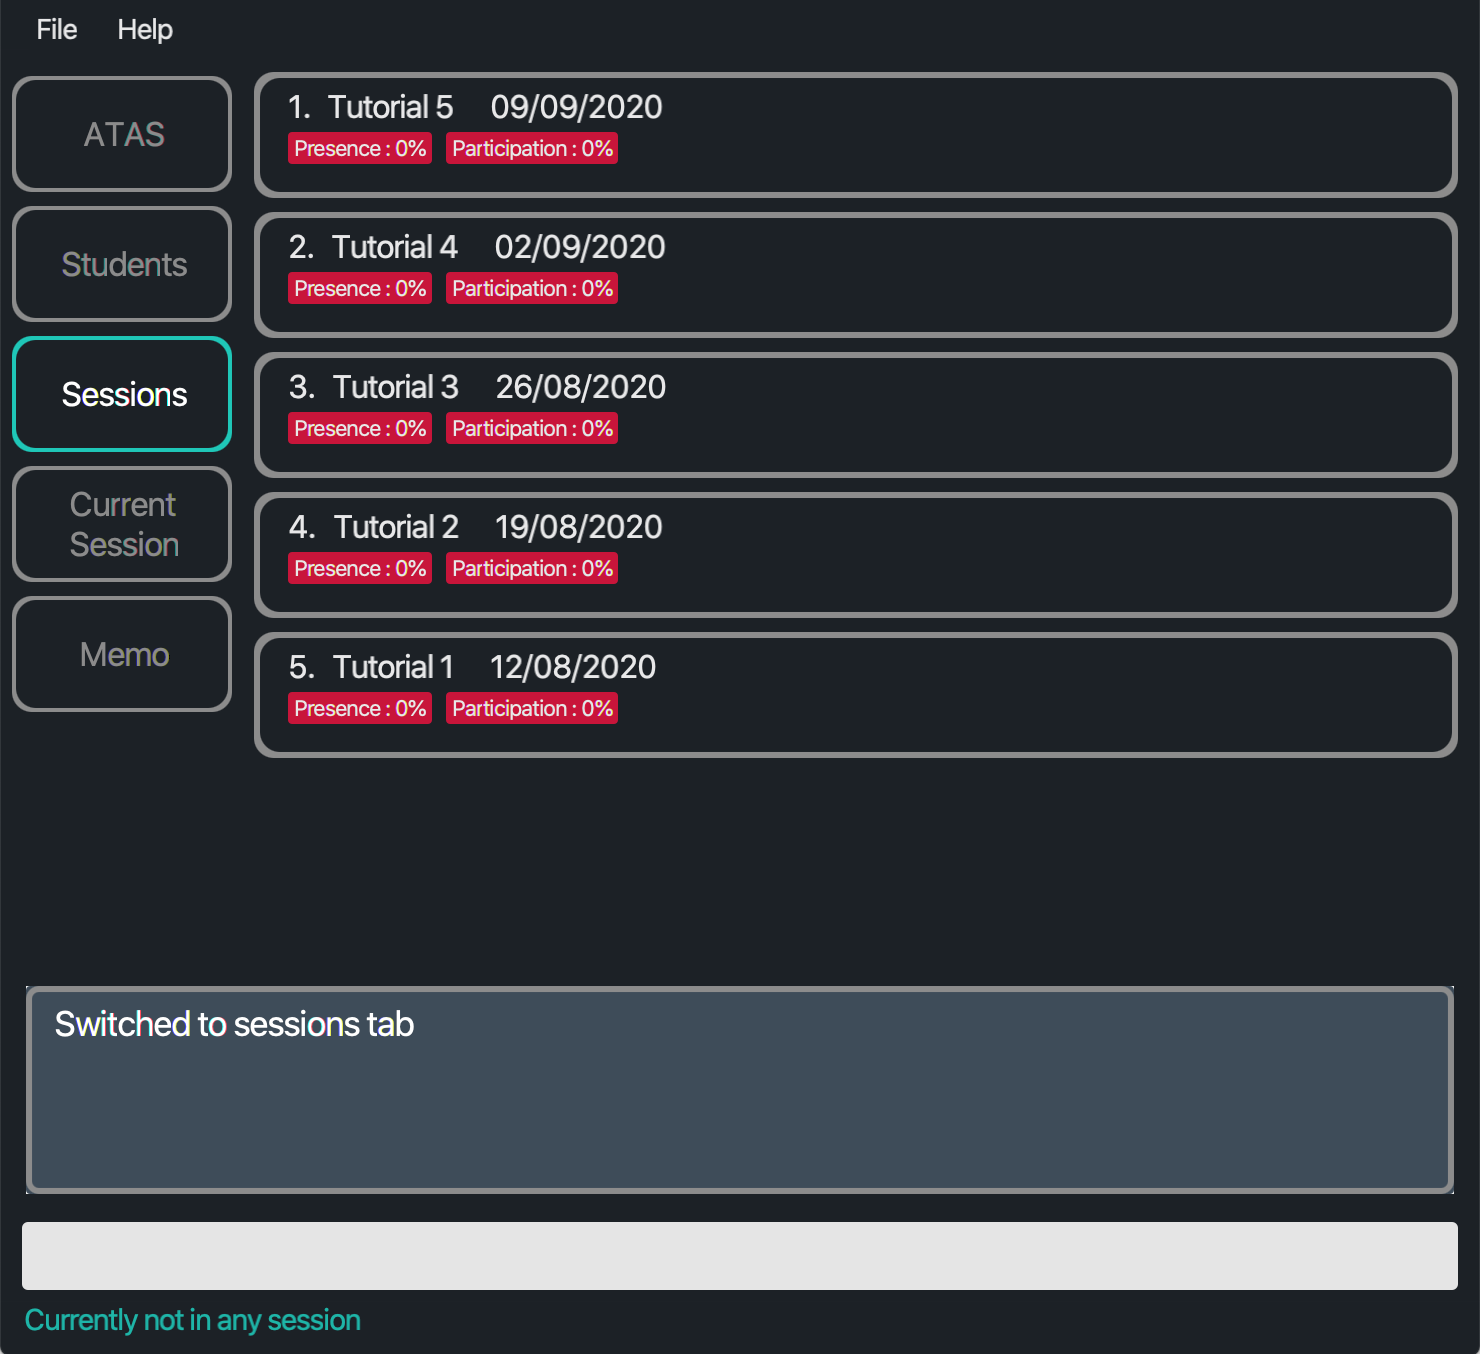
Figure 5.2.2.1: Application view after switching to the Sessions tab
{ end of features#general#switch written by: Ngoh Wei Yue }
{ start of features#general#rng written by: Masagca Eris Jacey }
5.2.3. Generating the name of a randomly-selected student : rng
Chooses a student at random from the student list.
Format:
rng
![]() Notes about the usage of this command:
Notes about the usage of this command:
- The student list that ATAS references will be whatever list is shown on the student’s tab.
- If the full list is shown (say after
liststu), then the student selected can be from anyone already in the overall student list. - If only a partial / no list is shown (say after
findstu), then the student selected will be someone from that truncated list. If the list is empty, then an error will be shown – there is no student to select from!
- If the full list is shown (say after
![]() Example:
Example:
rng
Outcome:
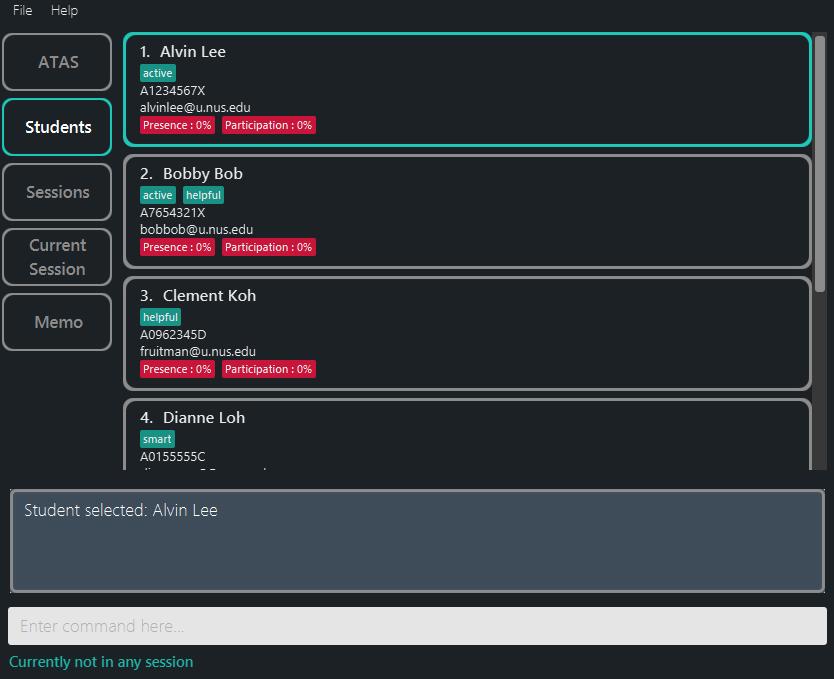
Figure 5.2.3.1: Application view after performing the rng command
{ end of features#general#rng written by: Masagca Eris Jacey }
{ start of features#general#undo written by: Masagca Eris Jacey }
5.2.4. Undo-ing a command : undo
Undoes a command and essentially returns ATAS to the state prior to performing that command.
Format:
undo
![]() Notes about the usage of this command:
Notes about the usage of this command:
- An
undois done per command and not per change. If you make multiple changes to a student, for example, using a singleeditstucommand, thenundowill revert all the changes. - Commands that can be undone are:
- Adding a student/session:
addstu/addses - Deleting a student/session:
deletestu/deleteses - Editing a student/session:
editstu/editses - Clearing all students/sessions:
clearstu/clearses - Entering a session:
enterses - Toggling the participation status of students:
participate - Toggling the presence status of students:
presence
- Adding a student/session:
- Commands not stated above make no change to the application state and thus cannot be undone.
- Successive
undocommands will bring the application state further back, until there are no more changes toundo. - You cannot
undoif there is no previous state to return to.
![]() Example:
Example:
The example we are about to use follows that used in Section 5.3.4 - Deleting a student.
- Suppose we have indeed deleted Alvin Lee from our student list.
This change is reflected in the students’ tab.
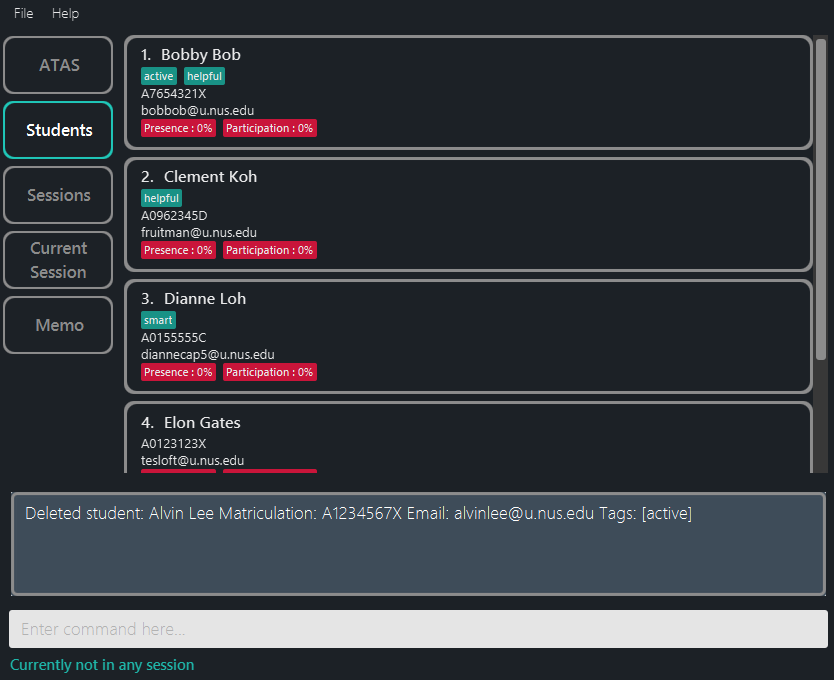
Figure 5.2.4.1: Application view after deleting Alvin Lee as seen in the students` tab
- However, we realise that deleting him was mistake.
He does belong to our class after all!
In this case, we can revert the deletion we have made with
undo.
Figure 5.2.4.2: Application view after performing the
undocommand
{ end of features#general#undo written by: Masagca Eris Jacey }
{ start of features#general#redo written by: Masagca Eris Jacey }
5.2.5. Redo-ing a command : redo
Redoes a command that was most recently undone and returns ATAS to the state after having performed that command.
Essentially the reverse of undo-ing a command.
You can think of it as performing that very same command you have undone!
Format:
redo
![]() Notes about the usage of this command:
Notes about the usage of this command:
- A
redois done per command and not per change. If you undo a command that makes multiple changes (likeeditstu), thenredowill recover all changes. - If any of the commands that support
undois performed after anundo, then all states currently available forredowill be erased and you will not be able to go to those states anymore. - You cannot
redoif there is no forward state to go to.
![]() Example:
Example:
We will be following up from the same example used in Section 5.2.4 - Undo-ing a command.
- Suppose it seems like Alvin Lee has tricked us all this while and isn’t actually our student!
This means that when we had initially deleted him from our list, it was actually the right thing to do.
We can simply reverse the undo we have made using
redo.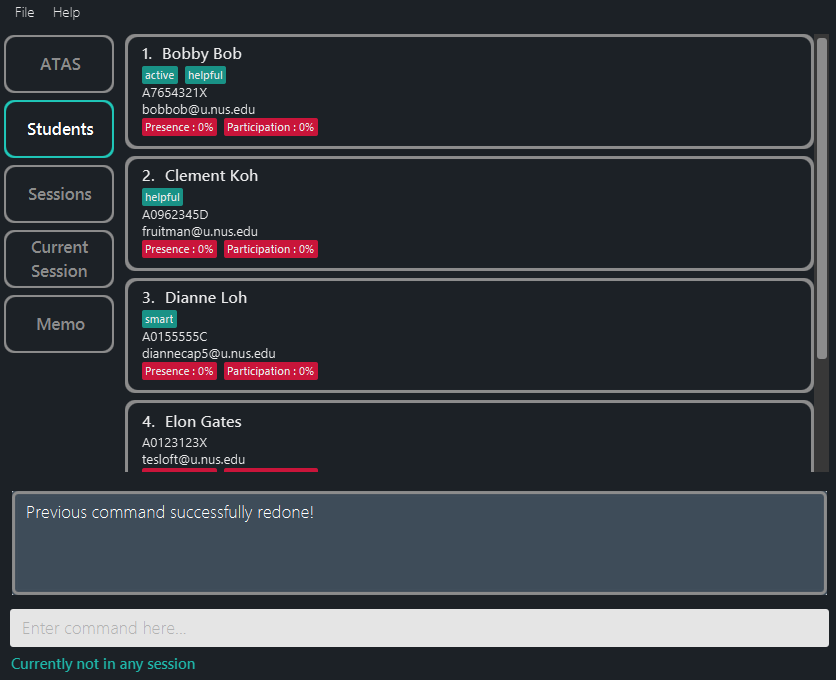
Figure 5.2.5.1: Application view after performing the redo command as seen in the students’ tab
As can be seen above, Alvin Lee has been removed from the student list again.
{ end of features#general#redo written by: Masagca Eris Jacey }
{ start of features#general#exit written by: Alvin Chee Teck Weng }
5.2.6. Exiting the program : exit
Exits the application.
Format:
exit
Outcome:
Program window will be closed.
{ end of features#general#exit written by: Alvin Chee Teck Weng }
{ start of features#students written by: Zhang Sheng Yang }
5.3. Students
This category consists of features related to students.
Student commands allow you to add a student with addstu or remove a student from the student
list by using deletestu. You can also modify the particulars of a student with editstu command.
Furthermore, if you want to search for certain students in the student list, try out findstu and utilize
liststu to gain a full view of the list again.
Lastly, clearstu allows you to remove all the students in the current student list at once.
5.3.1. Adding a student : addstu
Adds a student to the student list.
Format:
addstu n/NAME m/MATRICULATION_NUMBER e/NUS_EMAIL_ADDRESS [t/TAG]…
![]() Notes about the usage of this command:
Notes about the usage of this command:
- The name of a student should not contain special characters.
- The matriculation number of a student should be in the form of A0123456X.
- ATAS only accepts NUS email address, i.e. xxx@u.nus.edu.
- A student can have any number of tags (including 0) .
- A tag is made up of one single word.
- Students added can have the same name, but they cannot have the same matriculation number or NUS email as other students in the list.
![]() Examples:
Examples:
-
addstu n/John Cena m/A0123456J e/thechamp@u.nus.edu(Figure 5.3.1) addstu n/Alvina Handsome m/A0123456X e/handsome.alvina@u.nus.edu t/new
Outcome:

Figure 5.3.1: Addstu Command
5.3.2. Locating students by name : findstu
Finds students whose names contain any of the given keywords.
Format:
findstu KEYWORD [MORE_KEYWORDS]
![]() Notes about the usage of this command:
Notes about the usage of this command:
- The search is case-insensitive. e.g
johnwill matchJohn - The order of the keywords does not matter. e.g.
John Cenawill matchCena John - Only the name is searched.
- Only full words will be matched e.g.
Jonwill not matchJohn - Students matching at least one keyword will be returned (i.e.
ORsearch). e.g.John Cenawill returnJohn Tan,Mark Cena - If there are no students found, you will see a message similar to Figure 4.1.2.
![]() Examples:
Examples:
-
findstu bobreturnsBobby Bob(Figure 5.3.2) -
findstu kent ridgereturnsKent TanandMark Ridge
Outcome:
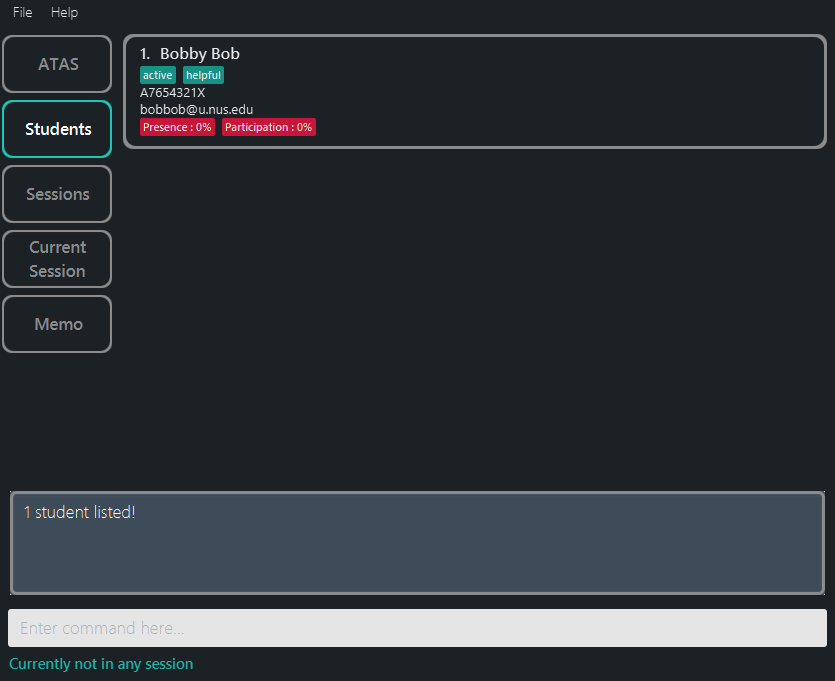
Figure 5.3.2: Findstu Command
5.3.3. Listing all students : liststu
Shows a list of all students in the current student list.
Format:
liststu
![]() Example:
Example:
-
liststu(Figure 5.3.3)
Outcome:
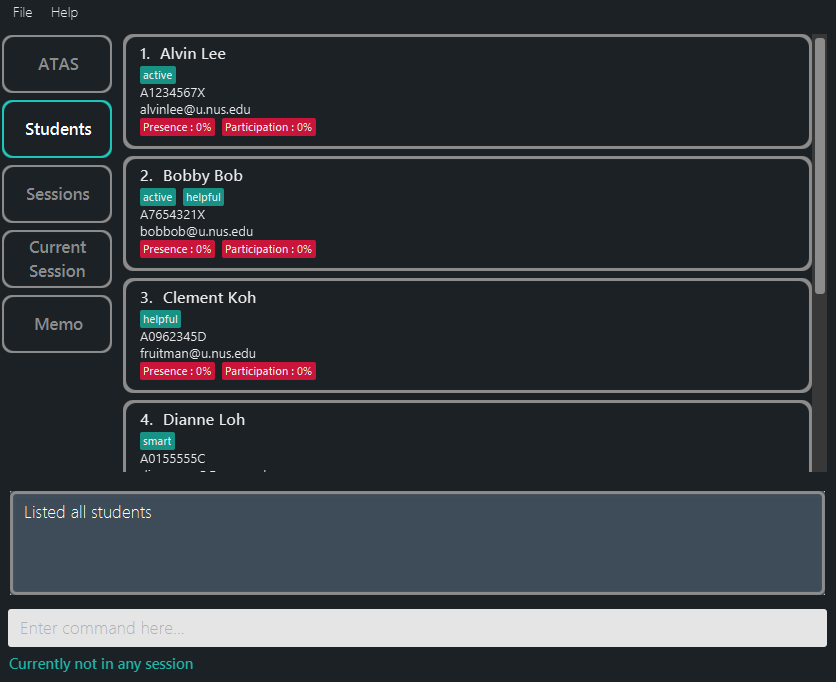
Figure 5.3.3: Liststu Command
{ end of features#students written by: Zhang Sheng Yang }
{ start of features#student#deletestu written by: Marcus Tan Wei }
5.3.4. Deleting a student : deletestu
Removes a student from the student list.
Format:
deletestu INDEX
![]() Notes about the usage of this command:
Notes about the usage of this command:
- Deletes the student at the specified
INDEX. - The index refers to the index number shown in the displayed student list.
- The index must be a positive integer 1, 2, 3, …
- You will then be prompted for a confirmation input
Delete student INDEX? (yes/no).- If yes: deletes the specified student from the student list.
- If no: the specified student remains in the student list.
![]() Examples:
Examples:
-
liststufollowed bydeletestu 1followed byyesdeletes the 1st student from the student list. (Figure 5.3.4.2) -
findstu Bobfollowed bydeletestu 1followed byyesdeletes the 1st student from the results of thefindstu Bobcommand.
Outcome:

Figure 5.3.4.1: Confirmation for deleting student 1
![]() After receiving the confirmation prompt, enter
After receiving the confirmation prompt, enter yes to confirm the removal of student at the specified INDEX, or reject the command by entering no.

Figure 5.3.4.2: After confirming the deletion of student 1
Examples:
{ end of features#student#deletestu written by: Marcus Tan Wei }
{ start of features#student#editstu written by: Marcus Tan Wei }
5.3.5. Editing a student’s particulars : editstu
Format:
editstu INDEX (n/UPDATED_NAME) (m/UPDATED_MATRICULATION) (e/UPDATED_EMAIL_ADDRESS) (t/UPDATED_TAG)…
![]() Notes about the usage of this command:
Notes about the usage of this command:
- Edits the student at the specified
INDEXwith the specified updated particular to be updated. - The index refers to the index number shown in the displayed student list.
- The index must be a positive integer 1, 2, 3, …
- You will then be prompted for a confirmation input
Edit student INDEX? (yes/no).- If yes: edits and updates the particulars of the specified student from the student list.
- If no: the specified student’s particulars remains the same.
- A tag is made up of one single word.
- Students edited can have the same name, but they cannot have the same Matriculation number or NUS email as other students in the list.
![]() Examples:
Examples:
-
editstu 1 n/Alvina Leefollowed byyesedits the 1st student in the student list with an updated nameAlvina Lee. (Figure 5.3.5) -
editstu 3 t/activefollowed byyesedits the 3rd student in the student list with an updated tagactive.
Outcome:
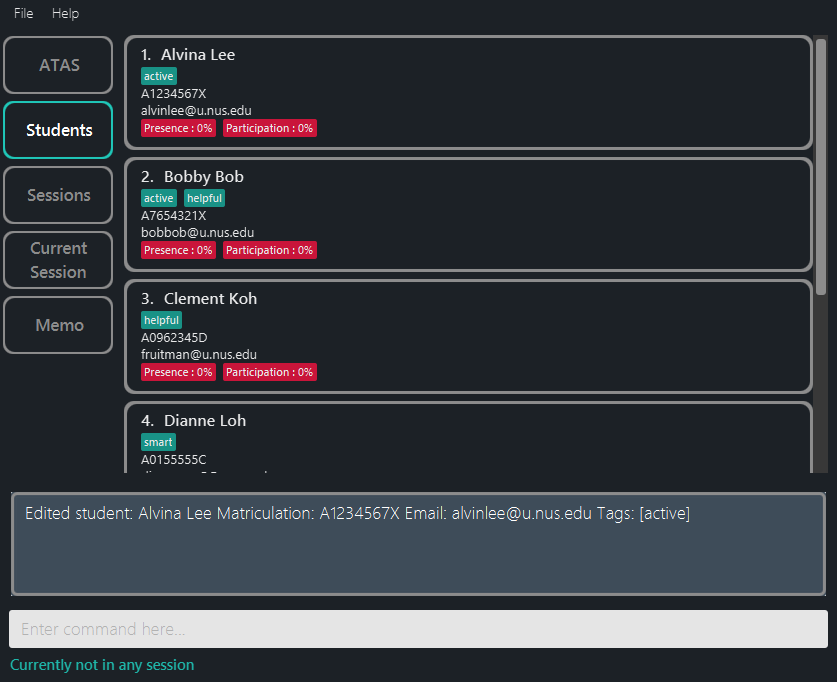
Figure 5.3.5: After confirming the editing of student 1 (confirmation is similar to delete student, thus not shown)
{ end of features#student#editstu written by: Marcus Tan Wei }
{ start of features#student#clearstu written by: Marcus Tan Wei }
5.3.6. Clearing the student list : clearstu
Clears and removes all students from the student list.
Format:
clearstu
![]() Notes about the usage of this command:
Notes about the usage of this command:
- You will then be prompted for a confirmation input
Clear student list? (yes/no).- If yes: removes all students from the student list.
- If no: student list remains unchanged and no removal of students occurs.
![]() Example:
Example:
-
clearstufollowed byyesclears the students from the student list (Figure 5.3.6).
Outcome:
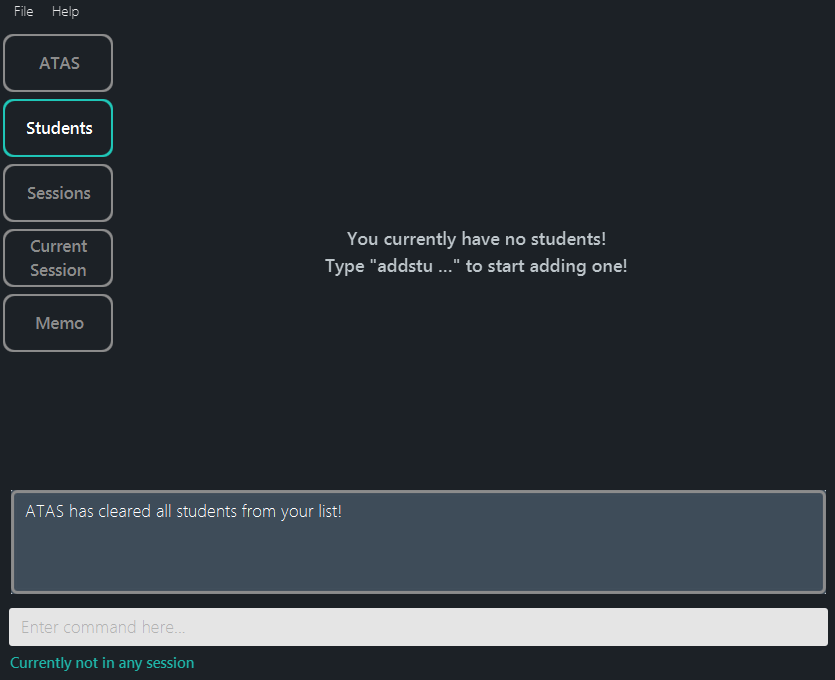
Figure 5.3.6: After confirming the clearing of the student list (confirmation is similar to delete student, thus not shown)
{ end of features#student#clearstu written by: Marcus Tan Wei }
{ start of features#sessions written by: Alvin Chee Teck Weng }
5.4. Sessions
This category consists of features related to sessions.
Session commands allow you to add a session with addsesor remove a session from the session list by using deleteses.
You can also modify the details of a session with editses command.
If you would like to enter a particular session in the session list, you can use enterses.
Lastly, clearses allows you to remove all the sessions in the current session list at once.
![]() Notes about sessions:
Notes about sessions:
- Sessions are sorted automatically to their dates in the session list, with the most recent session at the top.
- Every session command will cause you to exit the currently entered session, with the exception of enterses. Entering the same session will just give you an error.
5.4.1. Adding a session : addses
Adds a session to the session list.
Format:
addses s/SESSION_NAME d/SESSION_DATE
![]() Notes about the usage of this command:
Notes about the usage of this command:
- Adds a session with the specified name and date to the displayed session list.
-
SESSION_DATEshould be given in the format of d/M/yyyy or dd/MM/yyyy. This means if your day or month is single digit, you do not need to add a ‘0’ in front, for e.g., 09/01/2020 and 9/1/2020 are both accepted. - Two sessions cannot have the same name but they can have the same date.
![]() Warning about the usage of this command:
Warning about the usage of this command:
- You will be exited from any currently entered session upon using this command.
![]() Examples:
Examples:
-
addses s/Tutorial 6 d/12/7/2020(Figure 5.4.1) addses s/Lab 3 d/2/11/2020
Outcome:
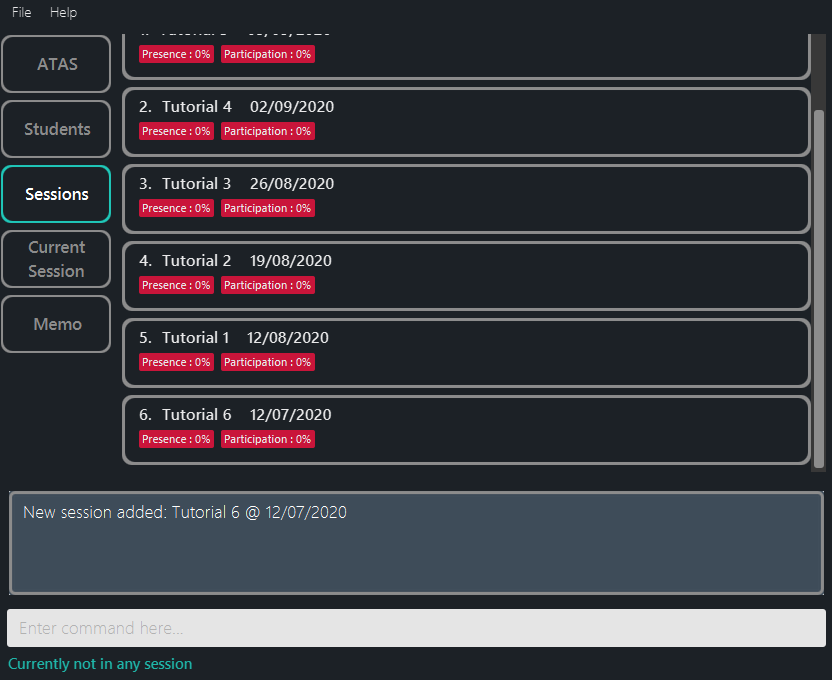
Figure 5.4.1: After adding a session
5.4.2. Deleting a session : deleteses
Deletes a session from the session list.
Format:
deleteses INDEX
![]() Notes about the usage of this command:
Notes about the usage of this command:
- Deletes the session from the displayed session list at the specified
INDEX. - The index refers to the index number shown in the session list.
- The index must be a positive integer 1, 2, 3, …
- You will be prompted for a confirmation input
(yes/no).- If yes: the specified session will be removed from the session list.
- If the specified
INDEXis invalid, error message will appear.
- If the specified
- If no: the specified session will not be removed from the session list.
- If yes: the specified session will be removed from the session list.
![]() Warning about the usage of this command:
Warning about the usage of this command:
- You will be exited from any currently entered session upon using this command.
![]() Examples:
Examples:
-
deleteses 1followed bynoresults in nothing changed. -
deleteses 5followed byyesdeletes the 5th session in the session list. (Figure 5.4.2)
Outcome:
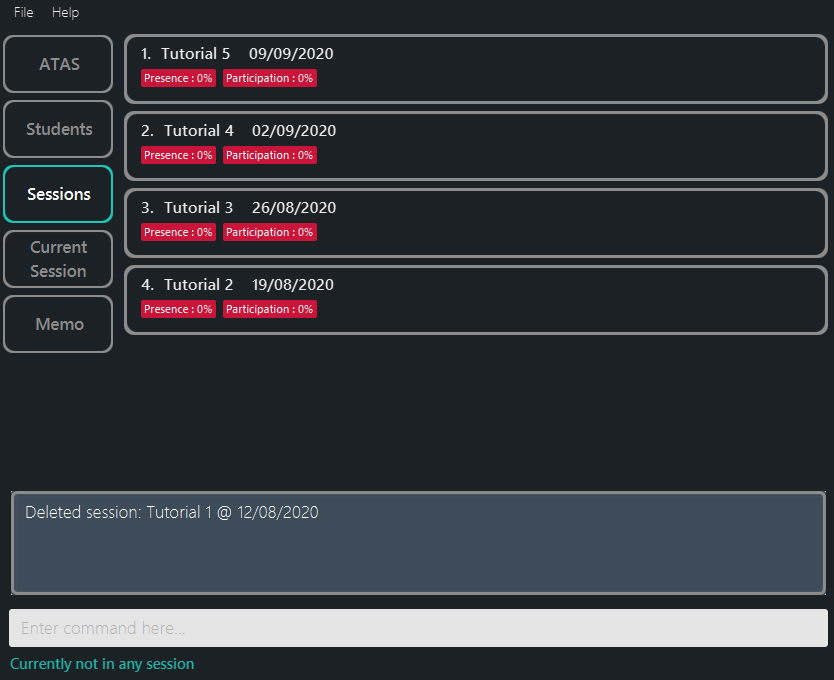
Figure 5.4.2: After deleting a session
5.4.3. Editing a session : editses
Edits a session in the session list.
Format:
editses INDEX (s/UPDATED_NAME) (d/UPDATED_DATE)
![]() Notes about the usage of this command:
Notes about the usage of this command:
- Edits the session in the displayed session list at the specified
INDEXwith the specified details. - The index refers to the index number shown in the session list.
- The index must be a positive integer 1, 2, 3, …
- You will be prompted for a confirmation input
(yes/no).- If yes: the specified session will be updated with the specified details.
- If no: the specified session will not be updated.
- The updated session cannot have the same name as any of the other sessions in the list but they can have the same date.
![]() Warning about the usage of this command:
Warning about the usage of this command:
- You will be exited from any currently entered session upon using this command.
![]() Example:
Example:
-
editses 1 s/Tutorial 6 d/10/10/2020followed byyesupdates the 1st session in the session list to a new session nameTutorial 6and a new session date10/10/2020. (Figure 5.4.3)
Outcome:
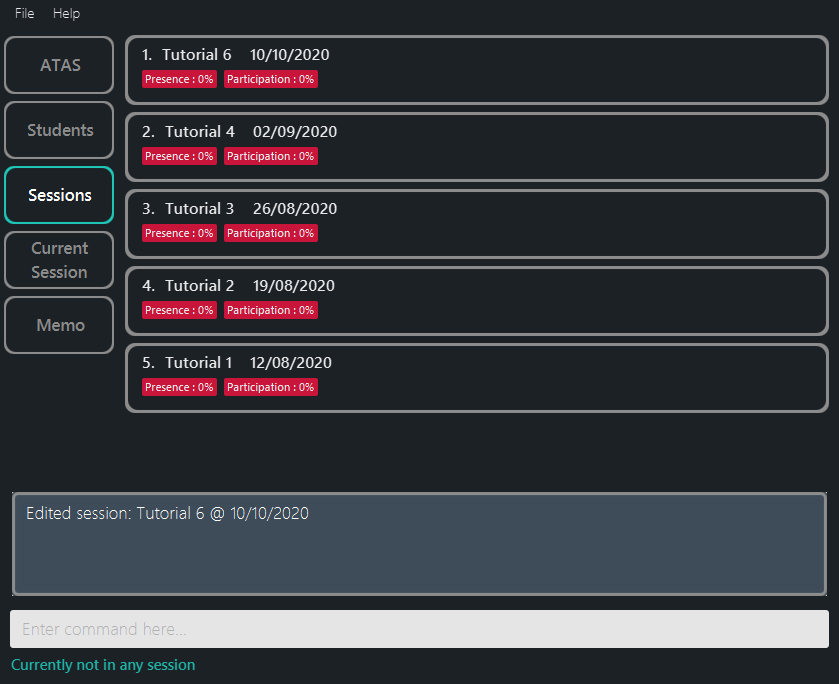
Figure 5.4.3: After editing a session
5.4.4. Clearing the session list : clearses
Deletes all the sessions in the session list.
Format:
clearses
![]() Notes about the usage of this command:
Notes about the usage of this command:
- Clears all the sessions in the displayed session list.
- You will be prompted for a confirmation input
(yes/no).- If yes: all sessions will be removed from the session list.
- If no: no sessions will be removed from the session list.
![]() Warning about the usage of this command:
Warning about the usage of this command:
- You will be exited from any currently entered session upon using this command.
![]() Examples:
Examples:
-
clearsesfollowed byyesdeletes all the sessions in the session list. (Figure 5.4.4)
Outcome:

Figure 5.4.4: After clearing a session
5.4.5. Entering a session : enterses
Enters a session in the session list.
Format:
enterses INDEX
![]() Notes about the usage of this command:
Notes about the usage of this command:
- Enters the session in the displayed session list at the specified
INDEX. - The index refers to the index number shown in the session list.
- The index must be a positive integer 1, 2, 3, …
![]() Warning about the usage of this command:
Warning about the usage of this command:
- You cannot enter the session again if you are already in that particular session.
![]() Example:
Example:
-
enterses 1enters the first session and allows you to useparticipateandpresencecommands. (Figure 5.4.5)
Outcome:
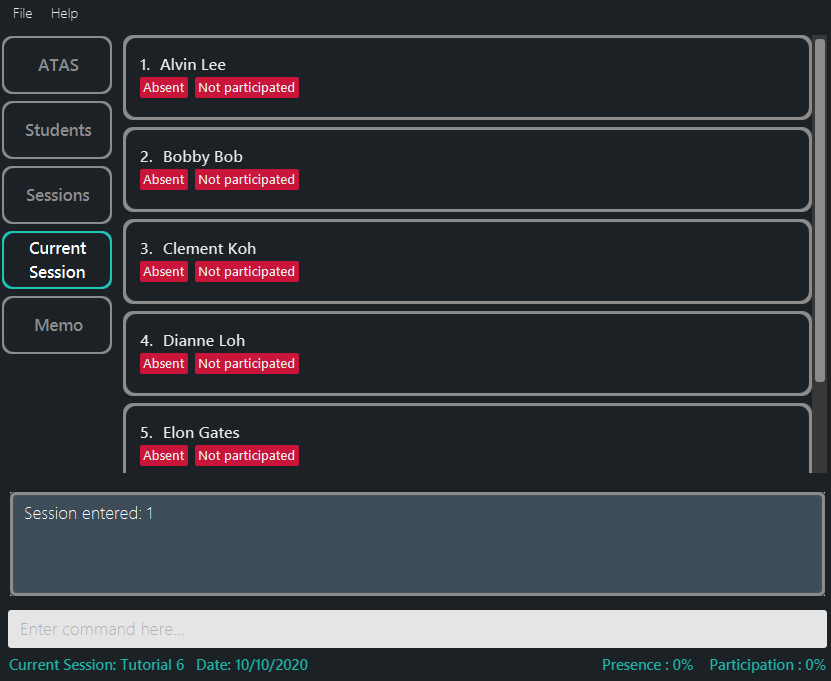
Figure 5.4.5: After entering a session
{ end of features#sessions written by: Alvin Chee Teck Weng }
{ start of features#current_session written by: Zhang Sheng Yang }
5.5. Current session
This category consists of features related to students.
After entering a session, which is mentioned above, you can now edit the presence and participation details
of a student. participate allows you to toggle the participation status (from absent to present or from
present to absent), and presence allows you to toggle the presence status of a student (from not
participated to participated or from participated to not participated).
5.5.1. Toggling participation status of students : participate
Toggles the participation status of the students in the student list of the session.
Format:
participate INDEX_RANGE
![]() Notes about the usage of this command:
Notes about the usage of this command:
- Toggles the participation status of the students at the specified
INDEX_RANGE. - The index range refers to the range of index numbers shown in the displayed student list of the session.
- The index range must be a positive integer 1, 2, 3, … OR a positive index range 1-4, 2-5, 2-9 …
![]() Examples:
Examples:
-
participate 1-4toggles the participation status of students 1 to 4. (Figure 5.5.1) -
participate 2toggles the participation status of student 2.
Outcome:
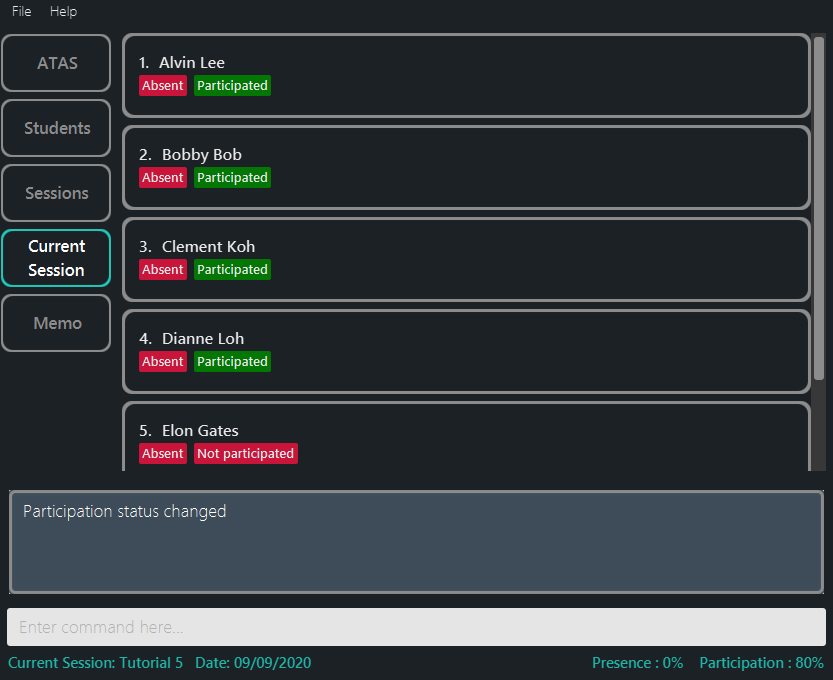
Figure 5.5.1: Participate Command
5.5.2. Toggling presence status of students : presence
Toggles the presence status of students in the student list of the session.
Format:
presence INDEX_RANGE
![]() Notes about the usage of this command:
Notes about the usage of this command:
- Toggles the presence status of the students at the specified
INDEX_RANGE. - The index range refers to the range of index numbers shown in the displayed student list of the session.
- The index range must be a positive integer 1, 2, 3, … OR a positive index range 1-4, 2-5, 2-9 …
![]() Examples:
Examples:
-
presence 1-4toggles the presence status of students 1 to 4. (Figure 5.5.2) -
presence 2toggles the presence status of student 2.
Outcome:
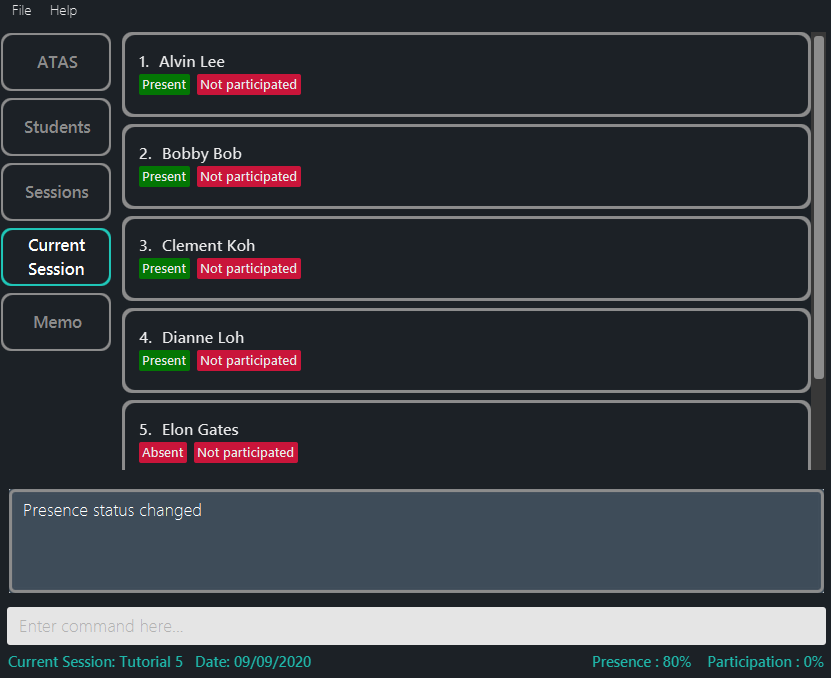
Figure 5.5.2: Presence Command
{ end of features#current_session written by: Zhang Sheng Yang }
{ start of features#memo written by: Ngoh Wei Yue }
5.6. Memo
This category consists of features related to Memo. They allow you to add text by typing into the memo box or by adding a note (addnote). You can also manually save the content in the memo box using certain keyboard shortcut.
{ end of features#memo written by: Ngoh Wei Yue }
{ start of features#memo#adding_text_into_memo written by: Ngoh Wei Yue }
5.6.1. Adding text into memo
You can add text into the memo in 2 ways:
- Type directly into the memo box in
Memotab. - Add a note.
{ end of features#memo#adding_text_into_memo written by: Ngoh Wei Yue }
{ start of features#memo#adding_text_into_memo#addnote written by: Ngoh Wei Yue }
5.6.1.1. Adding a note : addnote
Adds a note onto a new line at the end of the memo.
Format:
addnote NOTE
![]() Notes about the usage of this command:
Notes about the usage of this command:
-
NOTEcan include any characters including whitespaces.
![]() Example:
Example:
addnote clarify qn 3 with prof
Outcome:
The text “clarify qn 3 with prof” is added onto a new line in the memo box.
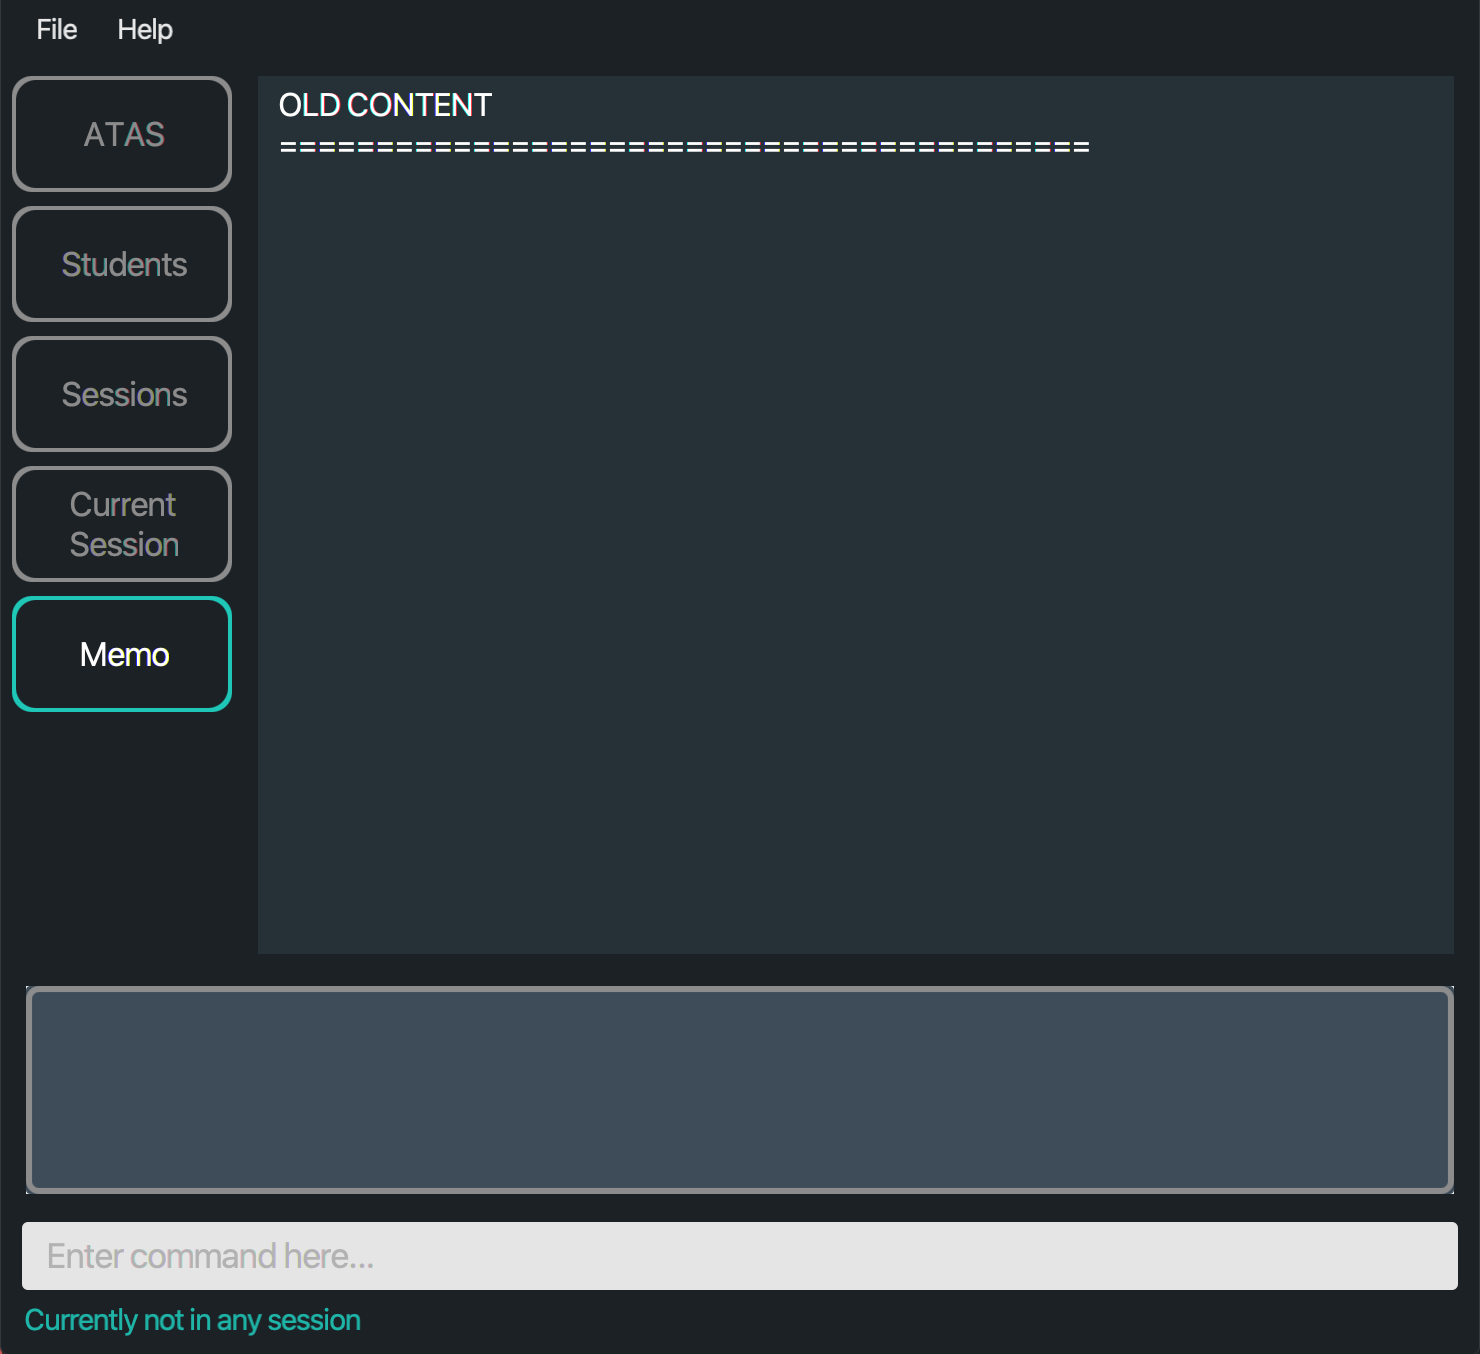
Figure 5.6.1.1.1: Application view before adding a note
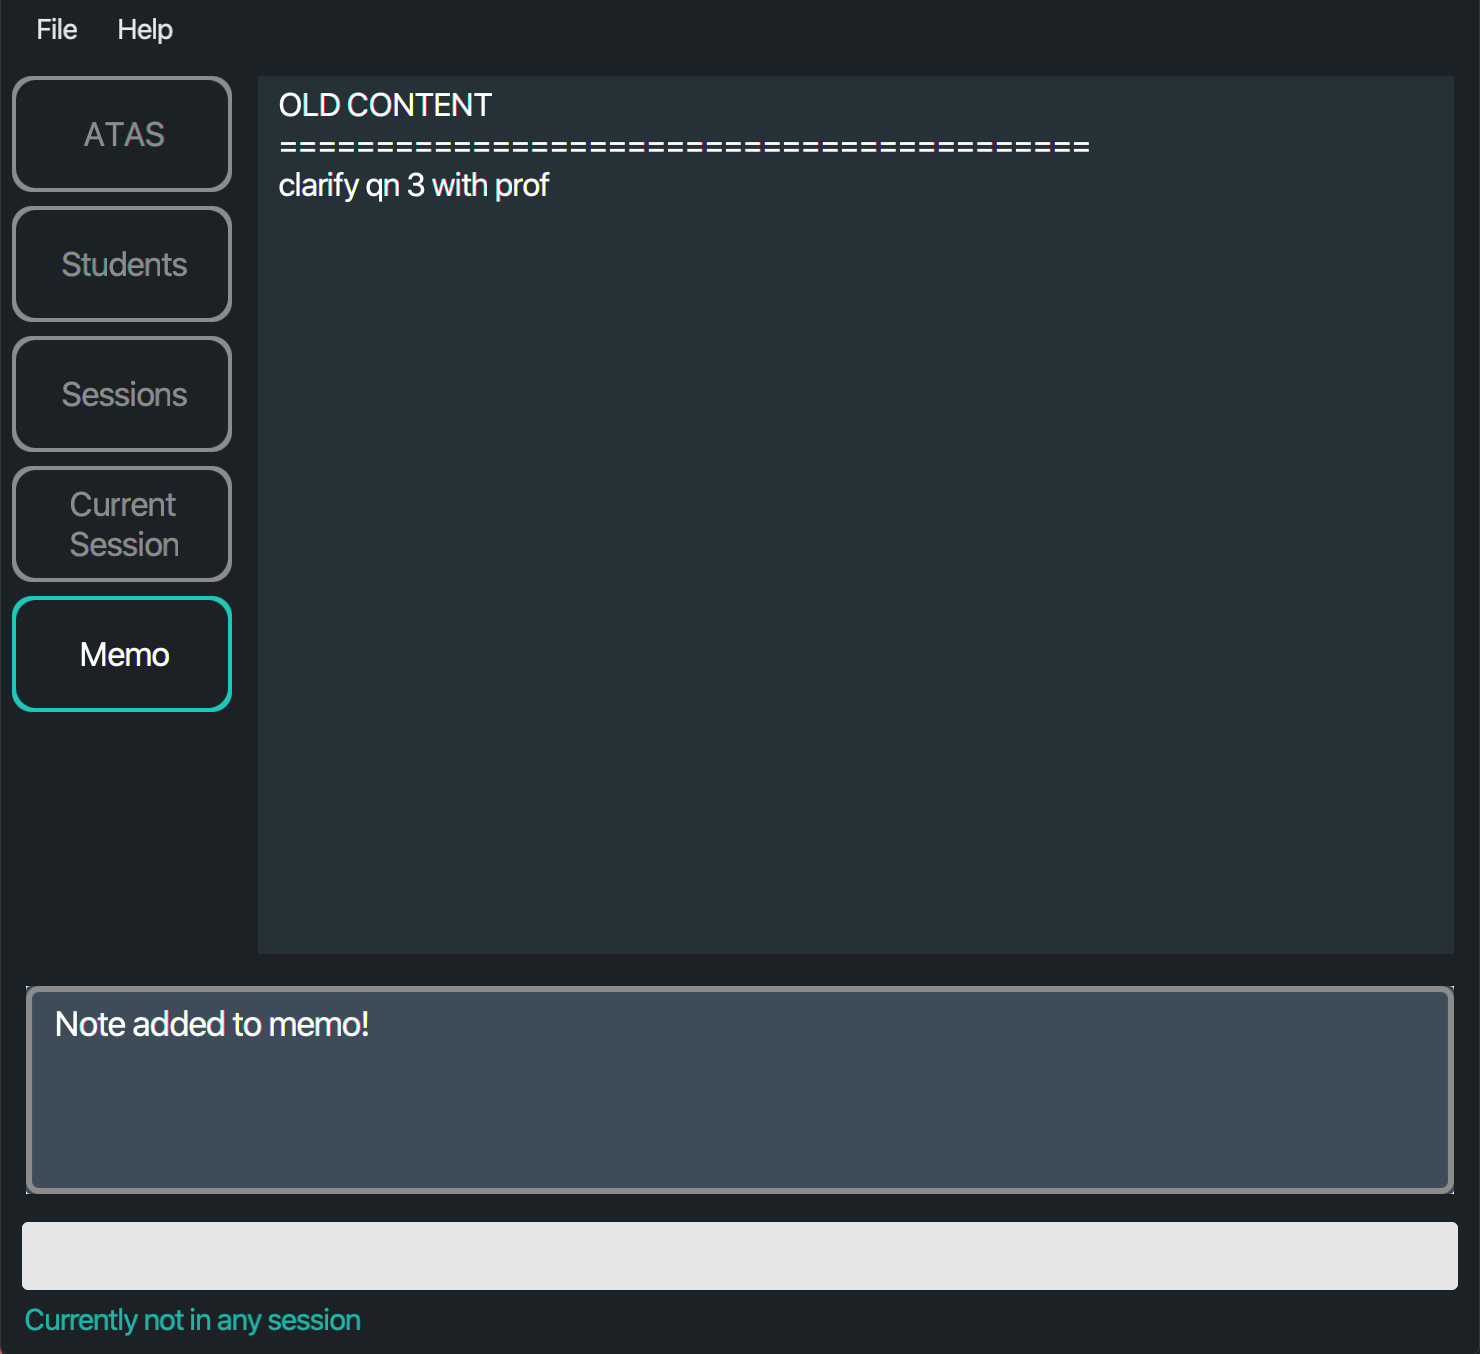
Figure 5.6.1.1.2: Application view after adding a note
{ end of features#memo#adding_text_into_memo#addnote written by: Ngoh Wei Yue }
{ start of features#memo#save_memo written by: Ngoh Wei Yue }
5.6.2. Saving the memo
Saves the content of the memo in the hard disk.
Unlike the above commands that you can execute by typing into the command box, this feature requires you to press a series of keys on your keyboard.
Keyboard shortcut:
- Click on the memo box in memo tab to bring focus to the memo box. Memo box should have a turquoise outline when under focus (Figure 5.6.2.1.).
If you are a Windows/Linux user,
-
Press down and hold the ‘ctrl’ key on your keyboard.
-
Press the ‘s’ key on your keyboard while holding down to the ‘ctrl’ key.
ctrl + s
If you are a MacOS user,
-
Press down and hold the ‘command’ key on your keyboard.
-
Press the ‘s’ key on your keyboard while holding down to the ‘command’ key.
command + s
![]() Example:
Example:
Depending on which OS you are using, try following the steps mentioned above.
Outcome: The content in the memo is saved in the hard disk.
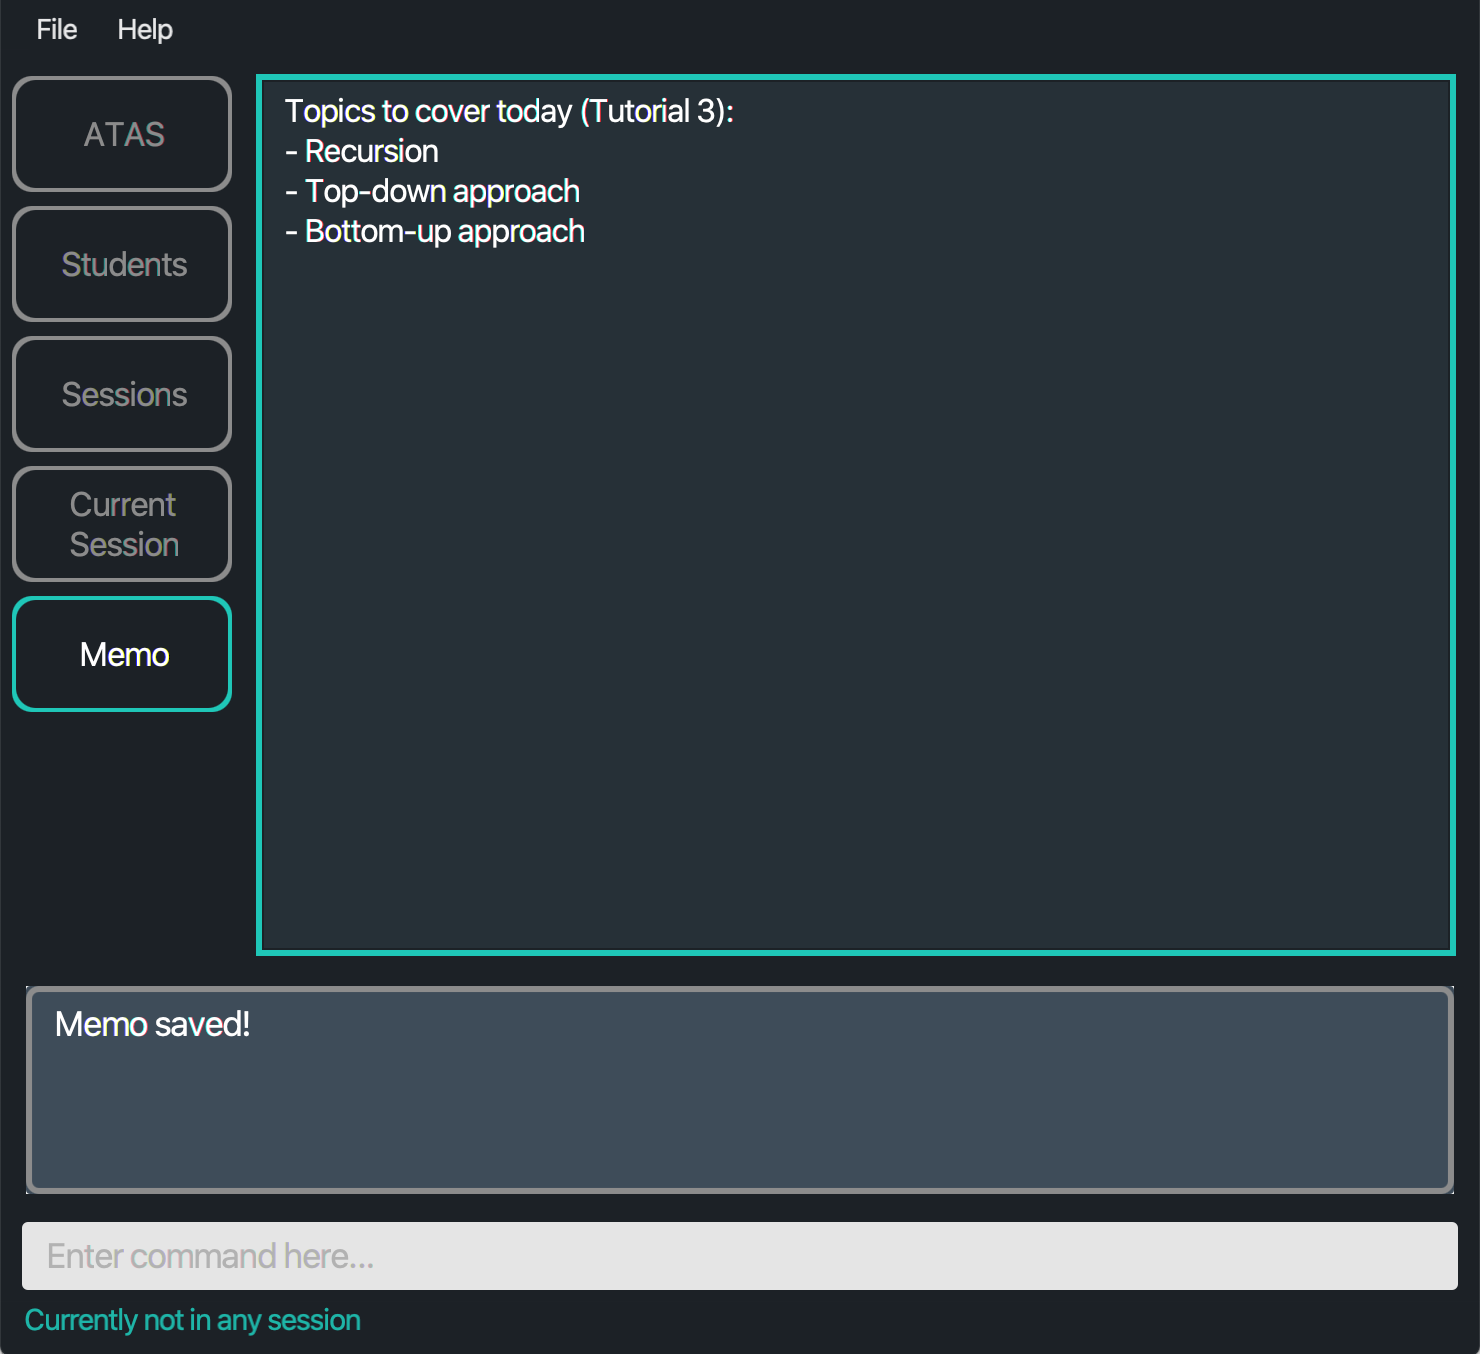
Figure 5.6.2.1: Application view after saving the memo
{ end of features#memo#save_memo written by: Ngoh Wei Yue }
{ start of features#userconfirmation#clearstu written by: Marcus Tan Wei }
5.7. User confirmation
Some commands have the ability to alter the data stored in the hard disk.
ATAS aims to make careful decisions and further prompts user to confirm the execution of those commands.
These commands are: deletestu, editstu,clearstu,
deleteses, editses and clearses.
![]() Tip: For your convenience, both
Tip: For your convenience, both yes and y are accepted when confirming the execution of a command while both no and n are accepted when rejecting the execution of a command.
![]() Examples:
Examples:
-
deletestu 1is followed with the following displayed messageDelete student 1? (yes/no). -
editstu 3 n/UPDATED_STUDENT_NAMEis followed with the following displayed messageEdit student 3? (yes/no). -
clearstuis followed with the following displayed messageClear student list? (yes/no)(Figure 5.7-1). -
deleteses 2is followed with the following displayed messageDelete session 2? (yes/no). -
editses 2 s/UPDATED_SESSION_NAMEis followed with the following displayed messageEdit session 3? (yes/no). -
clearsesis followed with the following displayed messageClear student list? (yes/no).
For example, confirmation of clearstu is shown above at Section 5.3.6 - Clearing the student list.
In this case, we will show an example of the confirmation prompt following the clearstu command (Figure 5.7-1) and result of rejecting a clearstu command (Figure 5.7-2).
Format:
clearstu
![]() Example:
Example:
-
clearstufollowed bynoresults in no removal of students from the student list.
Outcome:
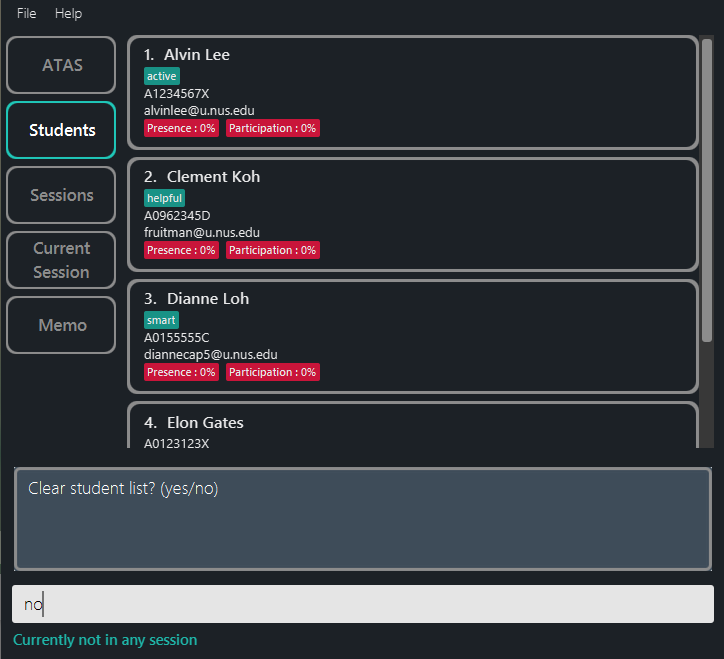
Figure 5.7.1: Confirmation prompt after entering the clear student list command
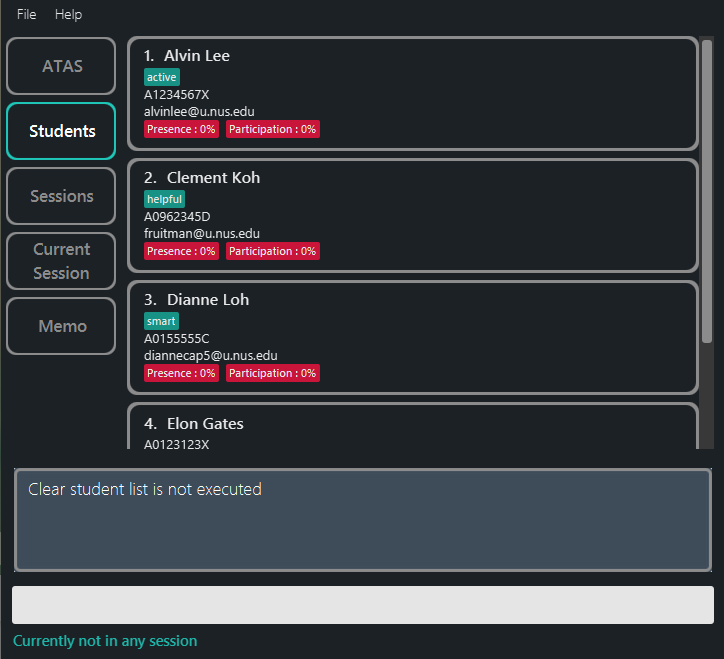
Figure 5.7.2: Clear student list command is rejected
{ end of features#userconfirmation#clearstu written by: Marcus Tan Wei }
{ start of features#saving_the_data written by: Ngoh Wei Yue }
5.8. Saving the data
Students, Sessions and Memo data are saved in the hard disk automatically after any command that changes the data. This includes typing directly into the memo box. There is no need to save manually. However, you can also choose to manually save the Memo data if you want as described in Section 5.6.2 - Saving the memo for that extra assurance!
The following are the names of the files that contains the respective data:
| Data | File name |
|---|---|
| Students’ particulars | studentlist.json |
| Sessions’ details including the students’ presence and participation records | sessionlist.json |
| Text in memo box | memo.txt |
You can find all the three files in the data folder located in the same directory as your atas.jar file.
{ end of features#saving_the_data written by: Ngoh Wei Yue }
{ start of faq written by: Ngoh Wei Yue }
6. FAQ
Q: How do I transfer my data to another Computer?
A: Install ATAS in the other computer and overwrite the empty data files it creates with the files that contains the data of your previous ATAS home folder. Details on where to find the data files can be found in Section 5.8 - Saving the data
Q: What if I notice something wrong with my application?
A: Please help us improve by writing to our email stated here.
{ end of faq written by: Ngoh Wei Yue }
{ start of command_summary written by: Masagca Eris Jacey }
7. Command summary
The following is a summary of all available commands for your reference.
{ end of command_summary written by: Masagca Eris Jacey }
{ start of command_summary#general written by: Masagca Eris Jacey }
7.1. General
The following is a summary of general commands.
| Command | Format, Examples |
|---|---|
| Help | help |
| Switch |
switch TAB_NAMEe.g., switch sessions
|
| Random Name Generation | rng |
| Undo | undo |
| Redo | redo |
| Exit | exit |
{ end of command_summary#general written by: Masagca Eris Jacey }
{ start of command_summary#students written by: Zhang Sheng Yang }
7.2. Students
The following is a summary of commands related to students.
| Command | Format, Examples |
|---|---|
| Add Student |
addstu n/NAME m/MATRICULATION_NUMBER e/NUS_EMAIL_ADDRESS [t/TAG]… e.g., addstu n/Elvin Ng m/A0123456J e/elvinng@u.nus.edu,addstu n/Bobby Tan m/A0123456X e/bobbytan@u.nus.edu t/new
|
| List Student(s) | liststu |
| Find Student(s) |
findstu KEYWORD [MORE_KEYWORDS] e.g., findstu John,findstu kent ridge
|
| Edit Student |
editstu INDEX (n/UPDATED_NAME) (m/UPDATED_MATRICULATION) (e/UPDATED_EMAIL_ADDRESS) (t/UPDATED_TAG)… e.g., editstu 2 n/Elvin Ng,editstu 3 t/active
|
| Delete Student |
deletestu INDEX e.g., deletestu 2
|
| Clear Student(s) | clearstu |
{ end of command_summary#students written by: Zhang Sheng Yang }
{ start of command_summary#sessions written by: Marcus Tan Wei}
7.3. Sessions
The following is a summary of commands related to sessions.
| Command | Format, Examples |
|---|---|
| Add Session |
addses s/SESSION_NAME d/SESSION_DATE e.g., addses s/Tutorial 1 d/11/11/2020
|
| Clear Session(s) | clearses |
| Delete Session | deleteses INDEX |
| Edit Session |
editses INDEX (s/UPDATED_SESSION_NAME) (d/UPDATED_SESSION_DATE) e.g., editses 1 s/Lab 1
|
| Enter Session | enterses INDEX |
{ end of command_summary#sessions written by: Marcus Tan Wei}
{ start of command_summary#current_session written by: Zhang Sheng Yang }
7.4. Current session
The following is a summary of commands related to current session.
| Command | Format, Examples |
|---|---|
| Participate |
participate INDEX_RANGE e.g., participate 1-4, participate 3
|
| Presence |
presence INDEX_RANGE e.g., presence 2-3, presence 7
|
{ end of command_summary#current_session written by: Zhang Sheng Yang }
{ start of command_summary#memo written by: Ngoh Wei Yue }
7.5. Memo
The following is a summary of commands related to memo.
| Command | Format, Examples |
|---|---|
| Add Note |
addnote NOTEe.g., addnote clarify qn 3 with prof
|
| Save Memo | Keyboard shortcut: ctrl + s for Windows/Linux and command + s for MacOS |
{ end of command_summary#memo written by: Ngoh Wei Yue }